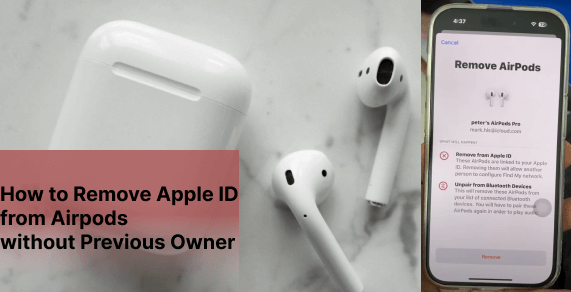
AirPods is known for its seamless connection with Apple devices, providing users with great convenience. But it can be frustrating when you got a pair of AirPods that's still linked to someone else's account.
If you bought a second-hand pair, you might be wondering how to remove Apple ID from AirPods without previous owner so that you can get personalized services? In this guide, we'll introduce easy ways to remove previous owner from AirPods.
In this article:
How to Remove Apple ID from AirPods Without Previous Owner?
Getting a pair of AirPods that is linked to the previous owner's Apple ID can cause you a great trouble, you won't be able to fully use or set up the AirPods as you like.
Therefore, you can try this method to remove Apple ID from AirPods without previous owner.
Step 1: Go to Settings > Bluetooth.
Step 2: Find your AirPods in the list of devices, tap the info icon next to your AirPods's name.
Step 3: Tap Forget This Device, then confirm to disconnect and unpair the AirPods from your device.
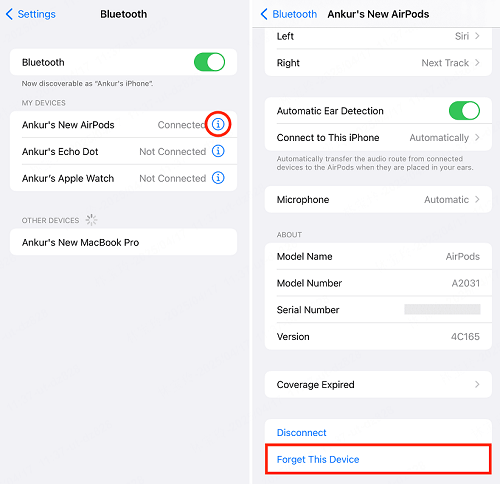
Step 4: Then, put the AirPods in the charging case and close the lid.
Step 5: Wait a few seconds, then open the lid, press and hold the setup button on the back of the case until the light flashes white.
Step 6: When the setup animation pop up on your device's screen, tap Connect and follow the on-screen instructions to complete the re-pair.
Some users have reported that this method doesn't work for them as this method simply clear the Bluetooth connection history between the AirPods and the old device. The binding information of Apple ID will not be cleared.
In that case, it's suggested to contact the previous owner to easily remove Apple ID from AirPods.
How to Remove Apple ID from AirPods by Previous Owner?
To remove AirPods from Apple ID, contacting the previous owner is also a good choice if you have to. Below are 4 methods on how to remove previous owner from AirPods.
1 How to Unpair AirPods from Apple ID in Settings
If you can contact the previous owner for help, the easiest way to remove the Apple ID from AirPods is through the Settings app.
This method only takes a minute to fully unlink the AirPods from the Apple ID account, so you can pair them with your own device without any issues later. Here’s how it works.
Step 1: Open the Settings app, tap [Your Name] at the top of the screen.
Step 2: Scroll down to the list of devices, find the AirPods you want to remove.
Step 3: Tap Remove from Account > Remove to confirm.
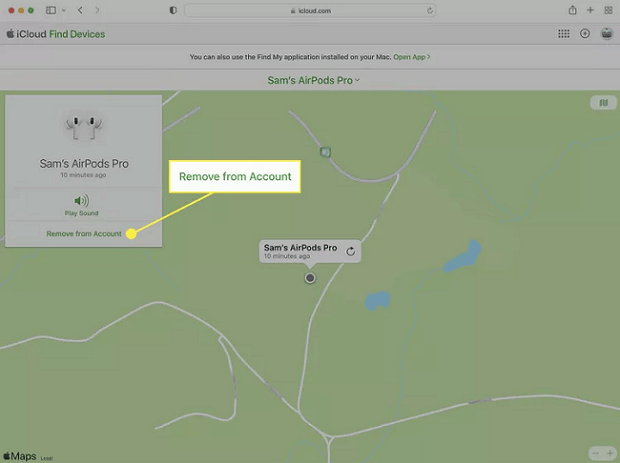
2 How to Remove Apple ID from AirPods via iCloud
If the original owner no longer has the AirPods with them but still wants to help, they can remove the Apple ID from AirPods remotely through iCloud.
This is a convenient option that works even if the AirPods aren't nearby, as long as they were connected to the account before. Here's how to unpair AirPods from Apple ID via the iCloud's official website.
Step 1: Go to iCloud and sign in with the Apple ID that is linked to that pair of AirPods.
Step 2: Click on Find iPhone > All Devices at the top.
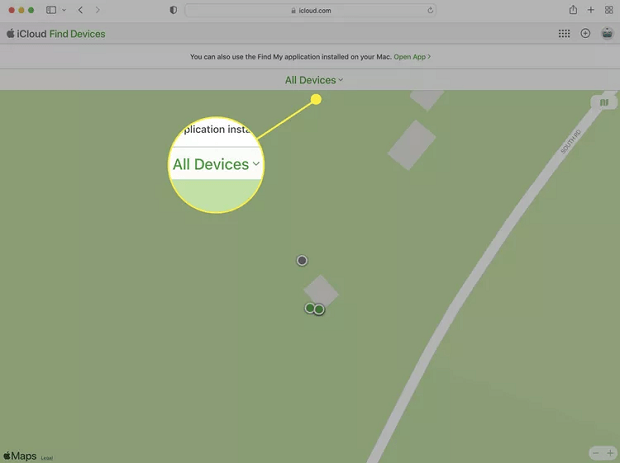
Step 3: From the list, find the AirPods that nees removing.
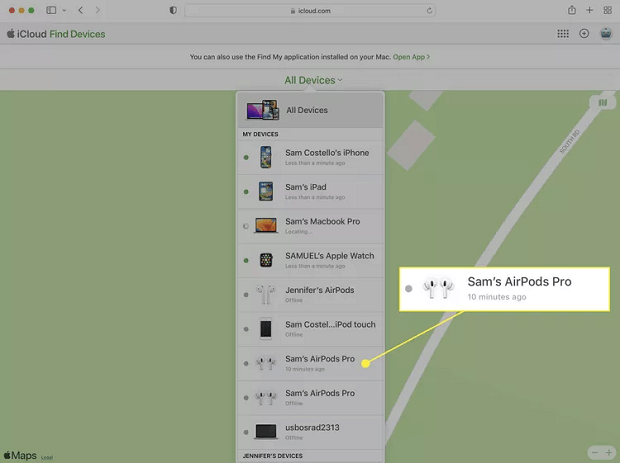
Step 4: Click Remove from Account then confirm the action.
3 How to Disconnect AirPods from Apple ID by Find My App
Using iCloud isn't the only way to disconnect AirPods from an Apple ID remotely. If the original owner has an Apple device like an iPhone or iPad nearby, they can also use the Find My app to do the same thing.
It's quick, convenient, and works just like the iCloud method, here’s how it’s done.
Step 1: Ask the original owner to open the Find My app on their iPhone or iPad.
Step 2: Tap the Devices tab at the bottom. Then scroll through the list and select the AirPods they want to remove.
Step 3: Swipe up on the AirPods screen to see more options, tap Remove This Device and confirm the removal when prompted.
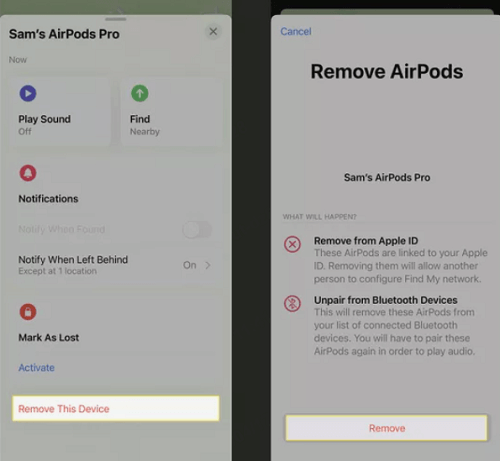
After removing someone else's Apple ID from AirPods, you can change the owner of Airpods to yourself.
4 How to Delete Apple ID from AirPods via Mac
If the previous owner doesn't have access to an iPhone or prefers using a computer, they can also remove the AirPods from their Apple ID using the Find My feature on a Mac.
Just like the iCloud and iPhone methods, this approach allows the previous owner to unlink the AirPods from their account remotely. Here’s how it works.
Step 1: Open the Find My app on the Mac, click Devices.
Step 2: Select the AirPods that you want to remove.
Step 3: On the map, click the More Info button.
Step 4: Click Remove from Account.
How to Reset AirPods from Previous Owner?
Before you can use a pair of secondhand AirPods, it's a good idea to reset them to factory settings, so that them can be prepared for pairing with a new device.
However, it's important to know that resetting won't remove the previous owner's Apple ID. Here's how to reset AirPods without previous owner.
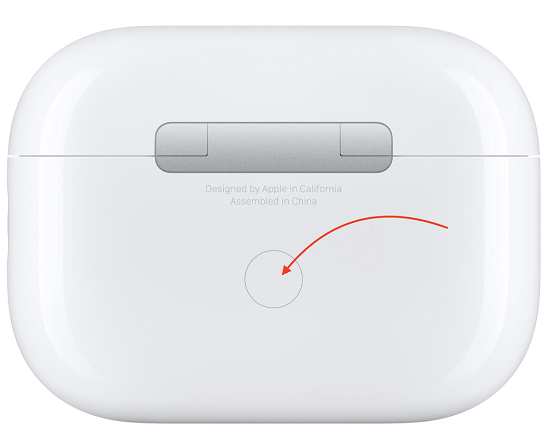
▼How to reset AirPods 1/2/3, AirPods Pro 1/2:
Step 1: Put your AirPods in their charging case, close the lid, and wait 30 seconds.
Step 2: Open the lid of your charging case again.
Step 3: Press and hold the setup button on the back of the case for around 15 seconds.
Step 4: Once the status light flashes amber and then white, your AirPods are reset. You can now follow the instructions on your device to pair them again.
▼How to reset AirPods 4 of all models:
Step 1: Place your AirPods in the charging case, close the lid, and wait for about 30 seconds.
Step 2: Open the lid to begin the reset process.
Step 3: When the status light is on, quickly double-tap the front of the case.
Step 4: When the light starts flashing white, double-tap it again.
Step 5: As the white light begins flashing faster, tap twice one more time.
Step 6: Once the light flashes amber, then white again, your AirPods are ready to reconnect, just follow the on-screen instructions on your device.
How to Set Up AirPods After Factory Reset?
After learning how to factory reset AirPods without previous owner, the next step is to set them up with your device as if they were brand new. The process is quick and easy, takes a few taps only. Here’s how to get your AirPods connected and ready to use again.
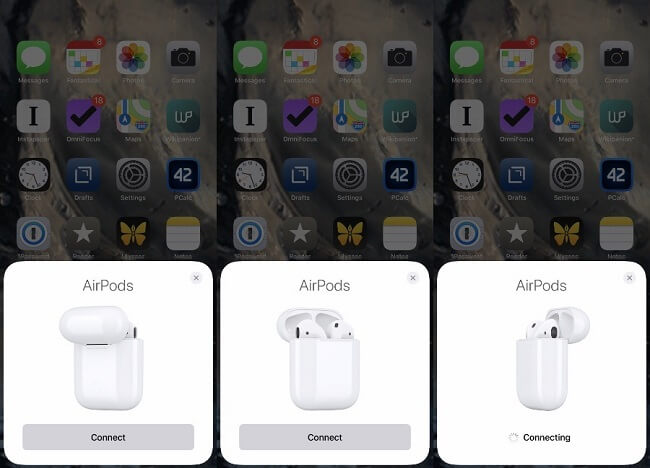
Step 1: Make sure Bluetooth is turned on on your iPhone, iPad, or other device.
Step 2: Open the lid of the charging case (with the AirPods inside) and hold it near your device.
Step 3: Wait for the setup animation to appear on the screen, then tap Connect.
Step 4: The device may take a few seconds to respond. When the setup is complete, tap Done.
How to Remove Apple ID from iPhone Without Previous Owner?
While this guide focuses on removing Apple ID from AirPods, some users may also run into the same issue with a secondhand iPhone. If the device is still linked to the previous owner's Apple ID, you won’t be able to use it fully.
In that case, you can try an Apple ID remover iMyFone LockWiper. Designed for unlocking various iPhone locks, this tool can help remove Apple ID from iPhone/iPad without someone else, and without password.
- Remove Apple ID Without Password: Remove the old Apple ID from locked iPhone without needing the password.
- Sign In with a New Apple ID: After removal, you can log in with your own Apple ID and use all iCloud services.
- Wide Range Support: Compatible with most iPhone and iPad models running iOS 16/17/18.
- Fast & Easy to Use: Simple steps with clear instructions, no technical skills needed.
- No Jailbreak Required: It's 100% safe to remove the Apple ID, no jailbreak needed.
- Safe and Reliable: Keeps your device secure with up to 99% success rate.
- More Powerful Features: It can also factory reset iPhone without Apple ID password, remove MDM, unlock iPhone screen locks and Screen Time passcode.
Let's see how to remove Apple ID from iPhone without password by iMyFone LockWiper.
Step 1: Download and install LockWiper on your computer. Launch it and select the Unlock Apple ID.

Step 2: Connect your iPhone to the computer. Once detected, click the Start button.

If "Find My" is turned off on your iPhone:
Step 3: Now, LockWiper will automatically remove Apple ID from your iPhone. The process will complete in minutes.

If "Find My" is turned on and your iPhone is running iOS 11.4 and above:
Step 3: Next, you will see this window. Follow to confirm your device's status. Then, click Unlock button.

Step 4: After that, follow the prompt to enter 000000 and click Unlock button again.

Step 5: When the process completes, you can follow to set up your iPhone to finish removing the Apple ID.

Conclusion
In this guide, we've explored how to remove Apple ID from AirPods without previous owner and how to do when you can contact them. Besides, you can learn how to factory reset and set up your AirPods with detailed steps.
Also, if you are experiencing the same problem with someone else's Apple ID on your iPhone/iPad, you can use iMyFone LockWiper to easily remove the old Apple ID without password within 5 minutes.
-
[2025] How to Use iforgot.apple.com Unlock Apple ID?
iforgot.apple.com can unlock Apple ID and reset Apple ID password. Let's see how it works to help you regain control of your device.
3 mins read -
[2025] How to Use 3uTools MDM Bypass & Its Alternatives
How to use 3uTools MDM bypass tool? This article gives a full review of how to bypass MDM with 3uTools and its best alternatives as well.
3 mins read -
What Is iOS 18 iPhone Inactivity Reboot Feature? How Does It Work?
Do you know the feature of iPhone inactivity reboot after 3 days in iOS 18.1? What is it and how does it work? This article tells you all!
2 mins read -
Explore the Best Free iPad Unlock Software: Unlock with Ease
If you are looking for a real free iPad unlocker, you can't miss the free iPad unlock software this article has put together for you, you can choose the best.
4 mins read -
[2025] What Is iOS Account Manager & How to Remove It
What is iOS Account Manager? Can I remove it? This guide will explain what does iOS Account Manager mean and provide steps for you to remove it with ease.
3 mins read -
How to Fix This Apple ID Is Not Valid or Supported
This guide focuses on explaining and resolving why this apple id is not valid or not supported issues to help you fix Apple ID not working on iPhone problems.
3 mins read


Was this page helpful?
Thanks for your rating
Rated successfully!
You have already rated this article, please do not repeat scoring!