iMyFone MagicMic for Mac
The full version of MagicMic includes all the same features as the free version. The difference is that you can enjoy all voices and sounds in the full version while you can only limited voices, sounds and functions in the free version. When you try to use the limited voice or sound, a window will pop-up to tell you that you will need to update your purchase plan for this feature. To enjoy all the voices and sounds, please upgrade your plan.
Purchse once, vip account can be used on Win/Mac/Android/iOS 4 platforms. Buy one and get 4, what a good deal!
Way 1. Check your MagicMic audio configuration.
1) Enable the "hear myself" option.

2) From the left menu, go to Settings.
3) In Input devices select your real microphone.

4) In Output devices select your headphones.
5) Now speak into your mic and check the volume bar if it‘s dynamic.
Way 2. Click the "Detect" option, let MagicMic help you.
In the "Settings", click the "Detect" button to detect your devices. Here are the situations you will meet and the solutions.
1) MagicMic driver not found.
In this case, we suggest you click the "Install" option to install MagicMic driver.

2) Microphone not found.
In this case, we suggest you connect a microphone and click the Refresh button

3) Headphone not found.
In this case, we suggest you connect a headphone and click the Refresh button

4) MagicMic Virtual Audio Device is disabled.
If you followed the previous steps and it didn't fix it, your Line or MagicMic mic may be muted. In this case, we suggest you click on Sound Control Panel.
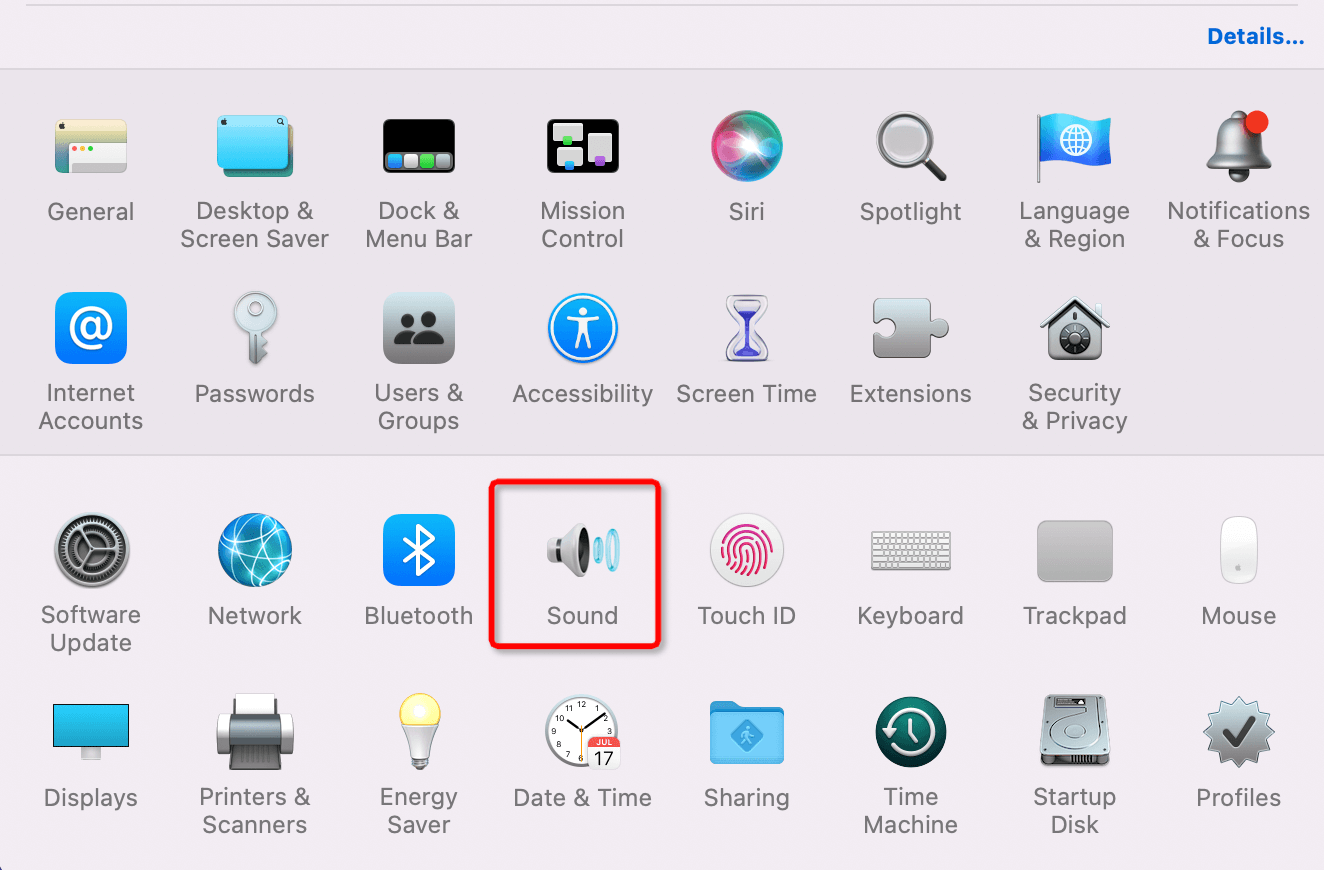
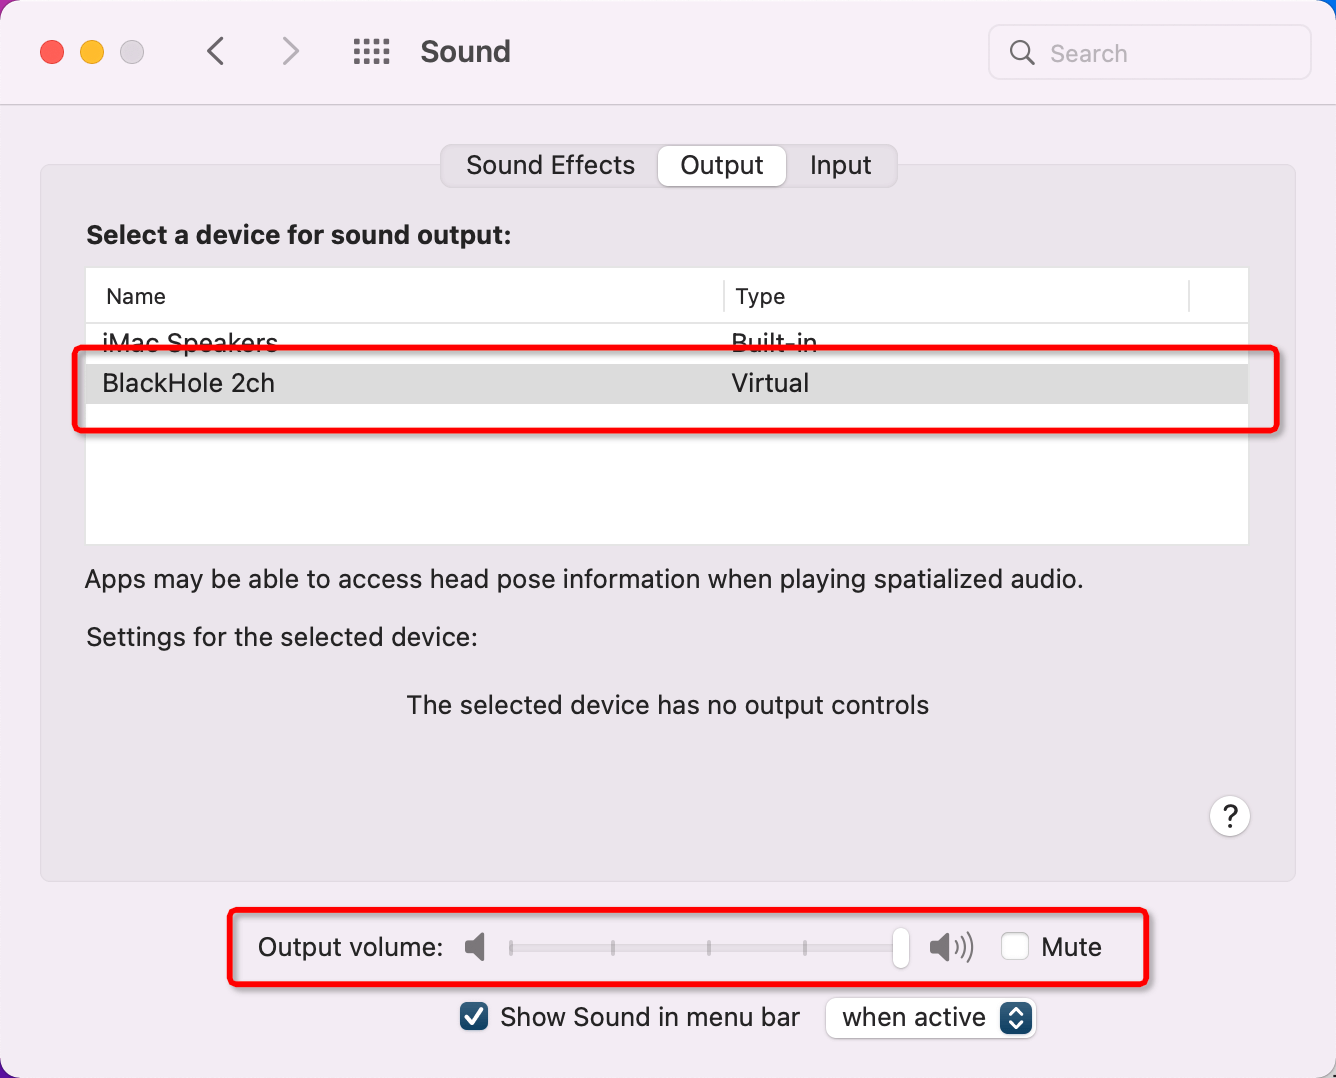
Open system sound setting on Mac device. Click "Sound" and check if MagicMic is muted.
On Output option,choose "BlackHole 2ch"
1) Check these options in Discord settings:
Go to settings > Voice & audio > Advanced and disable all these options and set Standard as audio subsystem.
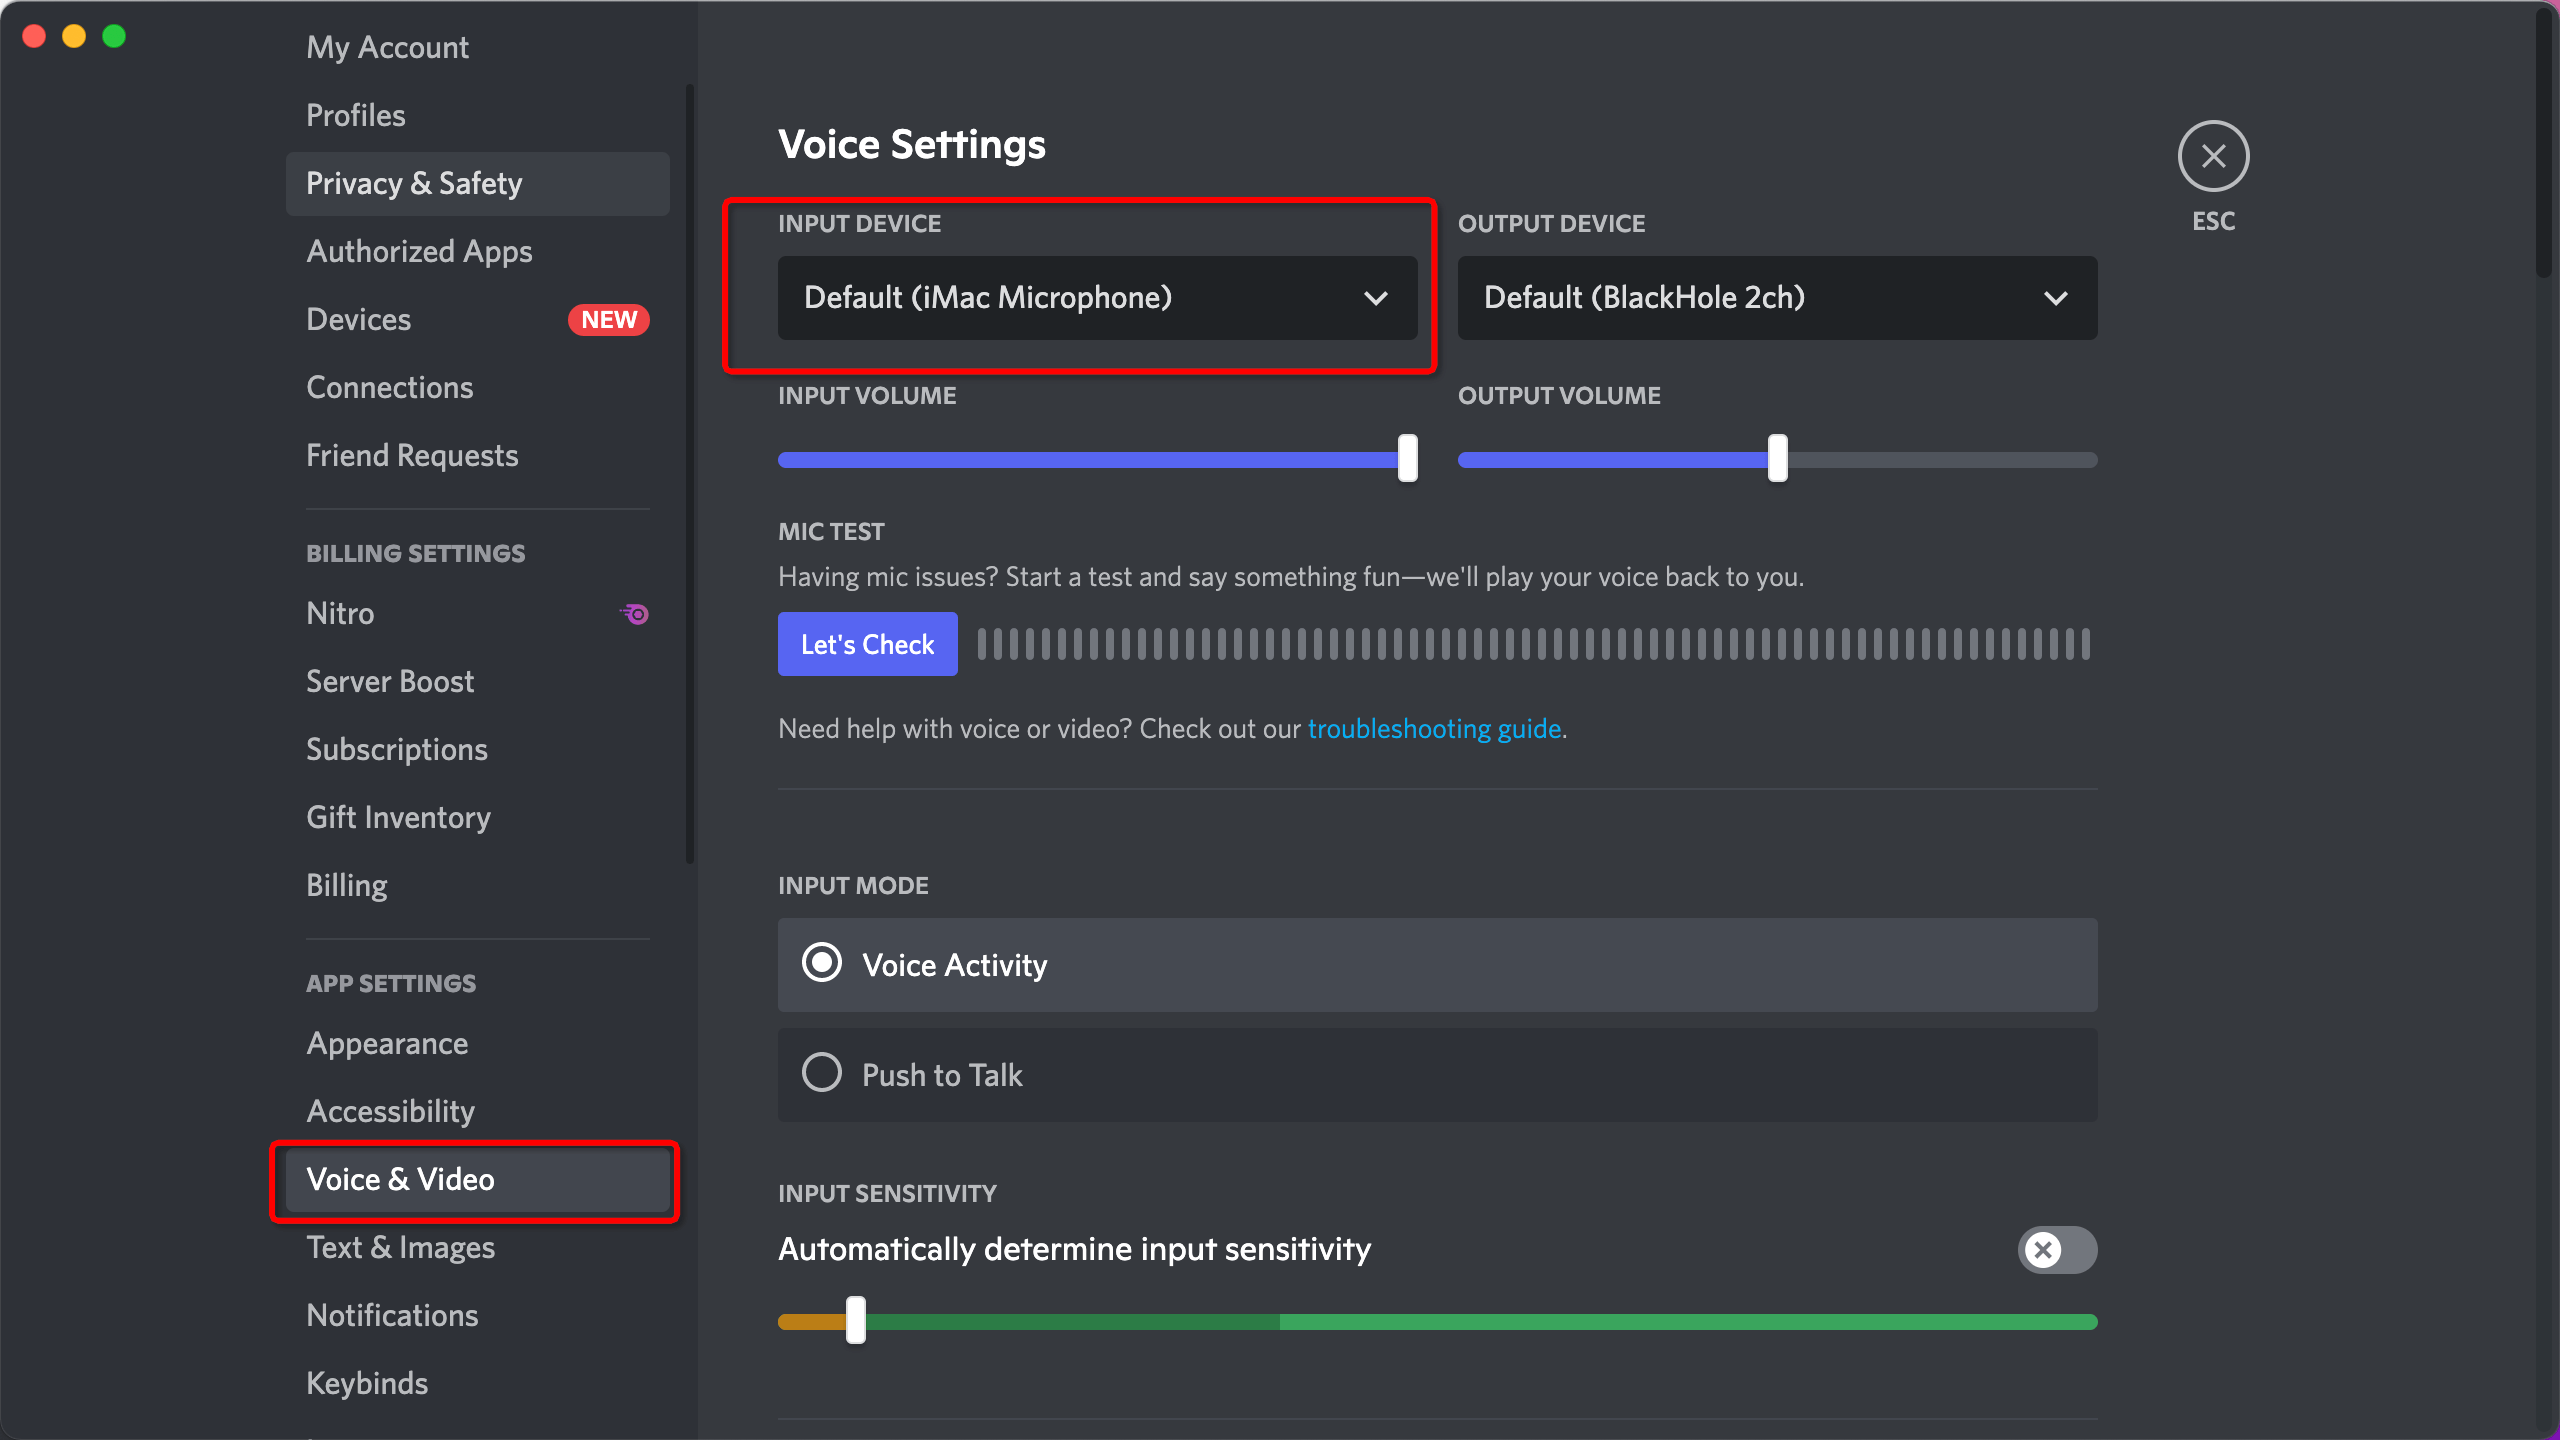
2) Choose input device as MagicMic virtual device "BlackHole 2ch"
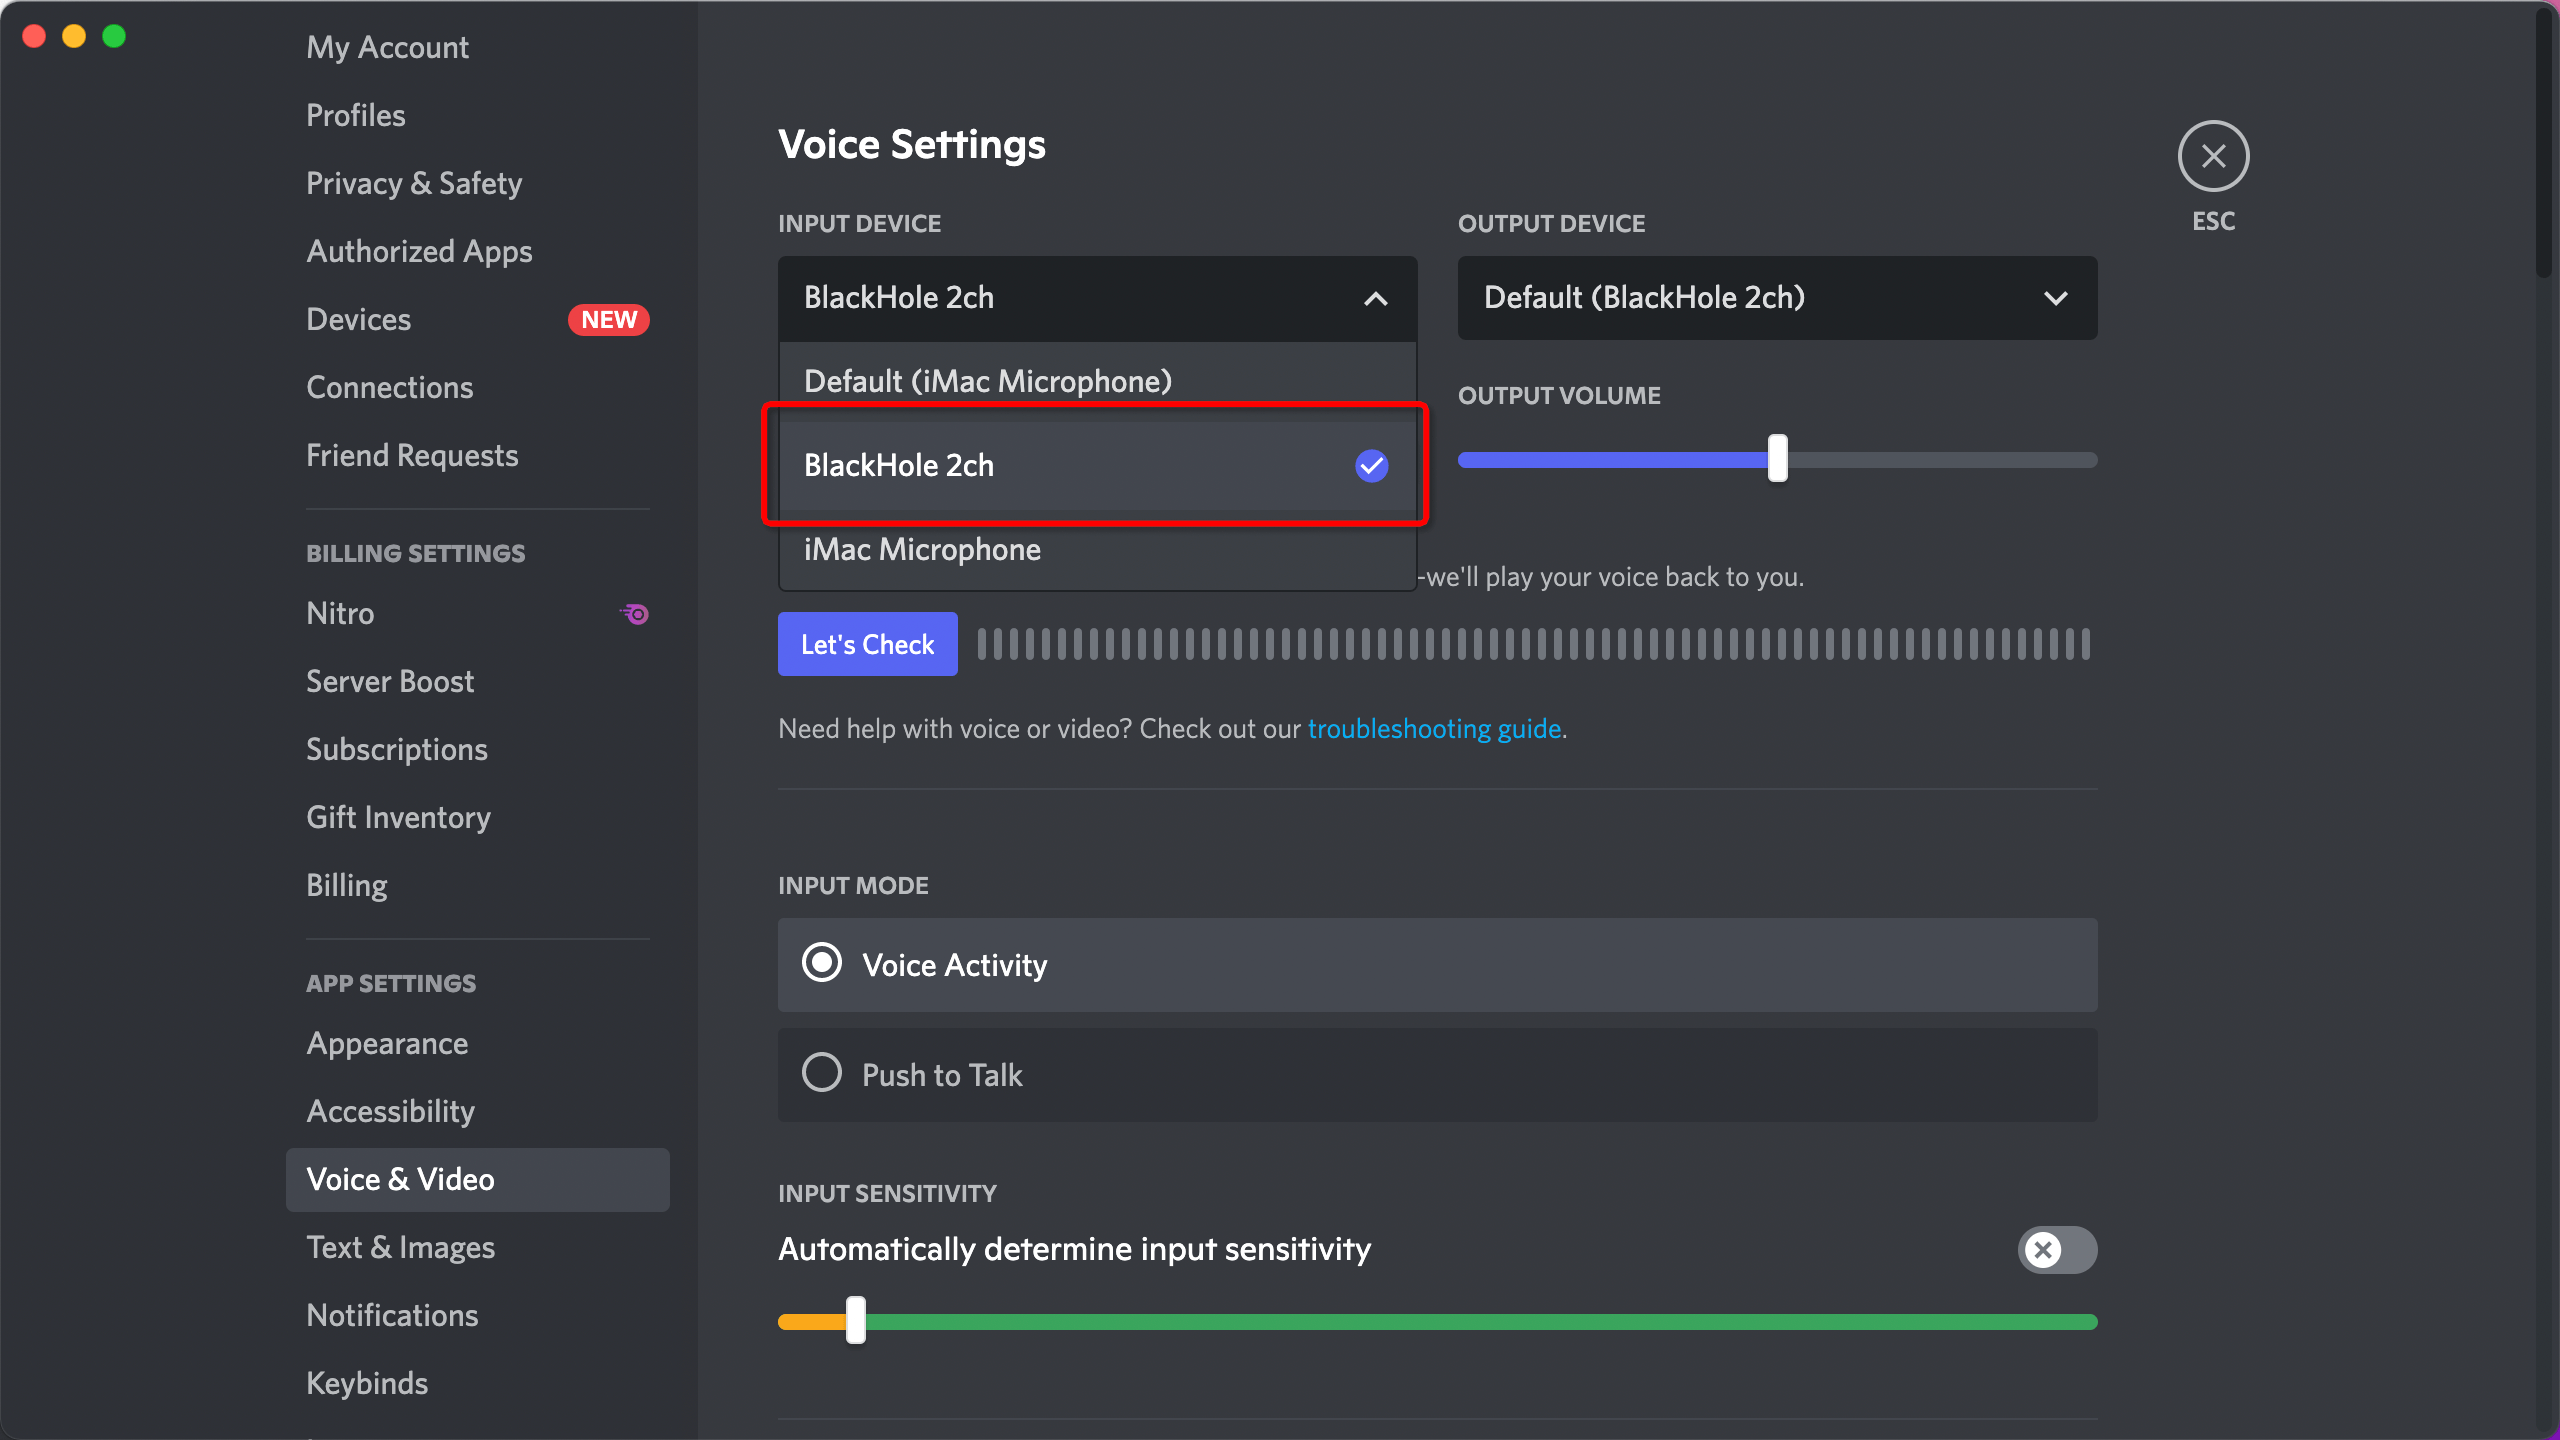
3) Choose sound output device on Discord, select your real output device (the device in the picture is an example, please select it according to your actual device name)
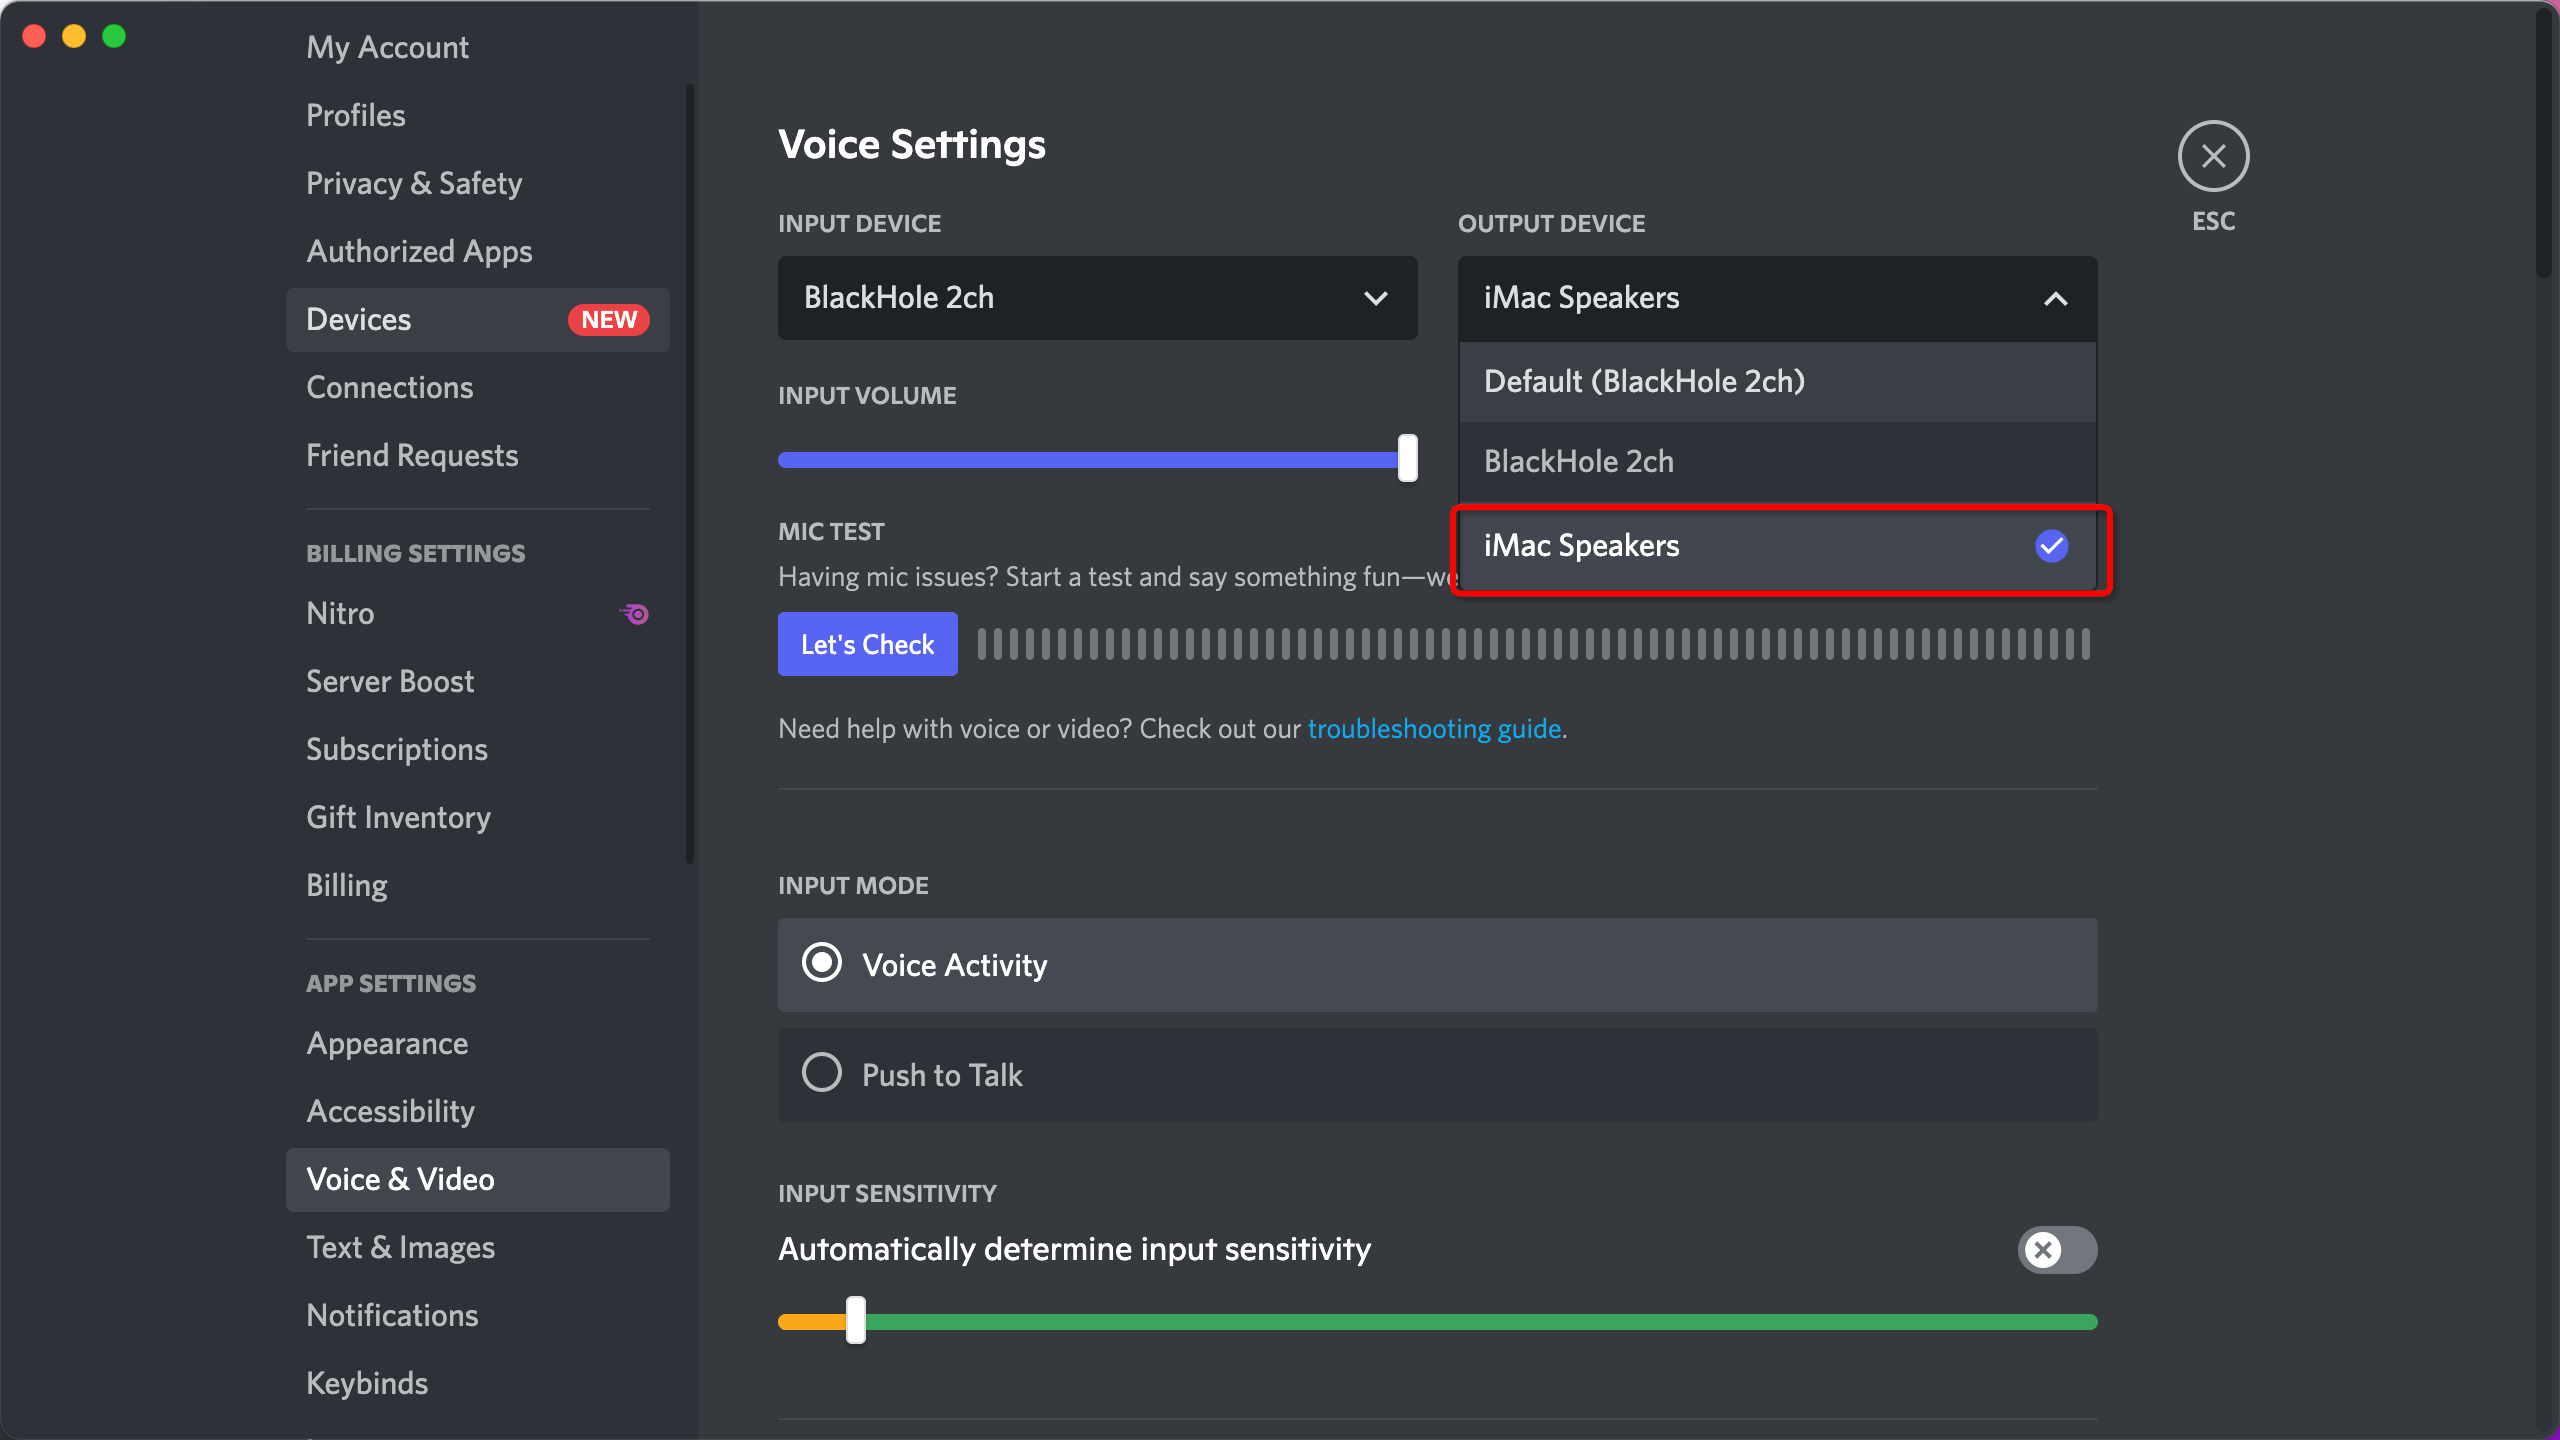
When you have problems using Discord, please try to modify the following settings
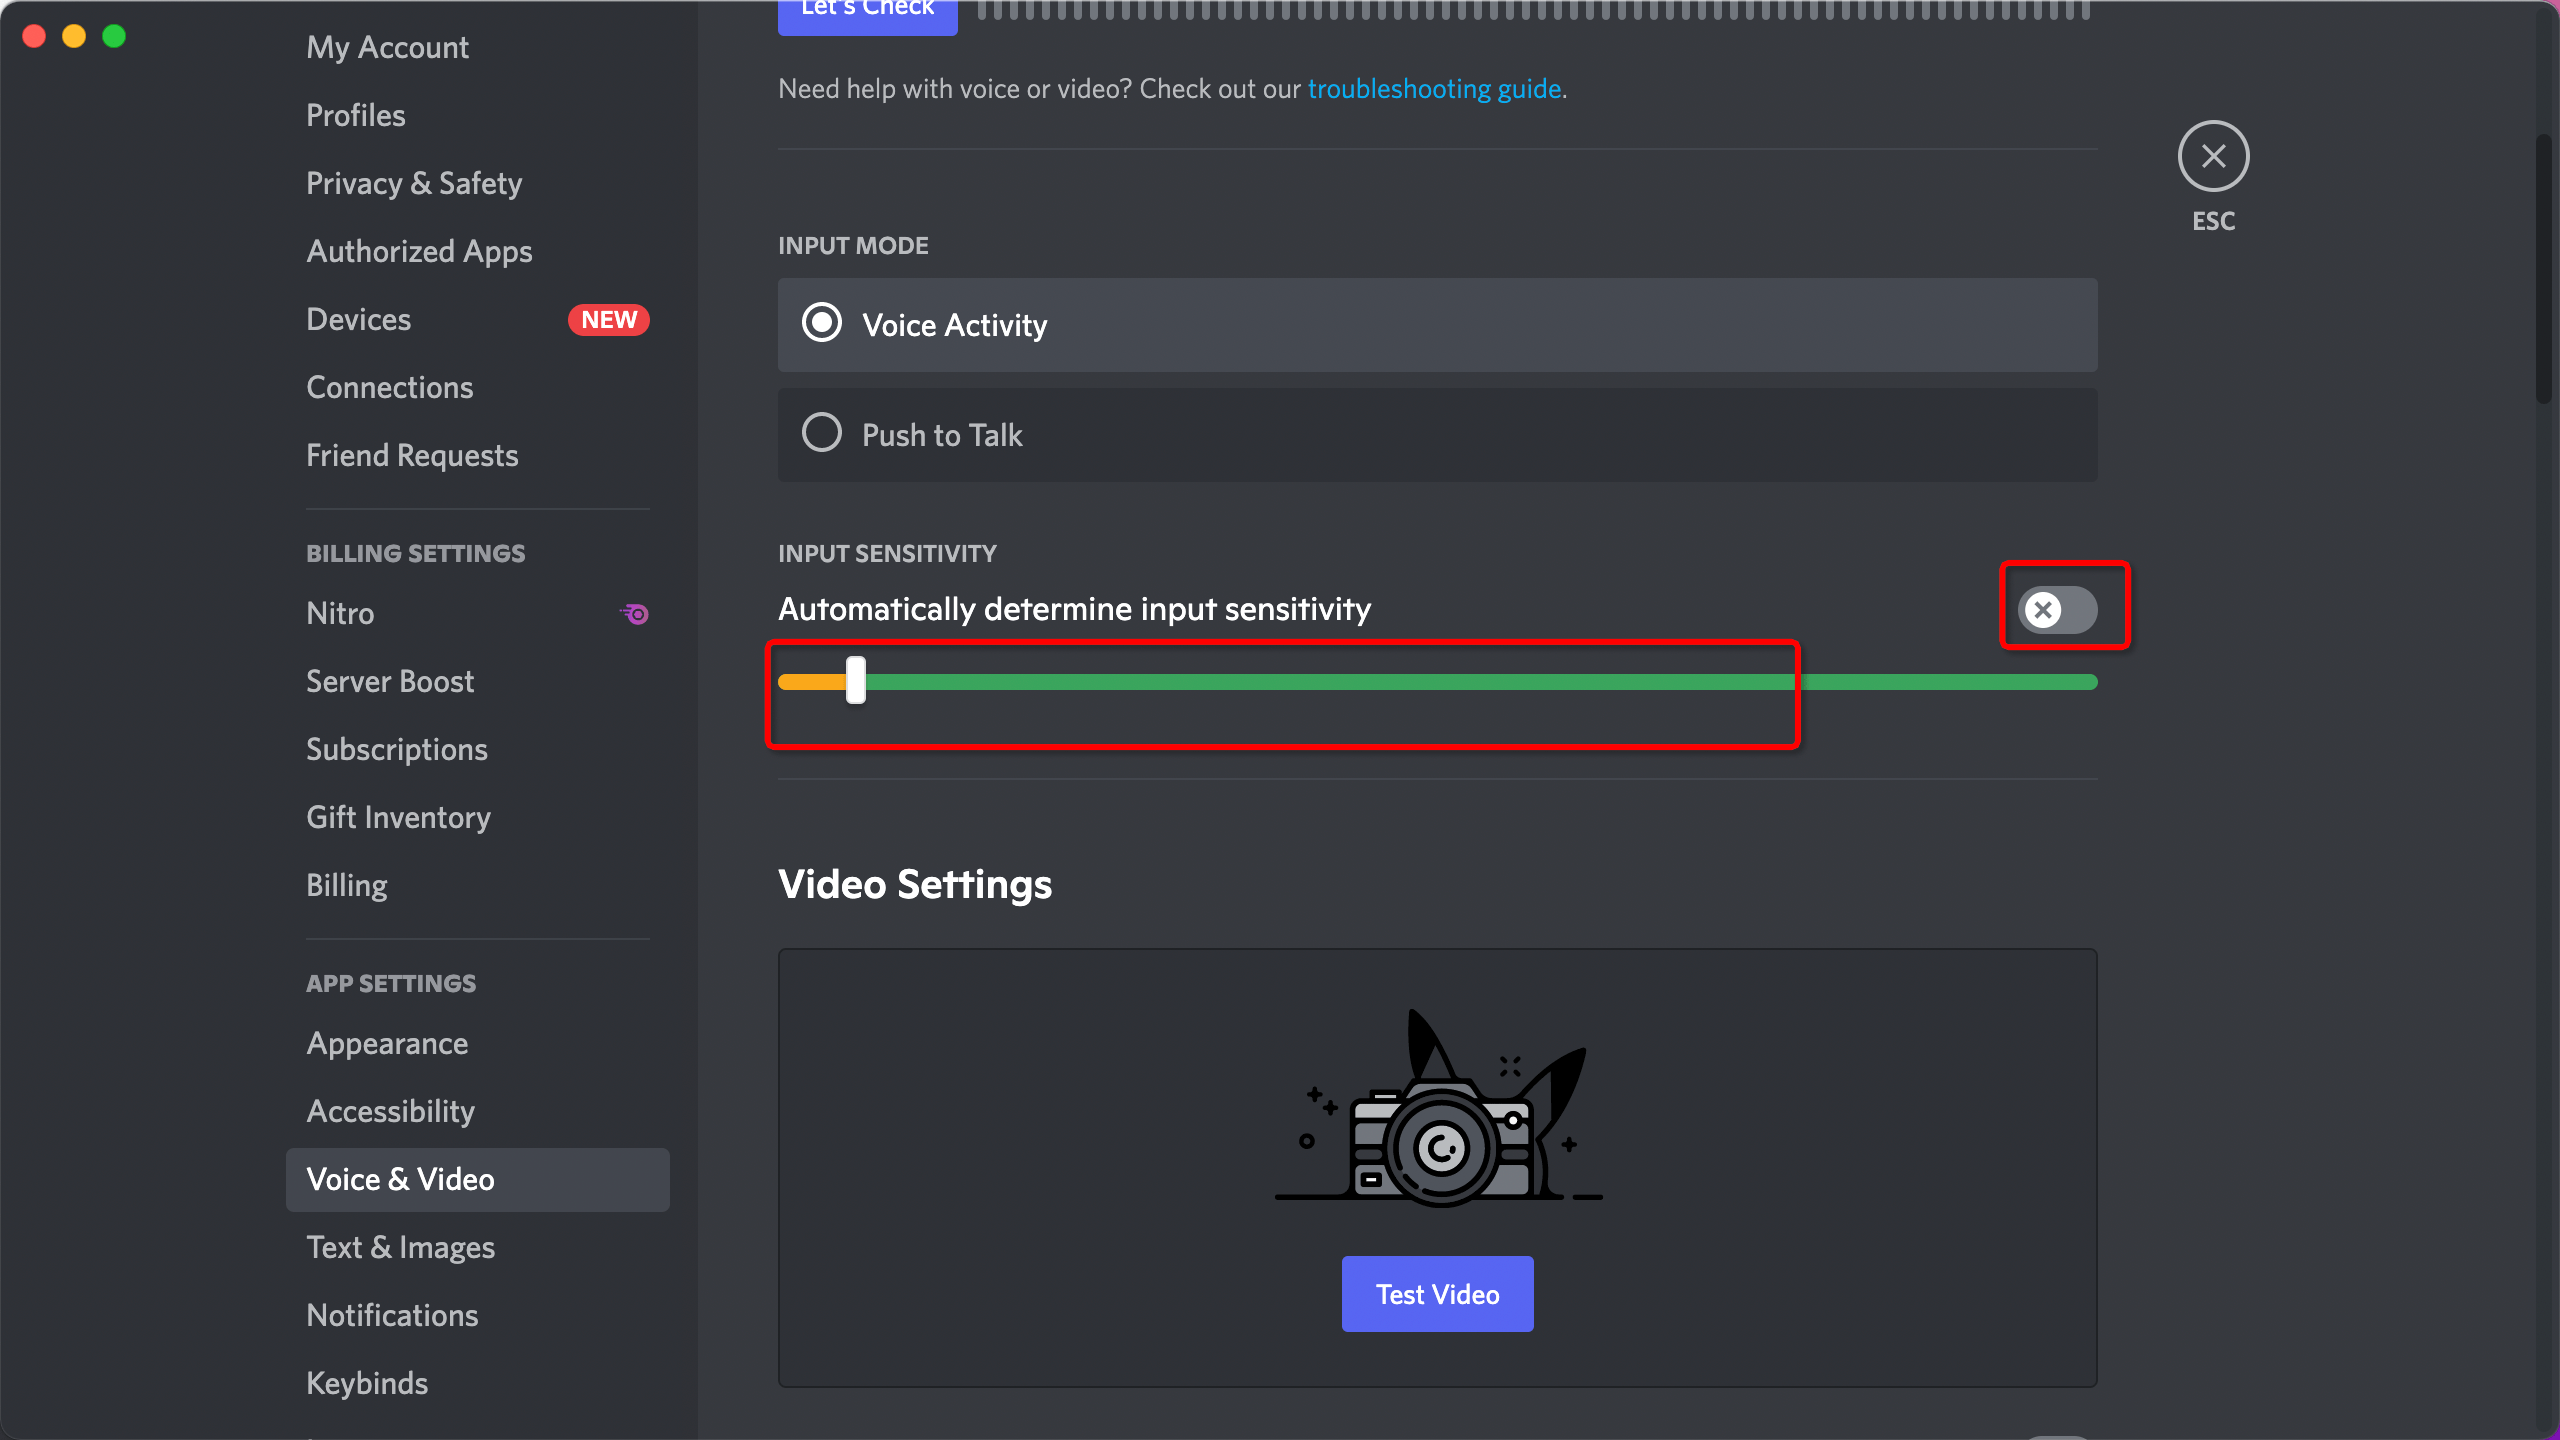
1) Turn off the "Input Sensitivity" and turn it down (example in the picture)
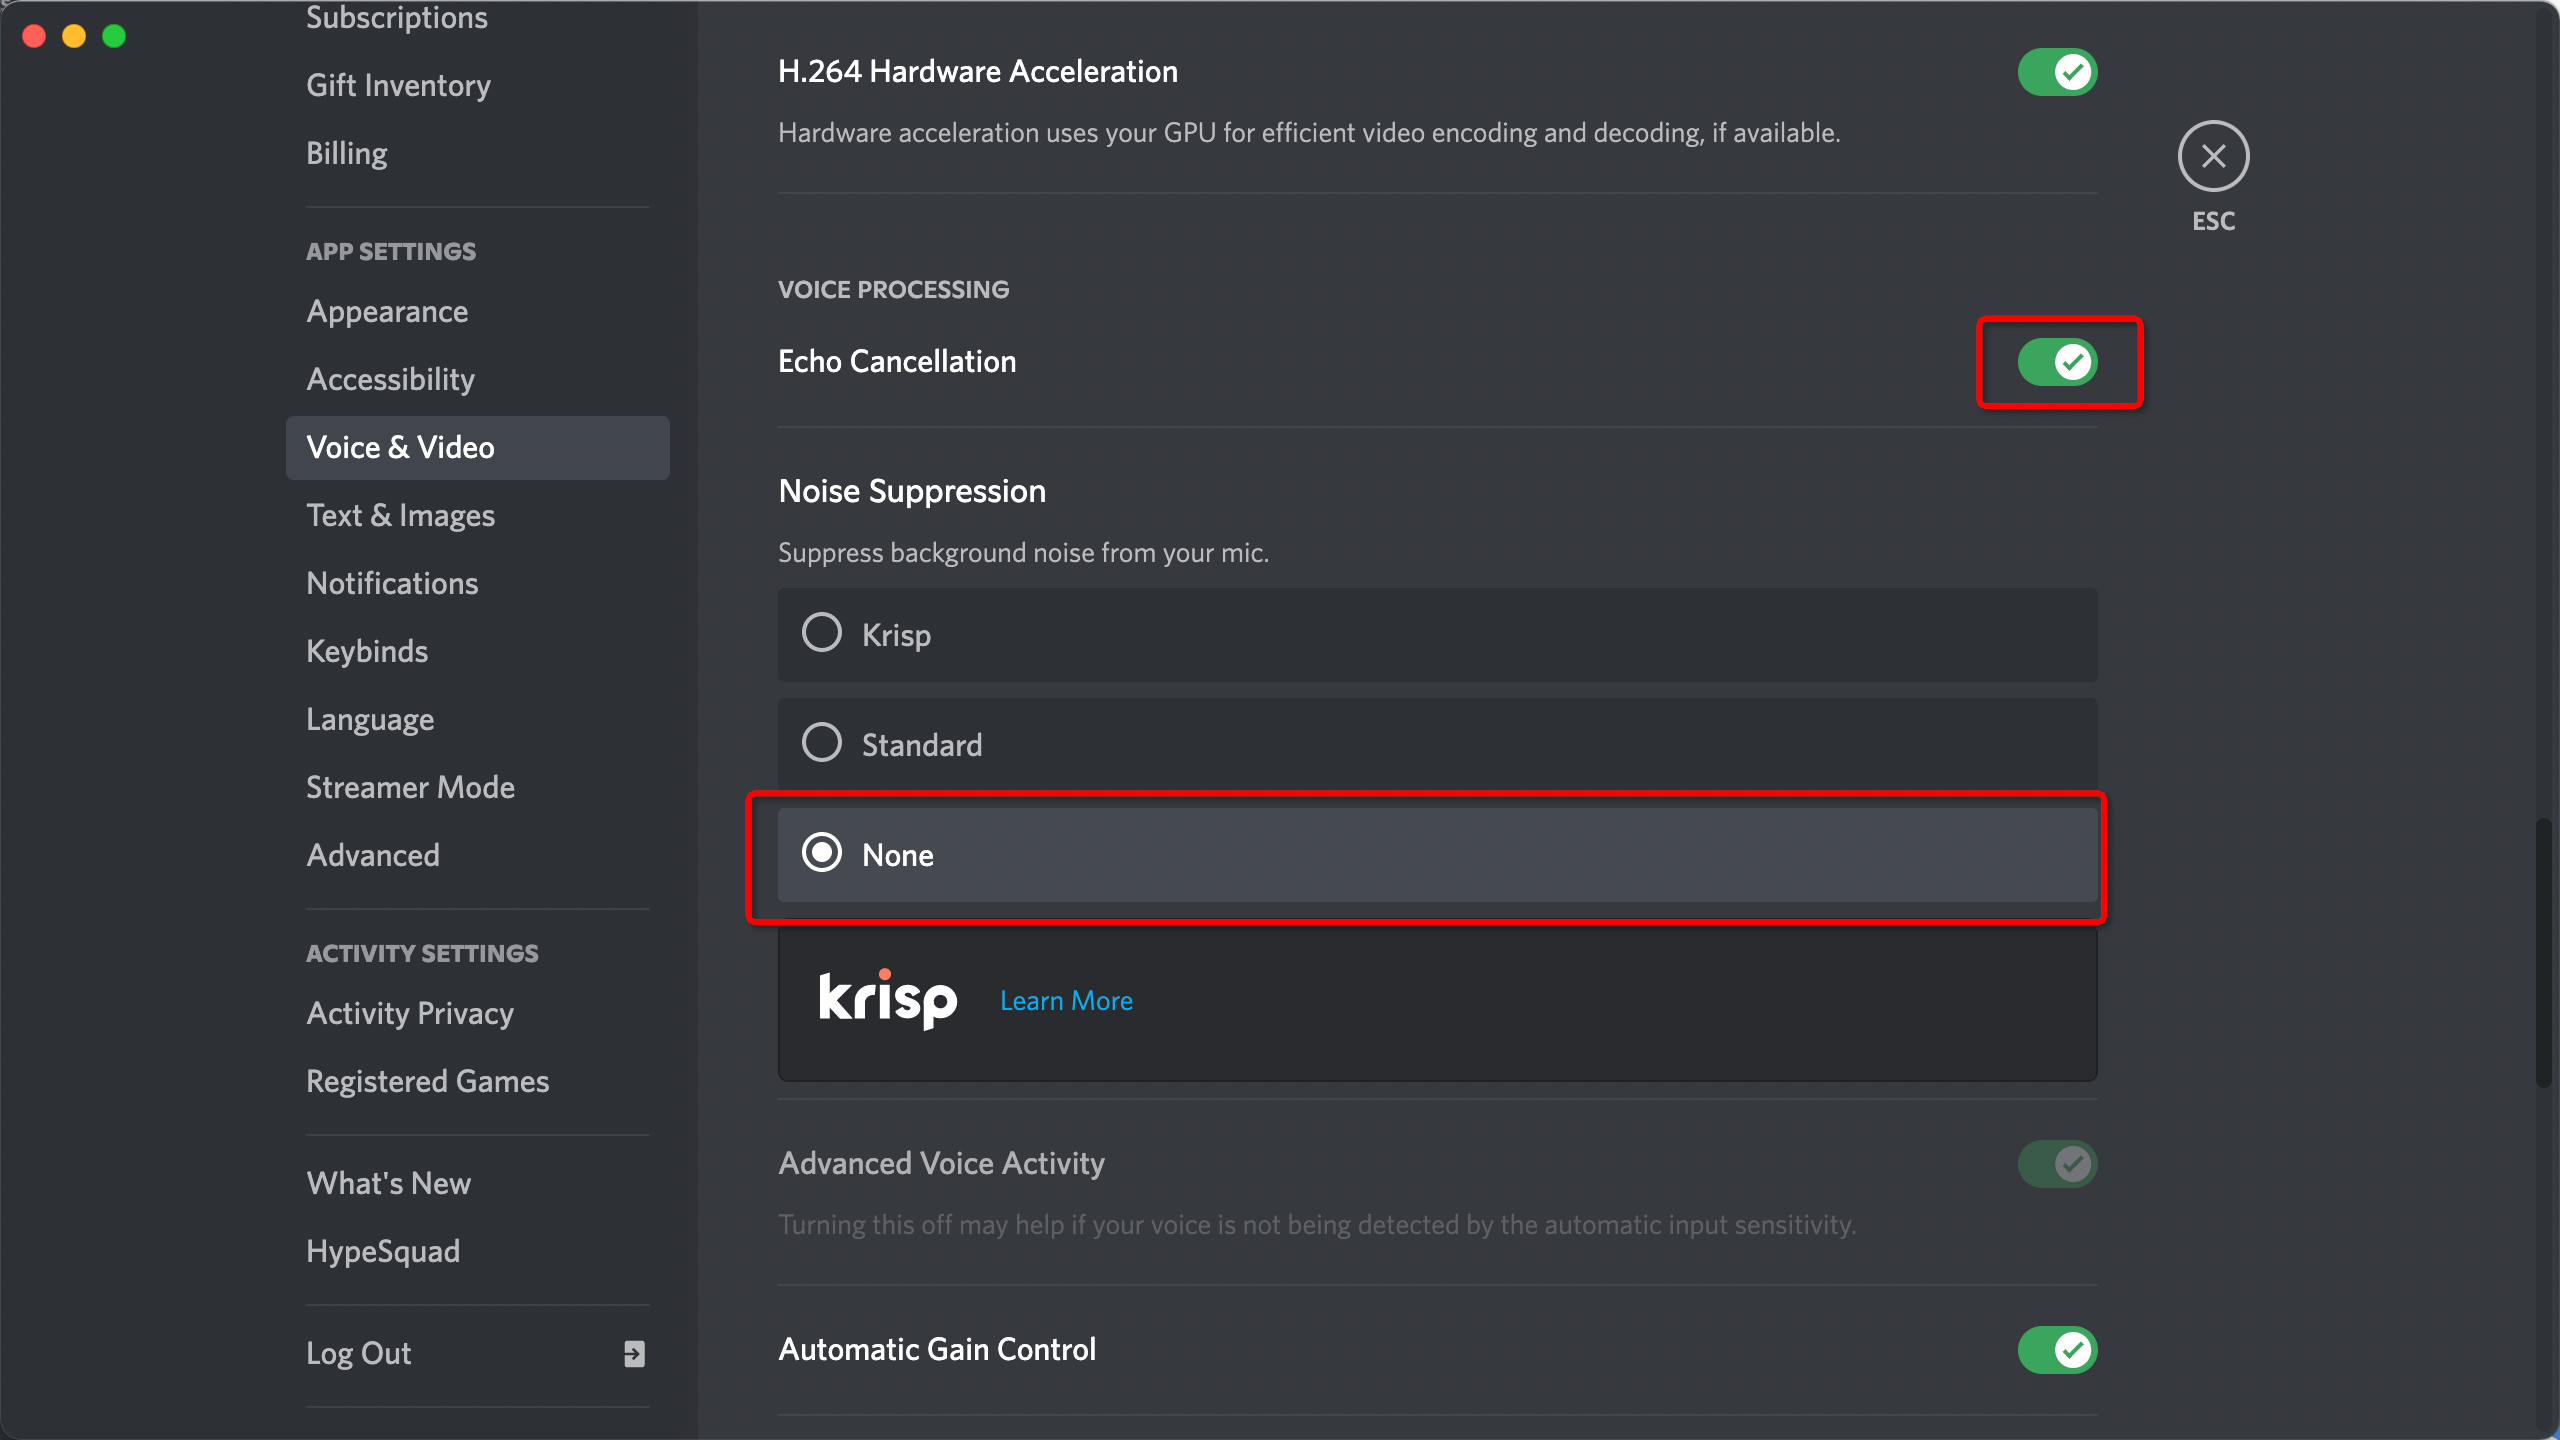
2) In the voice&video - advanced settings on Discord, turn off the 'Noise Suppression' switch and choose 'None' in noise suppression.
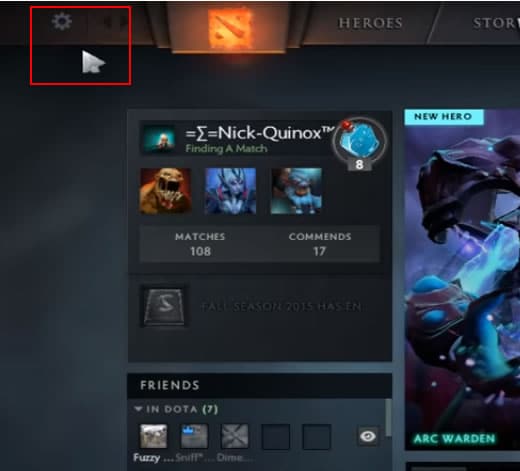
1) At the top, left-hand corner, click the gear icon to open Settings.
2) Select the AUDIO tab and ensure that the Speaker Configuration are set to BlackHole 2ch.

3) On the same tab, activate Voice (Party) and set your Push to Talk shortcut key for your team. You should then select the appropriate Open Mic Threshold using the slider at the bottom of this tab to get your microphone recorded at a comfortable level.
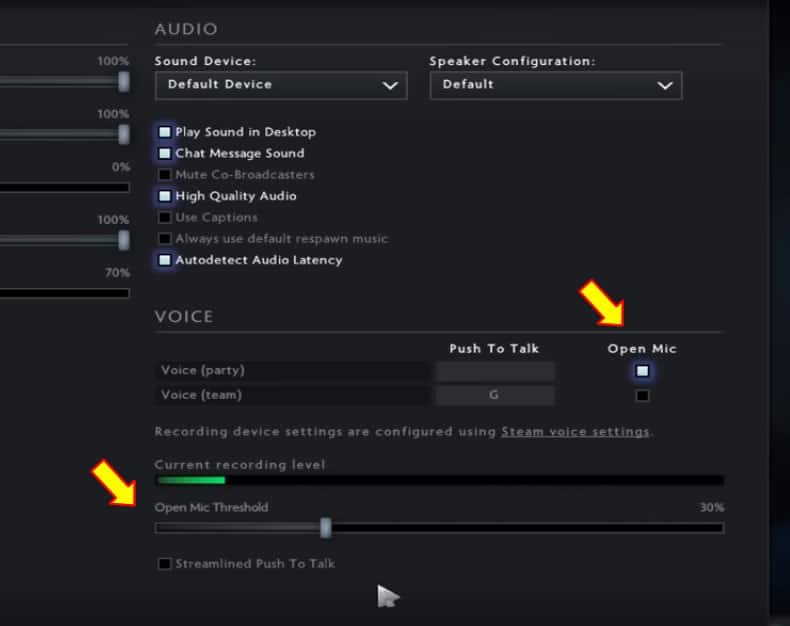
If your microphone is working outside the game, you should check if you’ve configured the in-game settings correctly. Here’re the steps:
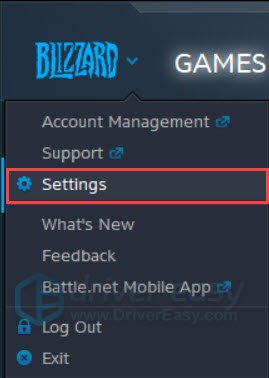
1) Open the Blizzard client. On the top left corner, click the Blizzard icon and select Settings.
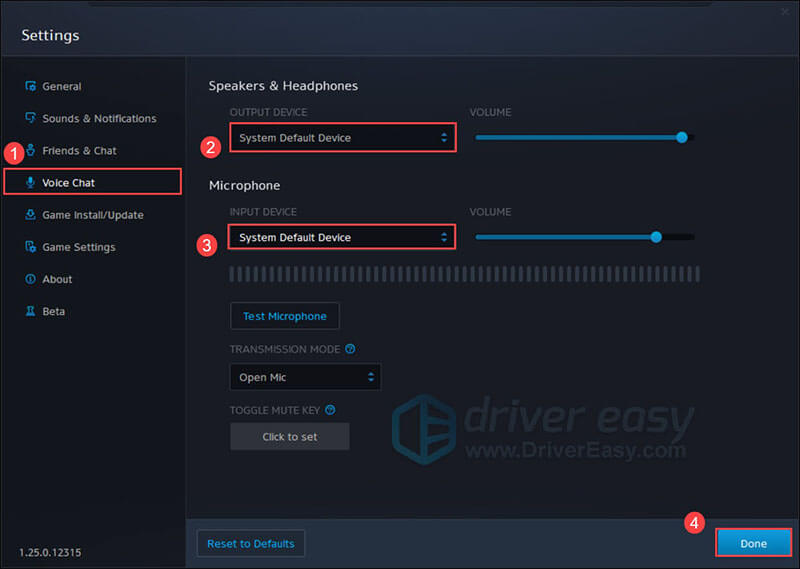
2) On the menu to your left, select Voice Chat. Set INPUT DEVICE to BlackHole 2ch. Then click Done.
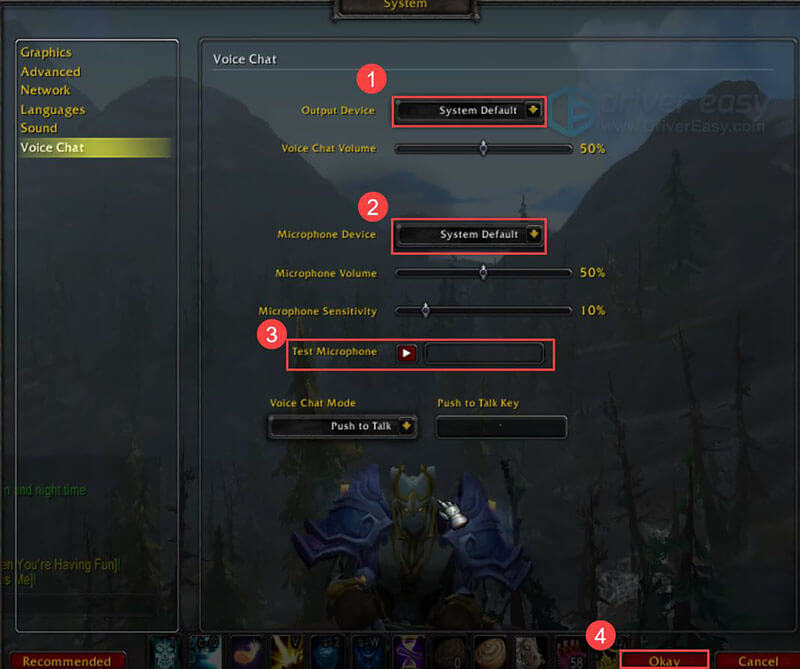
3) Launch WoW. Open game settings and select Voice Chat.
4) Configure Microphone Device to BlackHole 2ch. Then test your microphone. If your mic is working now, click Okay.
1) Click on the "Computer" icon to open the menu.
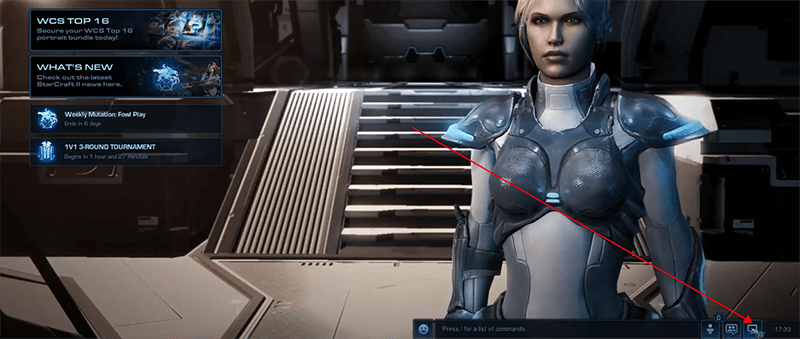
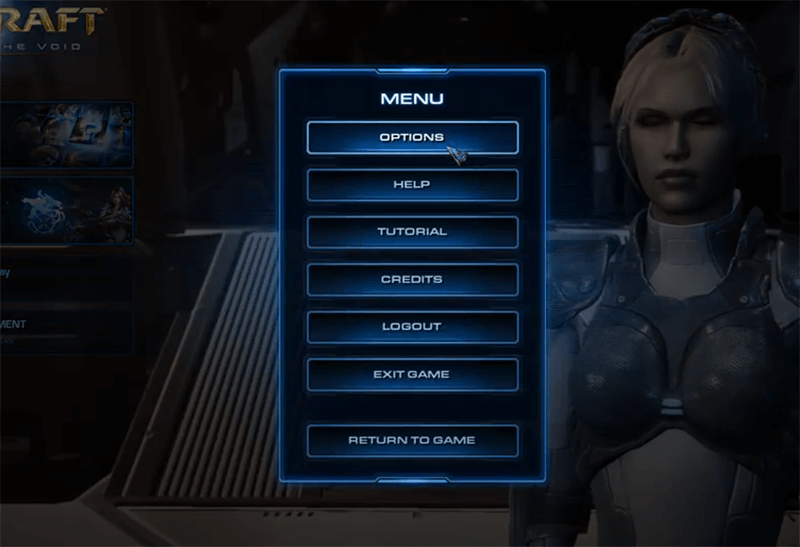
2) Click on options.
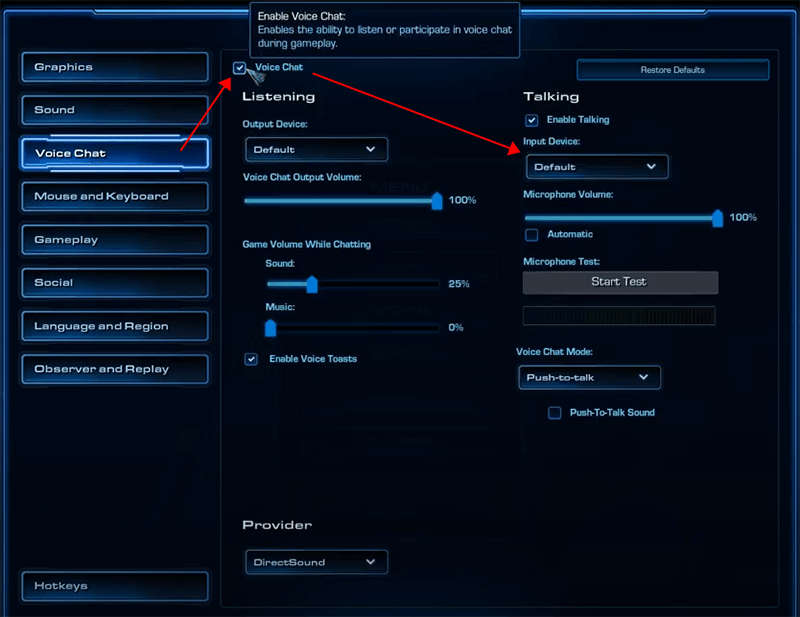
3) In the Voice Chat setting, tick on Voice Chat. Then change your input device to BlackHole 2ch.
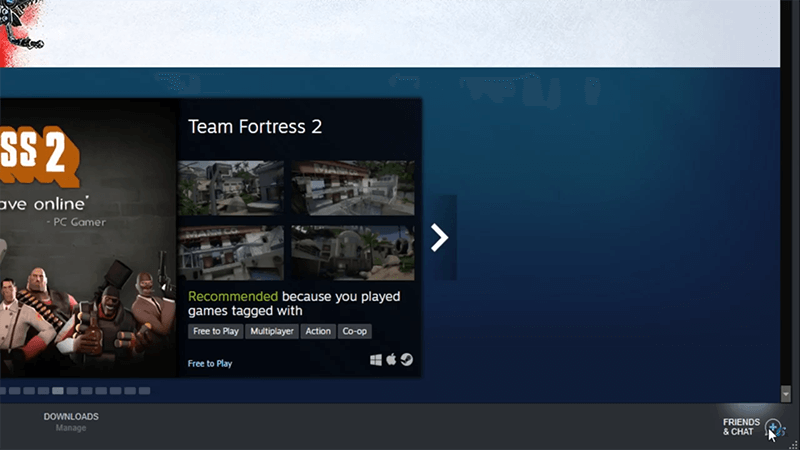
1) Go down to the bottom right hand corner of steam and click on Friends & Chat.
2) Then you will have a window at the left sidebar. Click on the gear icon to open the setting window.
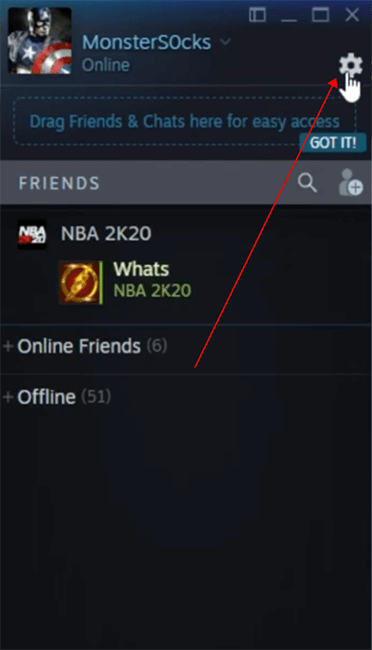
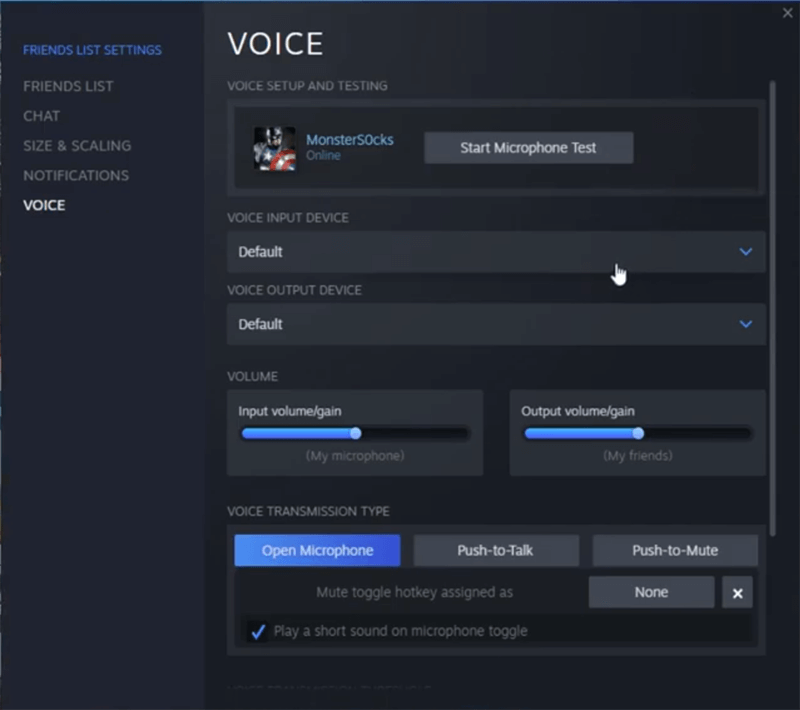
3) Click on VOICE INPUT DEVICE of the drop down menu , select BlackHole 2ch, then you will be able to use MagicMic in the game.
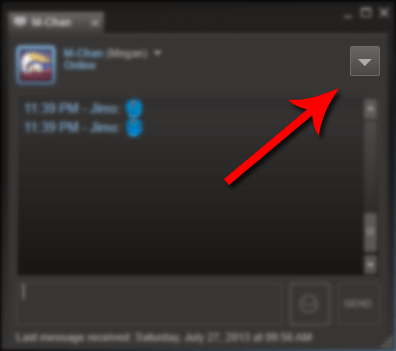
4) To begin a voice chat with somebody, open a regular chat with them on Steam and click on the arrow button located at the top right of the window.
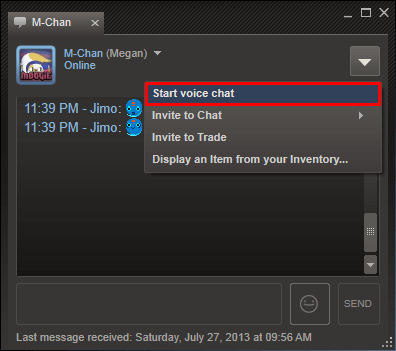
5) From the drop down menu select Start voice chat.
6) The person on the other end will be alerted by a ringing sound and a Steam notification. They will be able to choose to either answer the call or to ignore it by clicking the appropriate button at the top of the chat window. If the voice chat request receives no response it will automatically be ignored after 20 seconds.
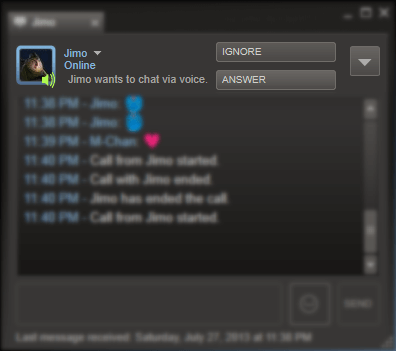
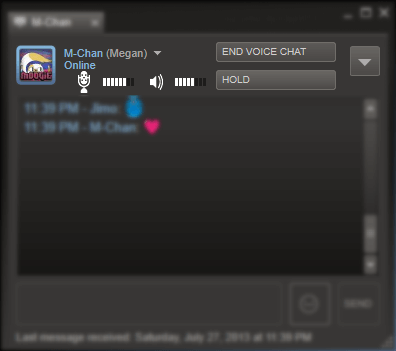
7) Once the voice chat session has started you can begin talking. During the voice chat session you can see your incoming and outgoing volume levels by looking at the indicators at the top of the chat window. Clicking on the volume indicators will also take you directly to your voice settings.
Make sure you haven’t turned off any options related to microphone in CS:GO.
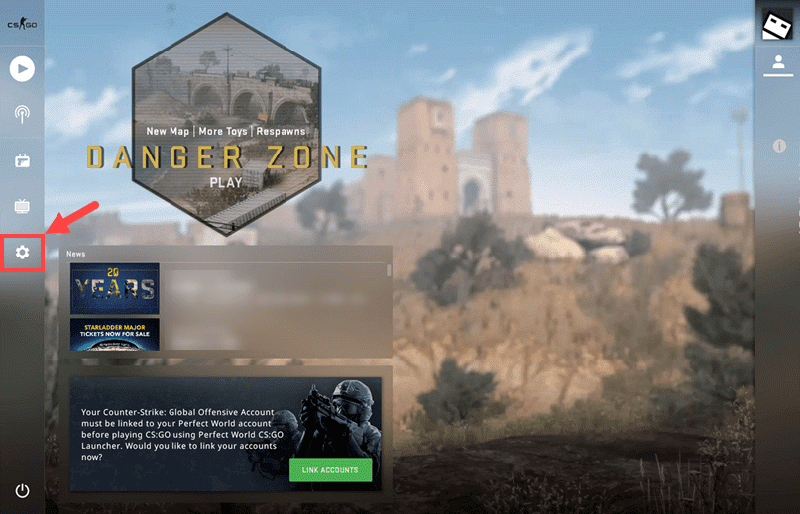
1) Launch CS:GO and click the gear icon in the left pane.
2) Go to the Audio Settings tab and select Audio below. Then, in the Audio Device, choose BlackHole 2ch as input device.
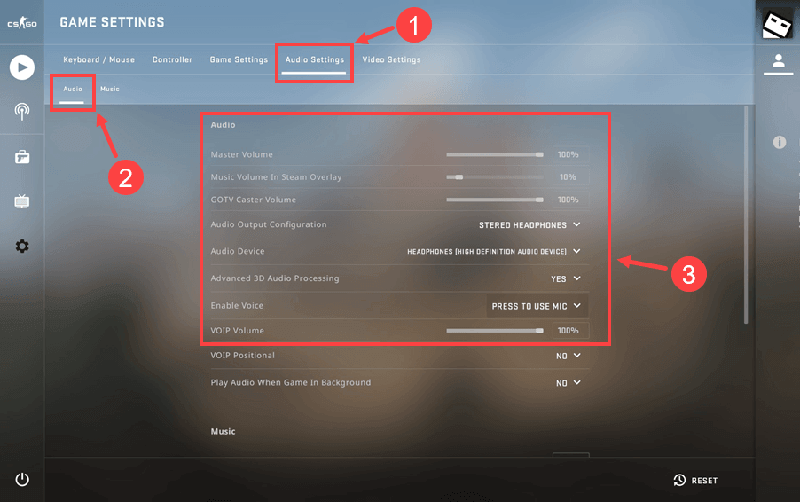
3) Select Game Settings > Communication. Make sure you haven’t muted your friends or others in the game.
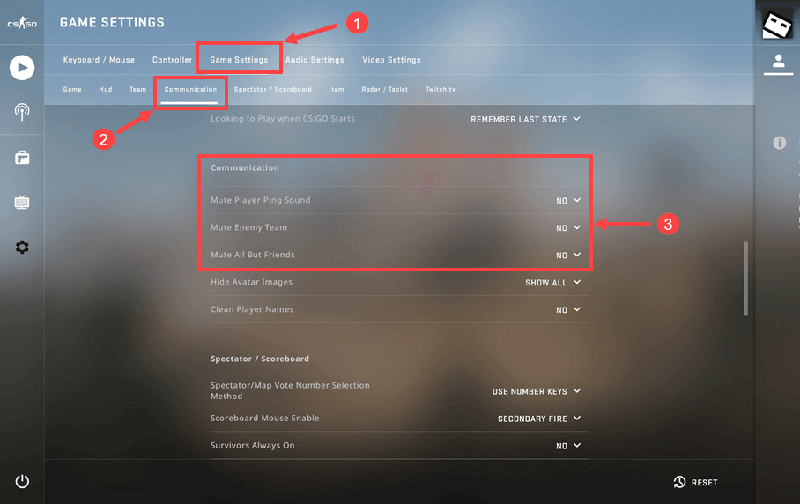
When you’re all set, you will be able to use MagicMic in CS:GO.
1) Go down to the bottom right hand corner of steam and click on Friends & Chat.
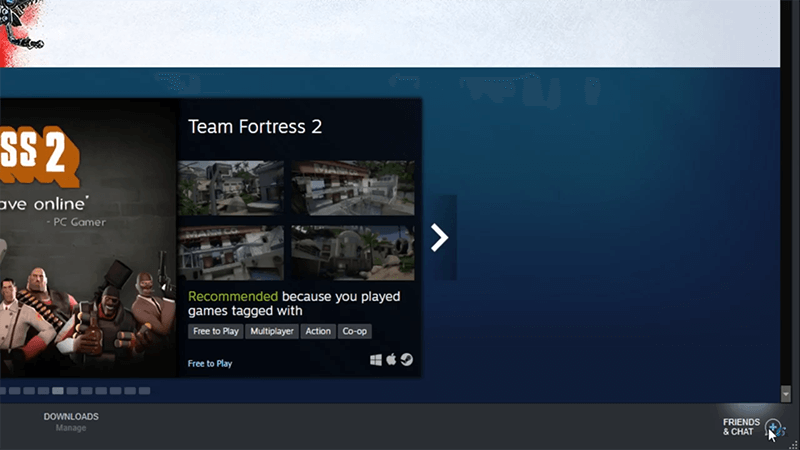
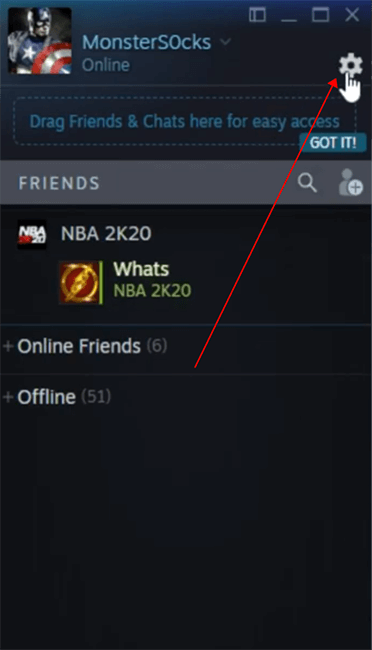
2) Then you will have a window at the left sidebar. Click on the gear icon to open the setting window.
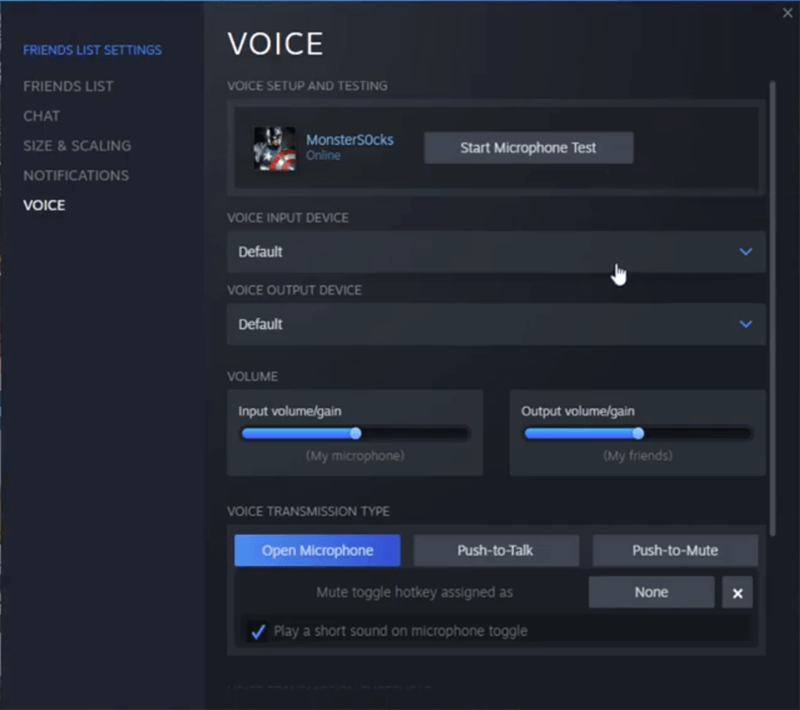
3) Click on VOICE INPUT DEVICE of the drop down menu, select BlackHole 2ch, then you will be able to use MagicMic in the game.
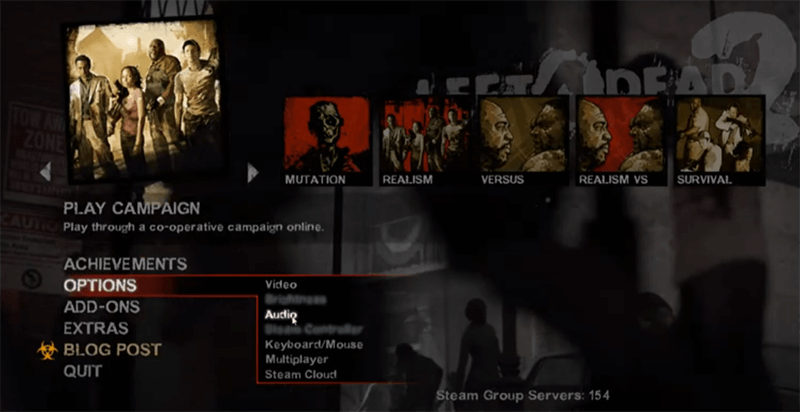
4) Before you start the game, you also need to make sure the in-game setting is OK. In the first page of Left 4 Dead 2, Choose OPTIONS and then Audio.
5) Click on "ENABLE VOICE IN THIS GAME", and then "Enabled".
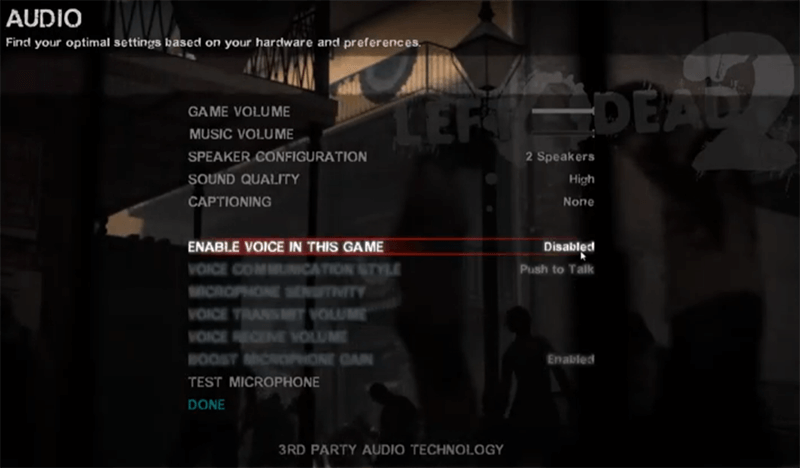
After that, everything is set up and you will be able to enjoy MagicMic and the game.
1) Download, install and configure MagicMic on your PC.
2) Open Discord and at the bottom click on your voice settings option button.
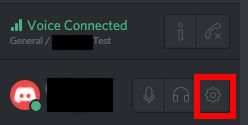
3) After the user settings window opens click on the "Voice" tab.
4) For INPUT DEVICE Select "BlackHole 2ch" in the drop down menu.
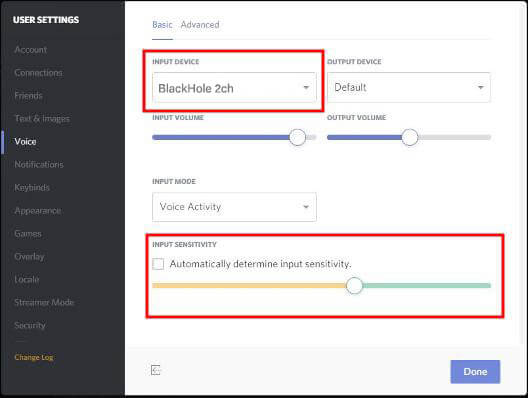
5) Uncheck Automatically determine input sensitivity.
6) Now speak into your microphone and adjust the sensitivity setting so it is showing green when you talk.
7) Click Escape.
1) Download, install and configure MagicMic on your PC.
2) Run Skype, log in your account. Choose Settings.
3) In the Settings dialog box: Select Audio & Video.
4) In Microphone area, select: BlackHole 2ch.
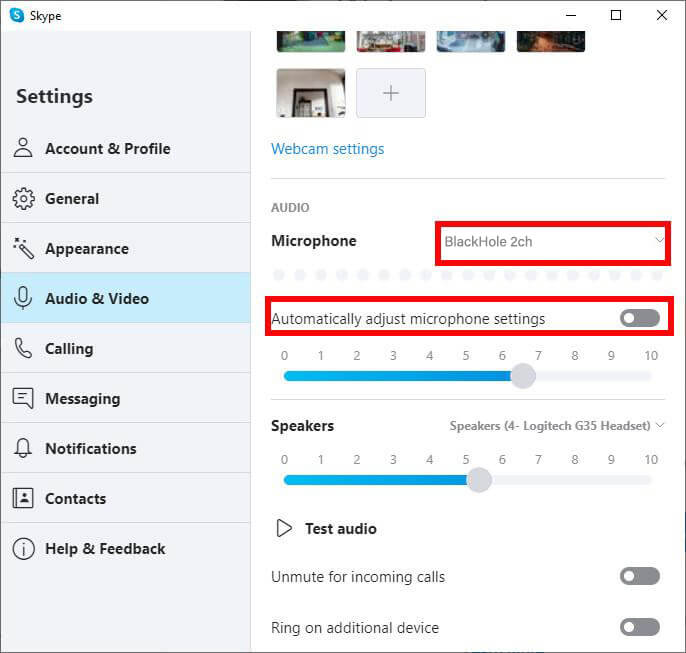
5) Click Save.
1) Download, install and configure MagicMic on your PC.
2) Open Zoom and at the top right click on your settings option button.
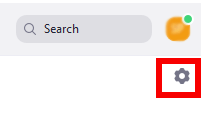
3) After the settings window opens click on the "Audio" tab.
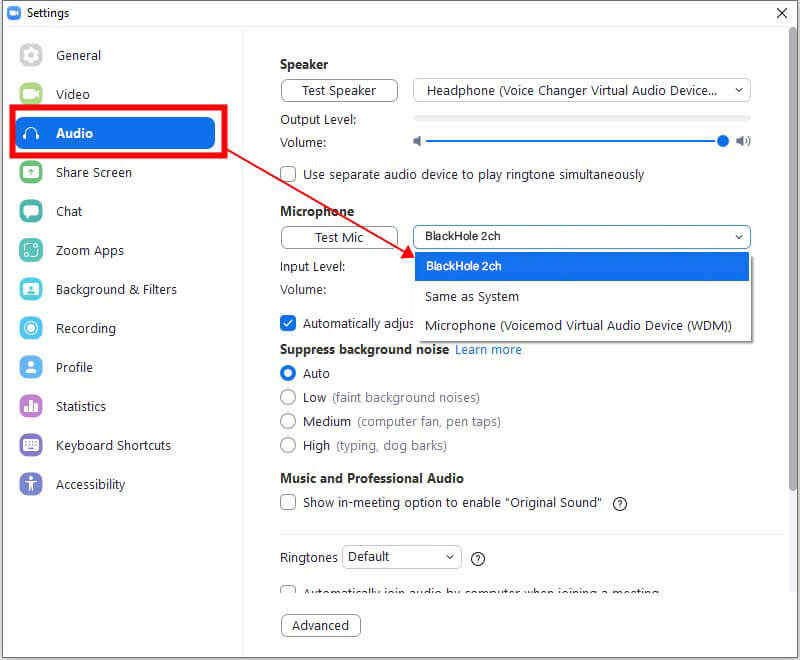
4) For Microphone Select "BlackHole 2ch" in the drop down.
5) Uncheck Automatically adjust volume.
6) Click the Test Mic button and speak into your microphone and adjust the microphone position to your mouth until the bars show in the middle when you talk. You may need to adjust your real microphone if it was originally not setup. You can do this by selecting your real microphone and running "Test Mic" for it, then switch back to the MagicMic Virtual Audio Device. Leave the MagicMic Virtual Audio Device microphone at 50%.
7) Close the settings dialog.
1) Download, install and configure MagicMic on your PC.
2) Run Twitch.
3) Under your user name click "Settings".
4) Select the Audio/Video section.
5) Under the Microphone expansion change the microphone to "BlackHole 2ch".
6) Now just press OK and close the Settings dialog. Be sure to run MagicMic while you are running Twitch
1) Download, install and configure MagicMic on your PC.
2) Open XSplit.
3) Go to Settings tab.
4) Go to Devices section.
5) Expand the Microphone source list and select BlackHole 2ch.
6) Done, you are ready!
1) Download, install and configure MagicMic on your PC.
2) Open Streamlabs and go to Editor.
3) Add a New Audio Input Capture and select BlackHole 2ch.
4) Now the mic signal can now be processed by MagicMic Voice Changer in real time.
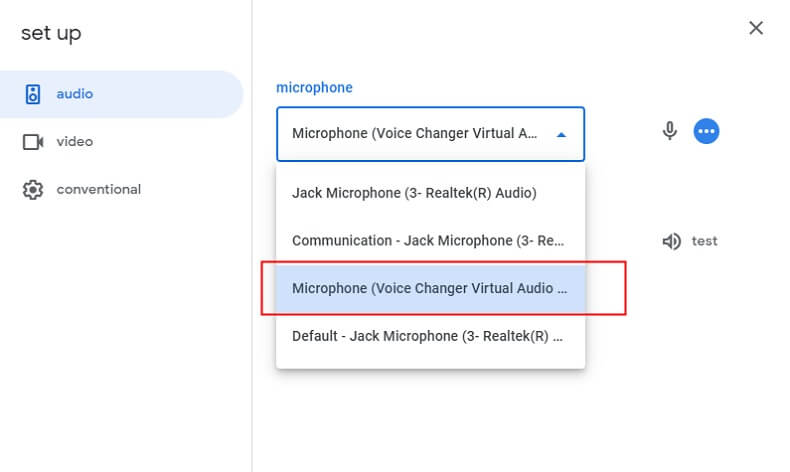
1. Open Google Meet,and click "Settings" on the right corner.
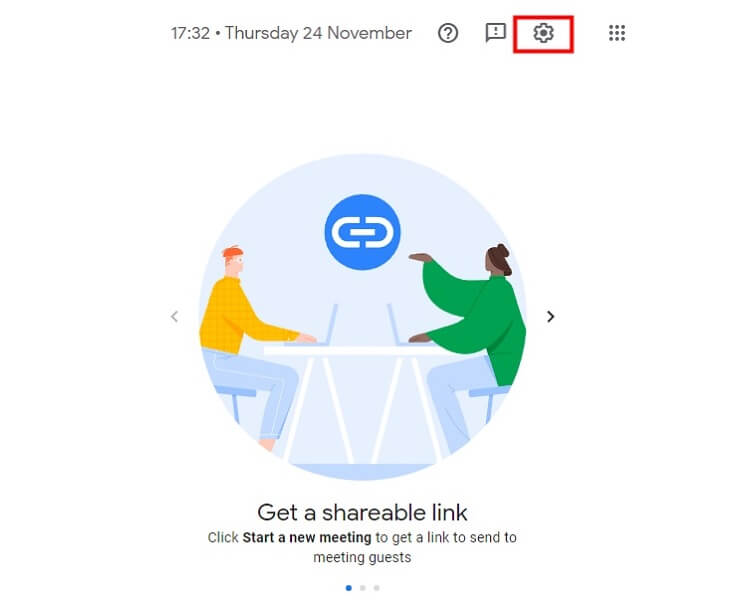
2. In Google Meet settings, choose MagicMic virtual audio device as your microphone.
MagicMic virtual device: Voice Changer Virtual Audio Device (WDM)
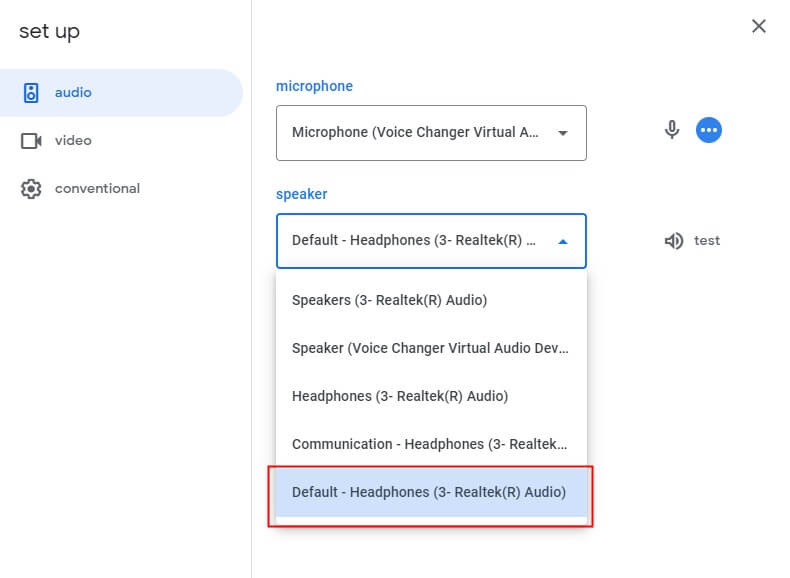
3. Choose your physical headphone device(like headphones) on Speaker setting.
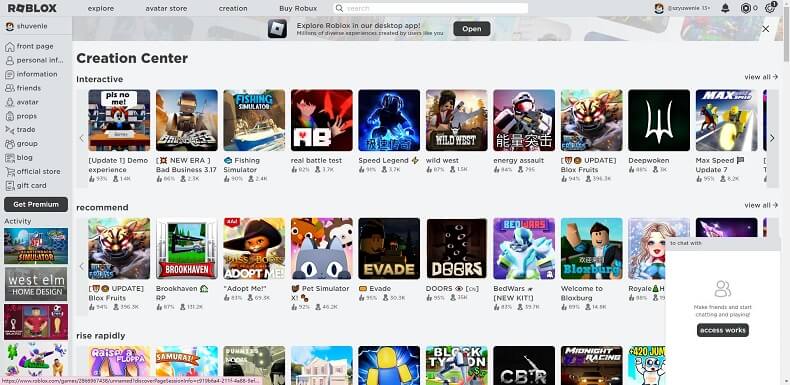
1. Open MagicMic then open Roblox. (If you open Roblox at first, pls close it before open MagicMic.
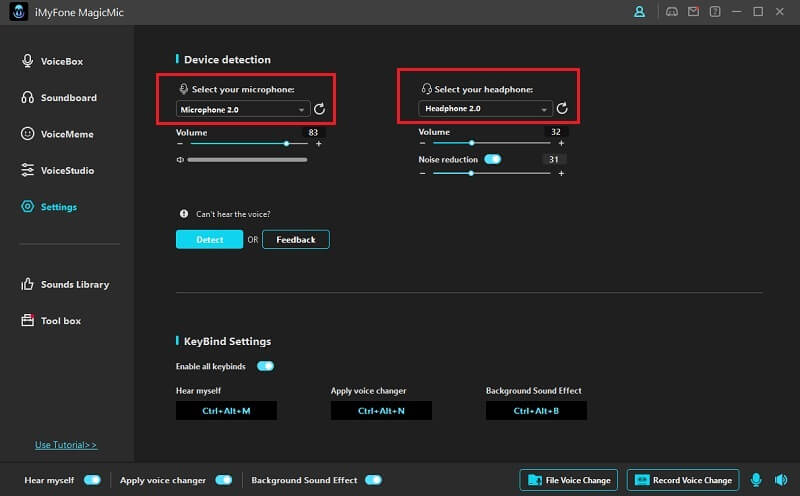
2. Choose microphone and headphone device on MagicMic until it is set correctly. Then open Roblox voice chat, voice changer on Roblox will work.
- iMyFone D-Back
- iMyFone Fixppo
- iMyFone UltraRepair
- iMyFone LockWiper
- iMyFone LockWiper (Android)
- iMyFone AnyTo
- iMyFone MirrorTo
- iMyFone ChatsBack
- iMyFone ChatsBack for LINE
- iMyFone iMyTrans
- iMyFone iTransor for LINE
- iMyFone iTransor
- iMyFone iTransor Lite
- iMyFone iTransor Pro
- iMyFone Umate
- iMyFone Umate Pro
- iMyFone TunesMate
- iMyFone Umate Mac Cleaner
- iMyFone TunesFix
- iMyFone D-Back (Android)
- iMyFone iBypasser
- iMyFone D-Back for Windows
- iMyFone D-Back for Mac
- iMyFone AllDrive
- iMyFone MagicMic
- iMyFone MagicPic
- iMyFone Filme
- iMyFone MarkGo
- iMyFone VoxBox
- iMyFone FamiGuard
- iMyFone KeyGenius
- iMyFone AnySmall
- Passper for Excel
- Passper for Word
- Passper for PDF
- Passper for PowerPoint
- Passper for RAR
- Passper for ZIP
- Passper WinSenior
- iMyFone Novi AI
- iMyFone MusicAI
- iMyFone DreamVid
- iMyFone PDFacademy


