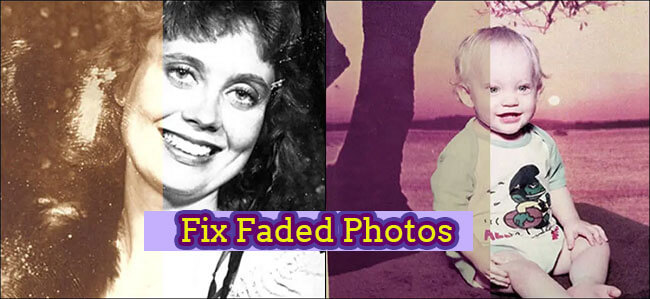
Photographs are the best memories we have. We all want them to get preserved for a long time. However, they can fade away because of some scientific reasons. The fading away picture has many causes, and some of them are:
- UV Light Exposure: Extreme sunlight causes photo-degradation because the molecules in plastic get excited by light, break down, and fade.
- Pollutants: Photo fading happens because of chemicals in the air.
- Adhesives in Photos Adhesives used to hold your photos cause long-term side effects. It seeps into the photos, screws from the photo molecules, and results in fading.
- Fungus: Photos kept for a long time without a check may attract fungus that leads to brown patches and yellowing. So, keep them nicely packed in a dry place.
- 1. Part 1. 4 Exclusive Troubleshooting Methods To Fix Faded Photos
- 1.1. Adobe Photoshop
- 1.2. Paintshop Pro
- 1.3. Lightroom
- 1.4. UltraRepair
- 2. Part 2. How to Restore Colors in an Old Photograph?
- 3. Part 3. How to Fix Corrupt/Inaccessible Photos?
- 3. Bonus Tips: Top Ways to Prevent Photos from Getting Faded
Part 1: 4 Exclusive Troubleshooting Methods To Fix Faded Photos
01 Adobe Photoshop
Adobe Photoshop is a simple photo-editing tool that you can use to restore your old photographs. The use of brushes in Photoshop can fix the spots, dampness, and color tones. It can restore your photographs from colored to vintage photos using the below-mentioned steps.
Step 1. Import Original Photos and Create New LayerImport the scanned image into Adobe Photoshop. The image must be the background layer so lock it without any adjustments. Create an empty layer or a new layer to make all the adjustments. Then lay the adjustments on top of the picture.
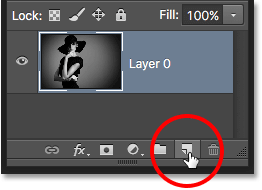
Top toolbar options have the Sample All Layers, where you can select the Content-Aware from the varied types available. Use a spot healing brush tool to fix the tears, erase any creases, and remove damages caused by mold and water. To smoothen out the details and textured areas, use the clone stamp tool, and select ‘current layers and below’ to work non-destructively.
Step 3. Colourise and Export Restored PhotoCreate a new layer for Sepia photos, using the ‘Ctrl+Alt+Shift+E’ command on Windows, and for Mac, use ‘Command+Option+Shift+E’. Click Filter > Neural Filter > Colourise. The blending mode must be set to color to create a colorized layer. After this, save the image in the file format and download it.
02 Paintshop Pro
Paintshop Pro is another faded photo editing software that restores the color of old photographs. Faded images can restore with a few clicks. You can filter images and fix the photodamage in these simple steps.
Step 1. Install The SoftwareFirstly, install and launch Paintshop Pro on your PC. Then open your faded image.
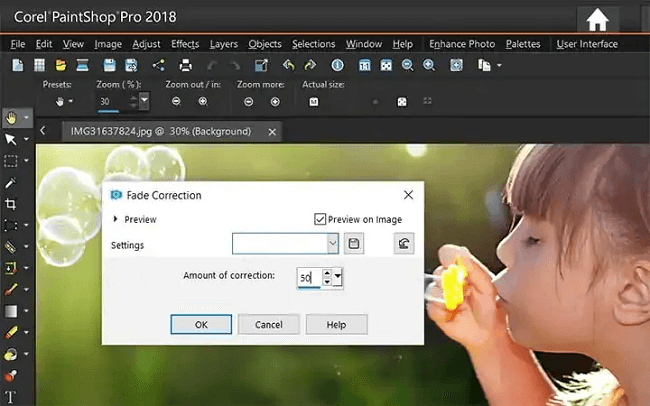
Step 2. Enlarge The Image and Select Fade CorrectionOpen the scanned image for enlarging. Click on Image > Resize > Advanced > AI-Powered settings. Then click on Resample Using > AI-powered. Select Adjust > Color > Fade Correction for fade correction.
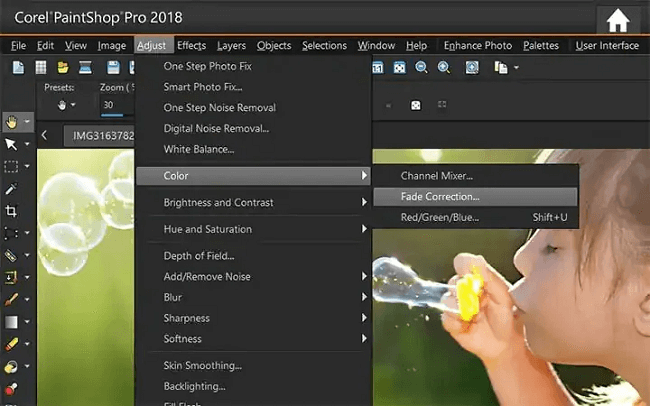
After choosing Fade Correction, you need to adjust the value in the provided box and choose the default value is 45.
Note
Here, you must choose the minimum value that corrects the image rightly. Applying too many highlights, corrections, and shadows can make the picture lose details. Then click the OK option.You can now adjust, add or remove noises and then choose AI Artifact Removal to remove any unwanted ‘artifacts’ processed during the restoration process.
03 Lightroom
Use the Lightroom photo processor and organizer tool to restore your old photographs and add highlights, tone, and color to them. If you are looking forward to how to restore faded photos easily and quickly, Lightroom is worth the shot. Here are simple steps:
Step 1. Import Your Faded PhotoFirstly, import the old or faded photo you want to restore.
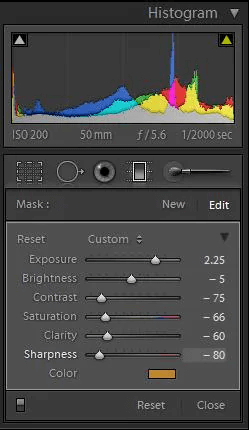
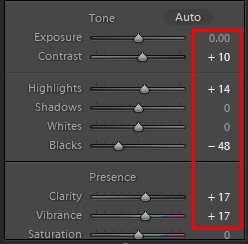
Step 2. Choose the Right Tools for FixingNow, click on ‘Develop’ and do the White Balance of the picture. Click on ‘color,’ and then reduce ‘tint’ and ‘temp’ as required. Change highlight, contrast, clarity, blacks, and pictures vibrancy for accuracy. The Hue panel will change the slide’s property and color value using split toning and luminance.
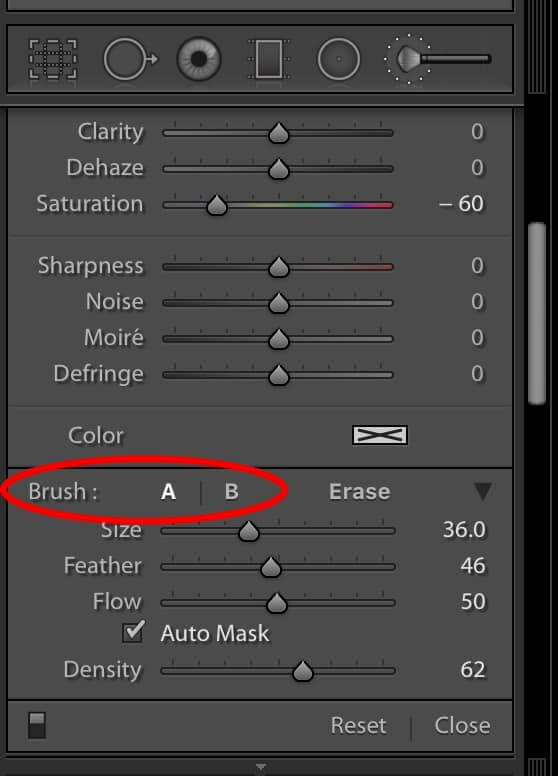
The Graduated Adjustment tool will help with careful retouching. Click on ‘Heal Brush’ from the Spot Removal menu. Keep the Capacity 100%, and drag a good portion of the photo to the scratched area.
Note
Here, you must choose the minimum value that corrects the image rightly. Applying too many highlights, corrections, and shadows can make the picture lose details. Then click the OK option.You can now adjust, add or remove noises and then choose AI Artifact Removal to remove any unwanted ‘artifacts’ processed during the restoration process.
04 UltraRepair
iMyFone UltraRepair is newly release faded photo fixing software that can help you great a lot. With the use of this tool, you can fix the faded images within a few minutes. With it's user-friendly interface, everyone can operate it easily! See how to do it below:
- Support repair broken picture in batch.
- Support multi format of photos, such as jpg, png, RAF, ARW, GPR, etc.
- Support repair photos from any device.

Step 1.Down the program on your PC and upload the faded photos you want to repair. (You can have a free try by clicking the button below.)

Step 2.Click the "Repair" button to start the repair procession.

Step 3.Now you can save the repaired photo.

You may also like: Fix Windows 10/11 Can't Open JPG
Part 2: How to Restore Colors in an Old Photograph?
Is this question bothering you after watching your old memories fade away? If yes, Adobe Photoshop and Lightroom are the tools that can restore, heal, and Colourise your old photographs. You must adjust the color and tone value correctly and use the Hue slider to give a natural look to your photographs. The contrast and color must be corrected using the Curves layer to correctly by setting the white and black points. The border on your old image will help restore the colors correctly.
Part 3: How to Fix Corrupt/Inaccessible Photos?
If you are wondering how to fix a faded photo, here is your answer. Sometimes the photographs become inaccessible due to damage or corruption caused to photograph because of natural occurrences. You can fix them using Lightroom, Photoshop, or Paintshop Pro software. They support images from any desktop, Mac, or mobile device too. You can try these various types of software for free from their respective platforms. They have respective tools to make pictures accessible and help you retrieve your picture.
Bonus Tips: Top Ways to Prevent Photos from Getting Faded
1 Create a Photo Album
An acid-free archival photo conservation paper can help in preventing your photos from getting faded. The pictures put up in the album are not exposed to direct sunlight, so they won't get faded.
2 Frame Your Pictures
Keep your photos in glass frames, and put them away from direct sunlight. If you want to illuminate the images, make them look bright, then use the artificial lighting source.
3 Keep them away from Humidity
Photos stored in humid areas can spoil them entirely. Photo fading and damage can prevent mildew and molds by storing them in a cool and dark place. Never keep your pictures in the attic or garage.
4 Use Proper Storage Facilities
You can store the photographs in acid-free papers, customized boxes meant to keep bugs away, slipcovers, and albums to ideally store the negatives and photos. These things will preserve pictures effectively.
To Conclude
That's all content for fixing faded photos! You can try all the methods we talk about above to solve this problem and keep in mind how we can prevent such issues happen again. Now is your turn, which methods do you like the best? Leave your comment below to tell us!


 December 29, 2022