How to Fix Low Resolution Photos in 3 Workable Ways?
Category: Repair Files

4 mins read
Photos has become one of the most important way to convey our feelings. We use digital devices to capture the precious moment, ensuring that the happiness can be recollected.
But if the photos are in low quality, things will be different. And that’s why learning how to fix low resolution photos, how to avoid them in low pixelation is necessary. Follow and check with details!

In this article:
Enhance low resolution photos to high resolution in 1 click.
Part 1: How to Fix Low Resolution Photos?
In this part, let’s head straight to the methods on fixing photos in low resolution, so that you can enjoy the images without blur again.
01 Try Photo Enhancer – iMyFone UltraRepair
The first simple yet powerful method to make a photo clear is by using a dedicated photo enhancer – iMyFone UltraRepair, which supports to repair photos in low resolution due to file corruption, file compression, limited storage space…
For image in the loss of resolution or high quality, enhancing it with this automatic AI tool saves you time and effort.
Key Features:
- Enhance photos in various levels of corruption, such as low resolution photos, pixelated photos, grainy photos, red-eyed photos, blurry photos, etc.
- Repair low resolution images in formats like JPG, JPEG, PNG, CR3, TIFF, CRW, RAW, etc.
- Repair blurry photos stored in cameras, SD cards, phones, USB drives, etc.
- Preview the comparison result before saving.
- Support to fix blurry photos and videos to improve quality.
- Compatible with Windows and Mac system, available on Android and iOS as well.
Watch the video on how to make a blurry photo clear:
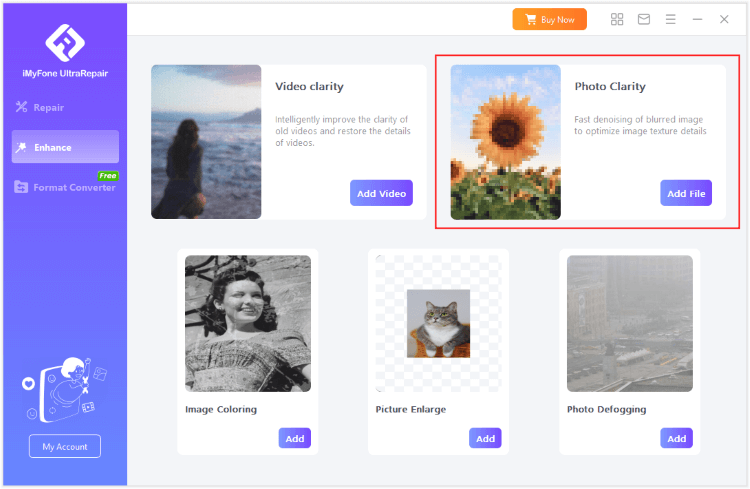
Step 1: Download to launch the software, click the Enhance tab, then choose the feature Photo Clarity.
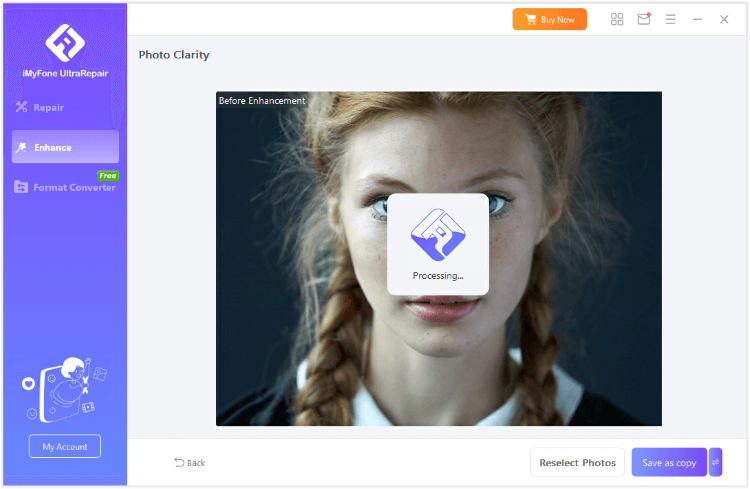
Step 2: Upload the photo you want to make it clear, then the software will begin to remove the blur from image automatically.
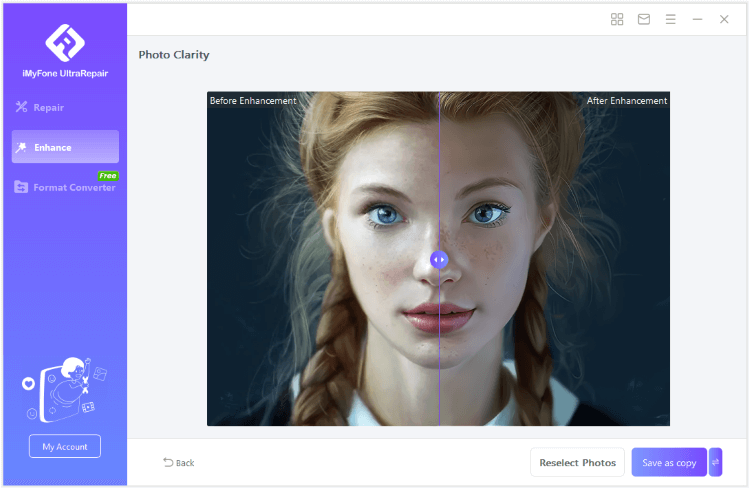
Step 3: When the photo is unblurred, you can see the contrast, then save the enhanced photo.
How to Fix Blurry Pictures on PC & Phone?
02 Try Photoshop
As the well-known editor, Adobe Photoshop is the greatest company for those skilled photographers, designers and more to edit and modify images. And of course you can fix a low resolution photo with it by adjusting the details of the photo. To learn more, follow steps here:
Step 1: Open the photo in Photoshop and make a duplicate layer to work on.
Step 2: Resize the image cautiously using the Image Size option, selecting the resolution/width/height as you want.
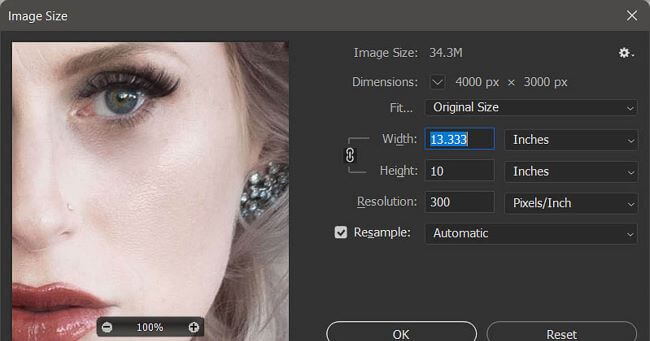
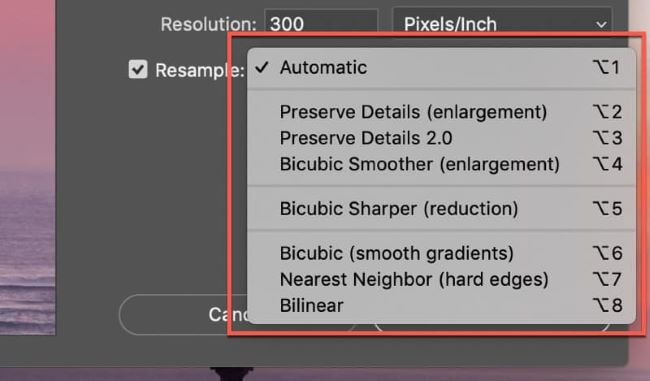
Step 3: Turn to Resample option to choose preserve details or other option.
Step 4: Use noise reduction filters to reduce unwanted artifacts without losing too much detail.
Step 5: Save your work in an appropriate format and consider using a different file name to preserve the original.
You May Learn: How to Increase Resolution of Image in Photoshop?
03 Try Lightroom
Developed by Adobe, Lightroom is also a powerful photo editing software for enhancing photo quality and resolution in no time.
For organizing, batch processing and adjust large collections of digital images, photographers may find it as useful as the Photoshop.
Here’s how to fix a low resolution photo with Lightroom:
Step 1: Import the photo in low quality in Lightroom.
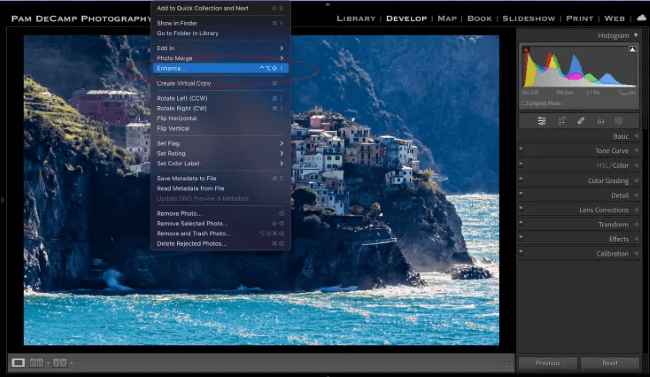
Step 2: Choose Photo, then Enhance option.
Step 3: Under Super Resolution, click Enhance to make adjustment directly.
Part 2: What to Know about Image Resolution?
Image resolution refers to the level of detail in a digital image, often represented as pixels per inch (PPI) for digital displays. A greater resolution signifies a denser arrangement of pixels, leading to enhanced image quality and sharper visuals.
That’s why in situations where top-notch image quality is imperative, opting for high resolution is the preferred approach.
Part 3: What May Lead to Low Quality Photos?
The low resolution photos may occur due to various reasons, some of the reasons are listed as a kind remind.
Using low-resolution settings or compressing images during capture can lead to lower-quality photos. Using digital zoom on a camera can lead to pixelation and lower image quality. Inadequate lighting may force the camera to use higher ISO settings, which can introduce noise and reduce image quality. Shaky hands or an unstable camera can lead to blurred images, especially in low light conditions. Cropping an image extensively can reduce its resolution and result in a lower-quality photo. Saving images in a format that compresses the file too much, or using high compression settings, can lead to loss of image quality.
Part 4: How to Avoid Low Resolution Photos?
You must don’t want to waste time on fixing photos in low resolution, so here’re some tips that you can try to prevent this annoying problem.
- Avoid Digital Zoom:
- Proper Lighting:
- Avoid Heavy Cropping:
- Use the RAW Format:
- Select the Right File Format:
- Avoid High ISO Settings:
Instead of using digital zoom, physically move closer to the subject to maintain image quality.
Ensure adequate lighting to prevent the camera from compensating with higher ISO settings, which can introduce noise.
Frame your shot correctly to reduce the need for extensive cropping, which can lead to lower resolution.
If possible, shoot in RAW format to retain maximum image data and flexibility during post-processing.
Choose lossless formats like TIFF or PNG for critical work, and use JPEG for general purposes with higher quality settings.
Use lower ISO settings whenever possible to minimize noise, especially in low-light conditions.
Conclusion
And that’s all for how to fix low resolution photos in 3 ways. For those who want to save time on editing images, photo enhancer – iMyFone UltraRepair is best for you. And for those who is skillful in using Adobe products, the Photoshop and Lightroom are better software. Choose the one you like!


