Finding “where are iPhone backups stored on your computer?” is pretty easy because regardless of whether its Windows or Mac OS X, iTunes backs up all your iPhone media to a specified directory on computer. Unless you have changed the backup location in iTunes settings, your backups are located in a default directory which is well-known.
Where Are iPhone Backups Stored
Read below to find out where are your iPhone backups stored:
iTunes Backup
On Mac
iPhone backup is stored in the following location in all versions of Mac OS X:
- ~/Library/Application Support/MobileSync/Backup/
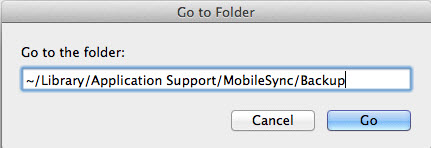
You can quickly navigate to this directory by using Command+Shift+G shortcut and copy/pasting the above directory path in the Go To Folder screen.
On Windows
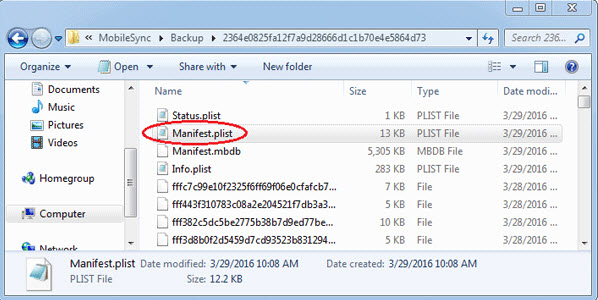
You can quickly navigate to this directory by using Command+Shift+G shortcut and copy/pasting the above directory path in the Go To Folder screen.
- Windows 7/ Vista: C:UsersuserAppDataRoamingApple ComputerMobileSyncBackup
- Windows 8/8.1/10: UsersYOURUSERNAMEAppDataRoamingApple ComputerMobileSyncBackup
- Windows XP: C:Documents and SettingsuserApplication DataApple ComputerMobileSyncBackup
iCloud Backup
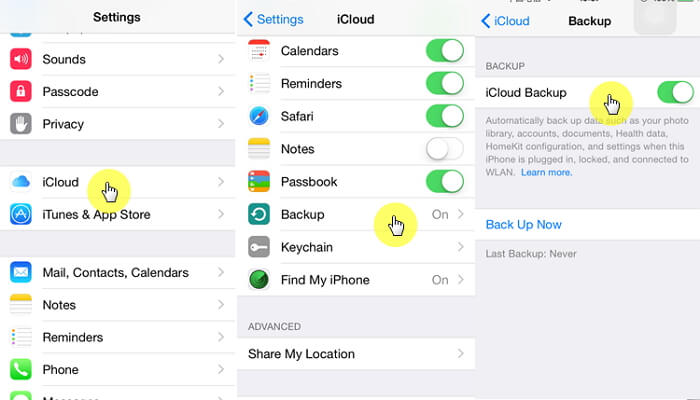
Follow these instructions to access where your iCloud backups stored are:
iPhone: Launch Settings app and then tap on iCloud and choose Storage & Backup.
Mac: Open Apple menu and navigate to System Preferences > iCloud and then select Manage.
Windows: The method to access iCloud backup varies from one Windows version to another. Follow these instructions:
- Windows 7: Navigate to Start menu > All Programs > iCloud and then select Manage.
- Windows 8/8.1/10: Go to Start screen and open dropdown menu. Choose iCloud from the list, then click Manage.
How to Delete iPhone Backups
After knowing where iPhone backups are stored, you may also want to know how to delete iPhone backups. It’s a straightforward procedure. Read below:
Delete iTunes Backup File
Deleting the iTunes backup file is very easy. It is similar to creating a backup, however you will have to navigate to the backup directory to delete the backup instead of performing it in iTunes.
Follow these instructions:
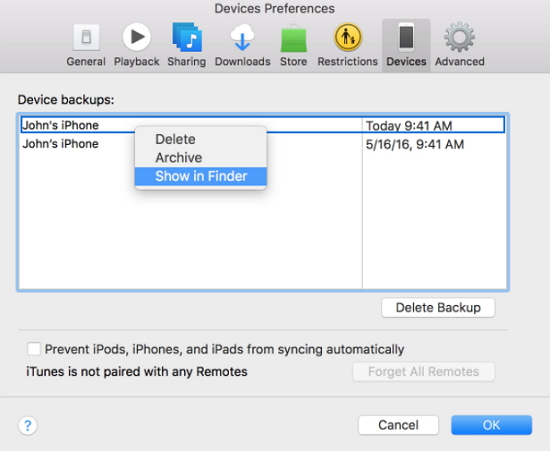
Step 1: Navigate to the iTunes backup directory i.e. username/library/Application Support/Mobile sync/Backups. You will see all your backups there.
Step 2: Now right click on the backup that you wish to delete and delete it the way you usually delete any other file/folder on your computer.
Delete iCloud Backup File
Deleting an iCloud backup is even easier than deleting a file/folder on your computer’s hard disk.
Follow these instructions:
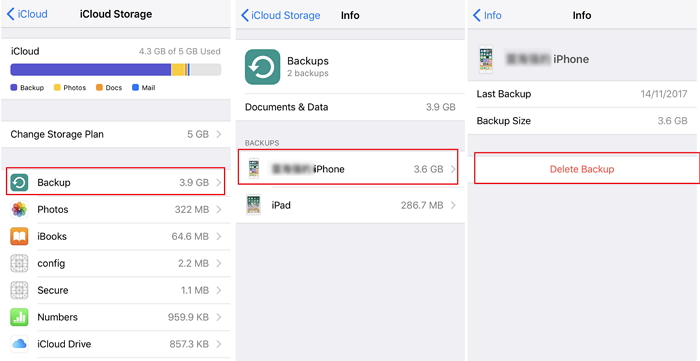
Step 1: On your iPhone, launch Settings app and then find and select the iCloud option.
Step 2: Now navigate to Storage & Backup > Manage Storage and then choose a backup.
Step 3: After selecting your desired backup, choose the Delete Backup option and your selected iCloud backup will be deleted.
How to Back Up iPhone to PC Without iTunes and iCloud
here are plenty of third-party tools that you can use to quickly back up your iPhone media. One of these tools is iMyFone TunesMate. It is one of the best iPhone file transfer tools that offers 1-click backup and restore options as well as allows you to conveniently transfer all kinds of media from your iPhone to computer and vice versa. Furthermore, you can also specify which types of media to back up for your convenience.
Key Features:
- 1-Click backup option to conveniently back up your iPhone music, videos, photos, podcasts, etc. to your computer.
- No need to launch iTunes on your computer in order to transfer files between your iPhone and PC.
- No password required to back up your iTunes files to your iPhone.
- Safely transfer files between your iPhone and PC without corrupting your iTunes library.
- Rebuild your corrupted or damaged iTunes library. You can also share your iTunes library with your friends and family, even if they are using different Apple IDs.
Steps to Transfer iPhone Music to Computer
Follow these instructions to transfer your iPhone music to your computer via TunesMate:
Step 1: Connect your iPhone to your Windows PC or Mac with a compatible USB cable.
Step 2: Launch iMyFone TunesMate. The software will detect your connected iPhone upon launch.
Step 3: Click the Music tab on the software. It will show a list of all the music available on your iPhone.
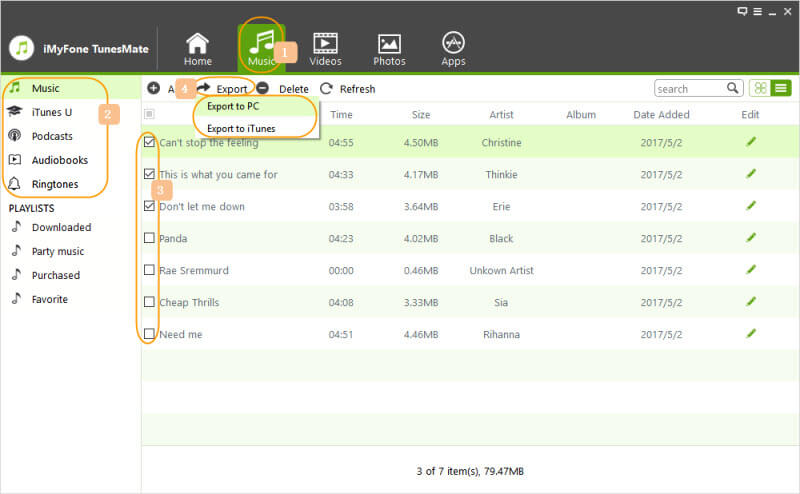
Step 4: Select the music files you wish to transfer by ticking the checkboxes next to them.
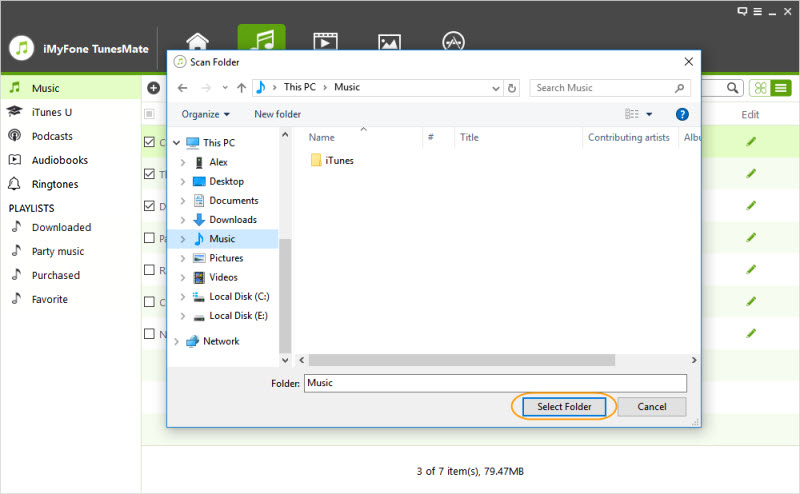
Step 5: After selection, choose Export > Export to PC option and then navigate to a folder on your computer’s hard disk where you wish to transfer your iPhone music. Once there, click on Select Folder option. The transfer process will begin.


 June 21, 2021

