The recent version of iTunes came along with numerous updates and changes. With this version, you are probably having a hard time transferring your ringtones to iPhone. Unfortunately, uninstalling and reinstalling cannot solve the problem and that is why in this article we bring about one of the most efficient solutions to this problem that will make your life with your iPhone way easier.
How to Transfer M4R to iPhone without iTunes
iTunes will delete the existing files on iPhone when syncing. It’s not recommended to use iTunes when you need to add files to iPhone. To transfer m4r file to iPhone, here we recommend the iPhone files transfer tool called iMyFone TunesMate iPhone Transfer, which supports to transfer ringtones, music, videos, playlists, photos, podcasts, audiobooks and more freely between iPhone and computer.
TunesMate Makes & Transfers Ringtones:
- Decide the precise section of any song to be your ringtone while listening.
- Preview the ringtone before you save it to your computer, or directly to your iPhone.
- Create m4r ringtone from any audio format, like MP3, M4R, WMA, M4A, OGG, AAC, etc.
- Extract (both purchased and non-purchased) ringtones from iPhone and share them to friends.
- Manage not only music but playlists too, like to backup, extract, import, add, delete, edit, etc.
1 Steps to Transfer M4R Ringtone to iPhone Easily without iTunes
Step 1. Connect your iPhone to iMyFone TunesMate on computer.
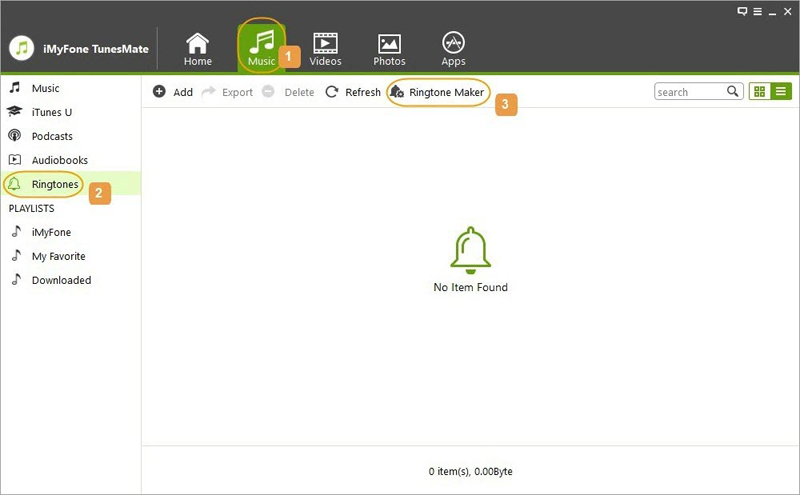
Step 2. Go to “Music” tab and then “Ringtones” category.
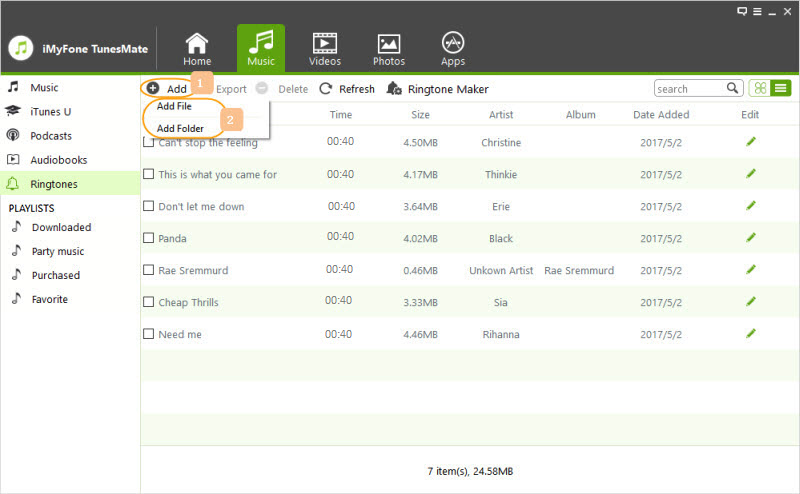
Step 3. Click “Add > Add File” and select the m4r ringtone from your PC or Mac. Then the ringtone will be added to your iPhone.

2Steps to Make Ringtones for iPhone without iTunes
Step 1: When TunesMate detects your iPhone, go to “Music > Ringtones > Ringtone Maker”.

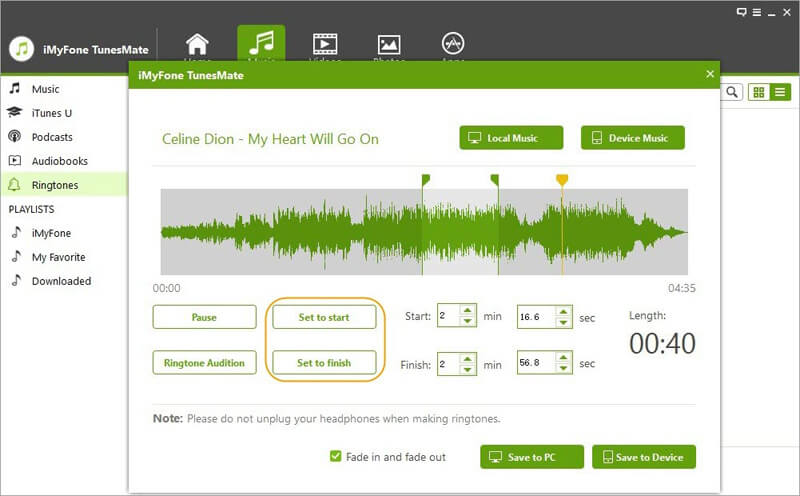
Step 2: Select the song you want to make ringtone from computer or your iPhone. Step 3. TunesMate will play the song from start to finish and you may decide the tones by pressing “Set to start” and “Set to finish” buttons. (Or you can manually write the start time and finish time.)
Ringtone Audition: You can use this function to preview the tones before you save it.

Step 4: Finally, click “Save to PC” or “Save to iDevice” and save the custom ringtones.
How to Transfer M4R Ringtones to iPhone in Old iTunes
If you are still using the old iTunes which is earlier than 12.7, you can use its sync feature to add the m4r file to iPhone. But note that, it will delete the custom ringtones from your iPhone at the same time. If you don’t want any data lost, just use the Method 1 in this post.
Before you sync the ringtones, you need to add them to your iTunes library, or just use “File > Transfer File to Library” to make it. If you haven’t prepared your ringtone, refer to this guide to create your own m4r ringtone.
Step 1: Connect your iPhone to computer and open iTunes.
Step 2: When iTunes detect your iPhone, click on the device tab.
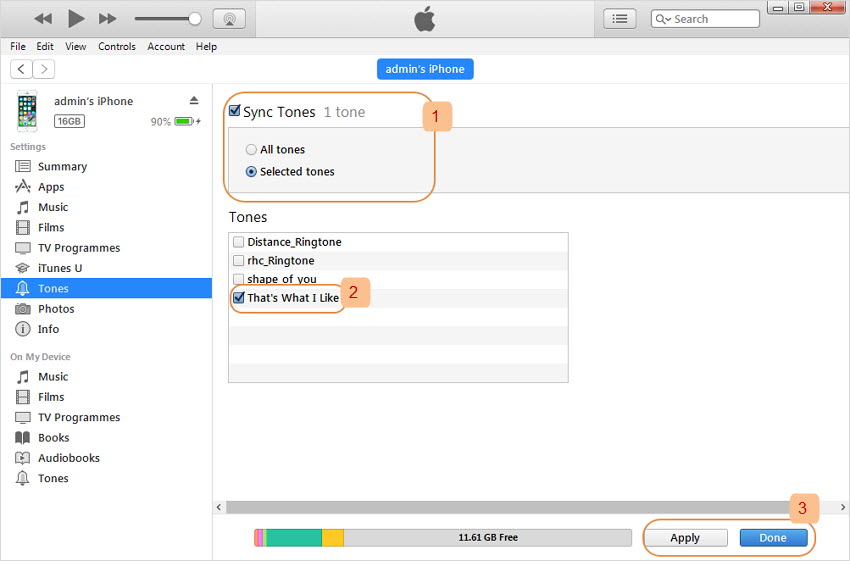
Step 3: Choose “Ringtones” from the left sidebar.
Step 4: Check “Sync Ringtones” and select the ringtones. Then hit Apply to sync the ringtones to iPhone.


 November 26, 2021