Would you like to restore your contents and settings from your iTunes backup to your new iPhone? We’ve shared this guide to help you restore new iPhone from iTunes seamlessly.
When you buy a new iPhone, there is always need to restore your iTunes backup to your new device. However, many would ask what is the need to restore new iPhone from iTunes? The answer to this question is penned down in the following paragraph.
Reasons to Restore Your New iPhone from iTunes
1. Retain your iOS files and data in your new device as it were on your old iPhone.
2. Retain your iOS settings as on your new device as it were in your old iPhone
3. Prevent any form of data loss which can occur when using file transfer methods other than iPhone restore.
4. Retain your purchased and non-purchased files on your new device.
Therefore, restoring your new iPhone from iTunes backup would help you to retain your data, contacts, media files, photos, audiobooks, iTunes U, and other files.
Part 1. How to Restore New iPhone Using iTunes
The process of restoring new iPhone via iTunes is the same as setting up your new iOS device from the backup of your previous iPhone, iPad, or iPod touch. But before we dive into this iOS data restoration process, we shall first look at the types of data you can restore with iTunes.
#1. What Type of Data Can You Restore with iTunes?
While backing up your device on iTunes you should know that the following types of files are not included in your iTunes backup.
- Contents purchased from the iTunes or App Stores.
- Imported MP3s, CDs, Videos, books and photos that were synced from iTunes.
- Photos in your iCloud library.
- Touch ID settings.
- Apple Pay settings and details.
- Other details such as healthcare data.
#2. How to Restore New iPhone from iTunes
You can learn how to restore your iPhone from an iTunes backup by following these steps.
- Launch iTunes on your Mac or PC that you used to back up your old iPhone.
- Connect your new iPhone to your PC with a USB cable, then trust your computer before progressing you’re the next step.
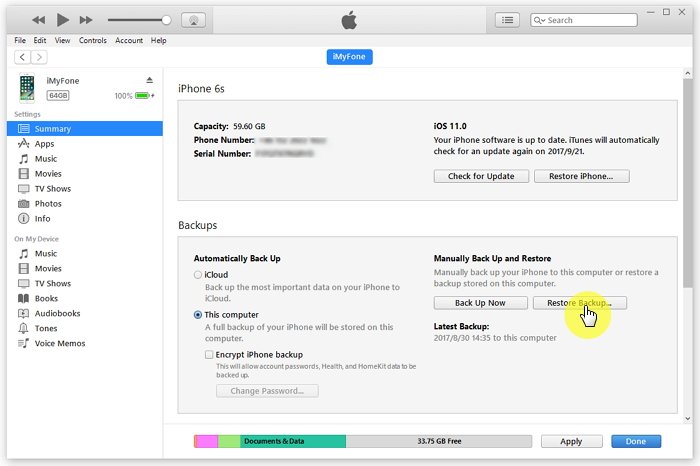
- Click on your iPhone icon when it appears in iTunes, then select “Restore Backup” in iTunes. If you asked to update your iOS device, follow the on-screen guide to update it.
- Choose the most recent backup from the list of relevant iTunes backups. Then click “Restore” and wait for the restore process to complete.
- Keep your iPhone connected to iTunes as it restarts and syncs with your computer.

#3. Disadvantages of Using iTunes in Restoring Backups
The following are the limits to using iTunes to restore new iPhone.
- iTunes causes software overload and can slow down your PC while restoring new iPhone.
- It can accidentally delete your important files such as video, music tracks, photos, document when restoring your iPhone.
- It doesn’t support the transfer of other file formats that are not MP3 and MP4 files.
- You’ll be faced with limited options and may not be able to view the files you are restoring to iTunes.
Part 2. Restore New iPhone from iTunes Selectively and Quickly
iMyFone TunesMate is a great iTunes alternative that can restore your new iPhone better than iTunes with no data/file transfer limitations or restriction. It can transfer iOS data from unlimited iTunes libraries to unlimited iOS devices.
This software can sync iTunes library to the iOS device without overwriting the previous data, rebuild previously damaged or corrupted iTunes library, and transfer various kinds of media files including music, videos, photos, audiobooks, playlists, ringtones, podcasts, and more.
iMyFone TunesMate iPhone Transfer
- iMyFone TunesMate offers you 2-way iOS data transfer between iPhone and iTunes/computer.
- iTunes library transfer or restore can be done without Apple ID or password using iMyFone TunesMate.
- Purchased and non-purchased iOS files can be freely transferred using TunesMate.
- You can preview your iOS files while restoring them to new iPhone.
- You can sync iPhone data without overwriting or erasing old data.
Steps to Restore New iPhone from iTunes with iMyFone TunesMate
Step 1: Download and install iMyFone TunesMate on your Mac or Windows PC. Run TunesMate, and connect your iPhone to your PC using a USB cable.
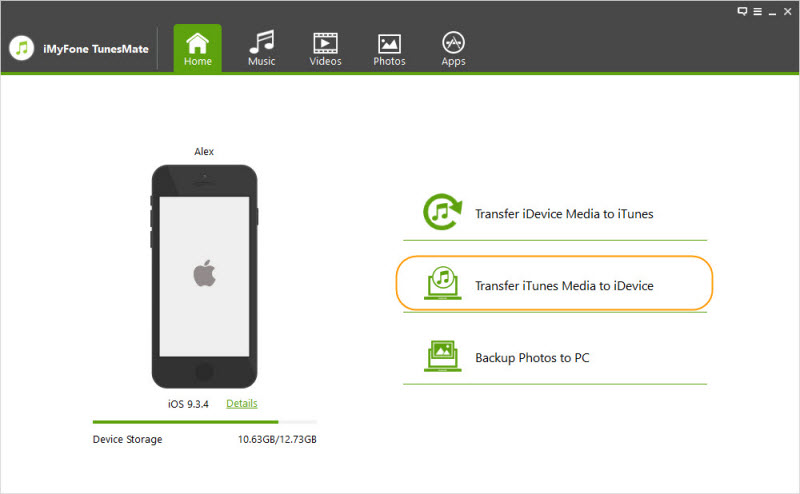
Step 2: Select “Transfer iTunes Media to iDevice” from the home interface. Your iTunes media file library will be scanned, and the list of media files in your iTunes library will be displayed.

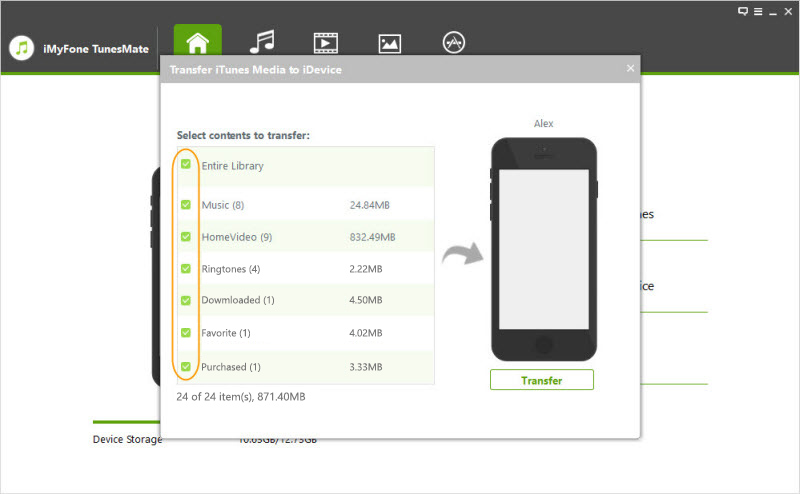
Step 3: Make sure the files you want to transfer is checked, then click “Transfer”. Your iPhone files will be restored at the end of the transfer process.


 June 28, 2021
