You can also read this guide in Français.
Have you ever had the frustration of not being able to move photos from your camera roll to album? You may be interested in “iPhone move photos to album delete from camera roll”. When you try to move them somewhere else, and then delete them on your camera roll, does your device then try to delete them everywhere? Apple’s products can be annoying like this, and sometimes you have to use a third-party application to get around these problems.
How to Move Photos from Camera Roll to Album on iPhone
There are two main ways on how to move photos from camera roll to album effectively. Let’s examine them here:
1. Move Photos from Camera Roll to Album on iPhone (for a large amount)
What is iMyFone TunesMate? It’s a device manager that does everything iTunes can’t and more. It makes it much easier to manage all of the media that you have on your devices running iOS 8 to iOS 14 or later and you can bypass most of Apple’s restrictions and ridiculous anti-features. Basically, it makes using your devices much more simple, the way they should be.
Key Features:
- Transfer iPhone photos (camera roll & photo stream), or albums (not just photos) to computer/external hard drive.
- Delete unwanted photos from iPhone in bulk for free.
- Manage HEIC Photos: View, transfer, or delete iOS 14 HEIC photos.
- Two-Way Transfer: Freely transfer files between iPhone and computer, or iTunes.
- Files supported: camera roll, photo stream, music, video, playlists, podcasts, audiobooks, etc.
Save 20% to Get iMyFone TunesMate Official Coupon Code >>
Steps to Move Photos from Camera Roll to Album on iPhone (iOS 14/13/12 Supported)
Step 1: Move photos from camera roll to computer
- Install TunesMate and launch it. Plug in your device.
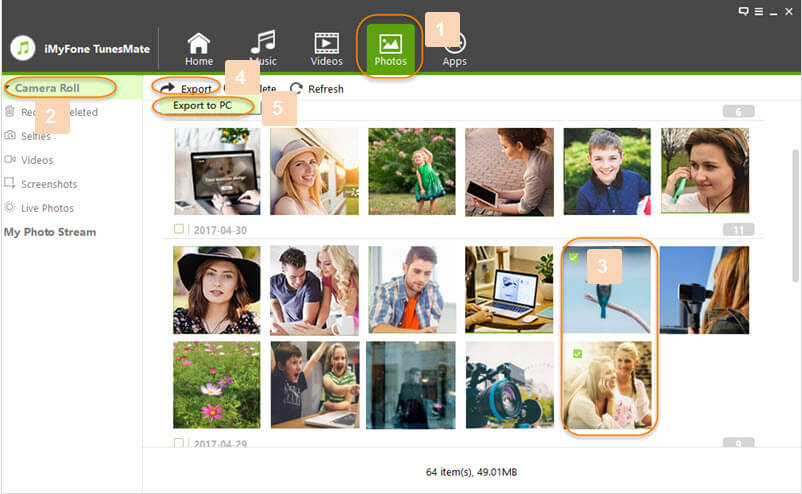
- Click on the “Photos” tab at the top. Open the “Camera Roll”.
- Select the photos that you want to move to album. Hit “Export > Export to PC”.
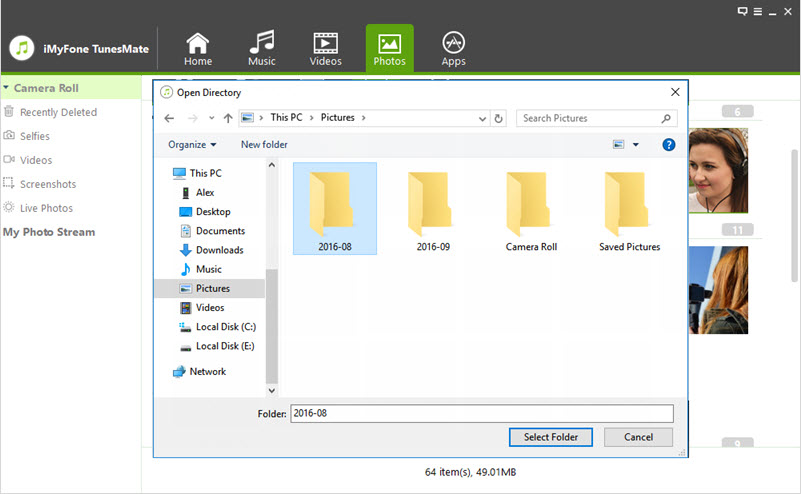
- Choose the folder that you want to save the photos to, or create one.

Step 2: Move photos from computer to album on iPhone
- Go to the left sidebar and right click, then choose “New Album”. Give it a name.
- Open up the new album, then click “Add” then “Add Folder” or “Add File” and then add the photos that you exported before from the Camera Roll.

This will make a new album that has all of your wanted photos on them. Using this work-around, even if you delete your photos from your Camera Roll on your device running iOS 14, they will still remain in that new album. So you can go to “Camera Roll” and delete these photos to free up space.
2. Manually Move Photos to Album on iPhone (for a small amount)
If you want to move some photos to album on iPhone, then you can do it on your phone.
Step 1: On your iPhone, find the “Photo” app and tap it.
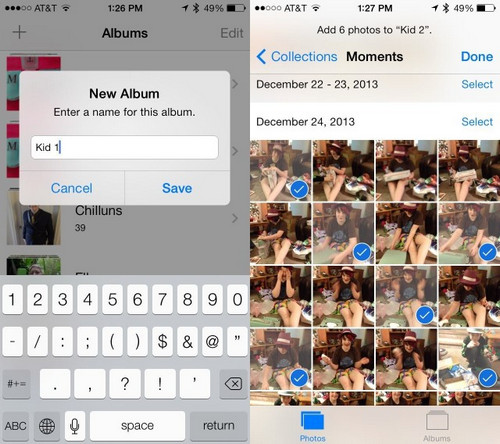
Step 2: Go to “Albums” from the bottom. To create a new album, you can hit “Edit” at the top right corner and then “+” button at the top left corner. Type the album name and tap “Save” and then “Done”.
Step 3: Go into the album you want to add photos from camera roll. Hit “Select” at the top right corner and then “Add” button at the bottom.
Step 4: Select which photos from the Camera roll that you want to add. Hit “Done” when you’re done.

Manually transfer photos to album isn't always the best choice because:
- If you want to transfer more than just a few, you’ll be tapping for ages.
- You can’t really look at your photos closely on those tiny screens.
- It won’t just move the photos, it will copy them to the new album, so they will take up double the space on your device.
- If you delete the original photo from the camera roll, it will delete all the other instances of that photo.
As you can see, it’s not too complicated - if you want to move just a few photos. What happens if you want to move tons of them, though? What happens if you want to preview them more closely or even edit them before you transfer them? This is where iMyFone TunesMate can be helpful.
There are many advantages to using iMyFone TunesMate to move your photos from your Camera Roll to a new album. The biggest of course is that you can do what you want with the original photo - even delete it - and its twin in the new album remains intact. Other advantages include that you can easily save backups of those photos on your computer, and you can easily preview your photos when you’re selecting them. It’s all extremely easy.


 June 21, 2021

