From the beginning, iPhone was meant to be a great music player. It was basically an iPod crossed with a phone, so it needed to have an extensive library of iPhone music formats that would work well. Though Apple isn’t exactly known for its openness, iPhone can indeed handle some specific music formats. What format does iPhone use for music?
What Are Supported iPhone Music Formats?
What music format does iPhone use? While there are limits to iPhones music support, you will find that most of the usual iPhone iOS 13 music formats will work just fine on various apps. Here is a list of them:
iPhone supports the following music formats:
- AIFF
- WAV (a large, but popular format, especially in video editing)
- AAX
- AAX+
- AA
- MP3 (one of the most standard and ubiquitous formats in the world)
- MP3 VBR
- ALAC
- AAC
- Protected AAC (this is the iTunes store format for songs)
- HE-AAC
As you can see, most of the formats that you would encounter on a PC or Mac or most other devices are well represented here.
What’s the Best Music Format for iPhone iOS 13
So what is the best format to use when you put music on your iPhone? The truth is that there is no “best” format, it’s just a matter of what you want to do with your song files.
- For example, MP3 is one of the most common audio formats ever, so if you want your music to be able to play on a wide variety of devices, it wouldn’t hurt to store your music in MP3 format.
- AAC isn’t as common, but it will play on all Apple devices, and it will also play on many modern PC’s as well.
- The problem with both of these file types, though, is that they are lossy files, meaning that they are compressed. If you want a format that is not compressed, WAV is a better option, though the file size is often huge compared to MP3 and AAC.
The recommended iPhone music format for general use would probably be MP3, simply because it has a compact file size and works on just about any device. Of course, this is ultimately a matter of preference.
Free Way to Convert Music Formats for iPhone iOS 13
Sometimes you will need to convert your music files to a different format. Here’s how to do that with iTunes.
1. Convert songs that are already in iTunes library
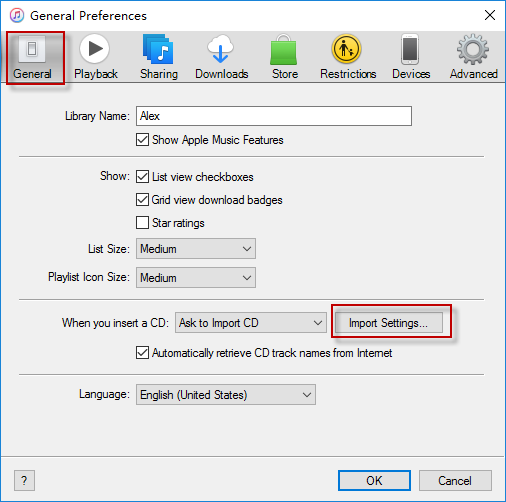
2. Go to “Edit > Preferences” at the top left corner. (If you are using a Mac computer, go to “iTunes > Preferences”.)
3. Click “General > Import Settings”.
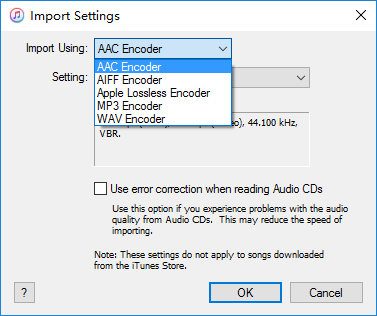
4. From the little menu next to where it says “Import Using”, pick which encoding format you want.
5. Click “OK” to save the settings.
6. Pick which songs you want to convert from your library.
7. Go to “File > Convert”, and then go to “Create [the format you want] Version”.After that, you’ll see the new music file appear in your library next to the original files.
2. Convert songs that are in a folder or a disk
You might also want to convert a song that’s in one of your folders, but not currently in iTunes. Here’s how you do that:
2. Go to “Edit > Preferences”. (If you are using a Mac computer, go to “iTunes > Preferences”.)
3. Click “General > Import Settings”.
4. From the little menu next to where it says “Import Using”, pick which encoding format you want.
5. Click "OK".
Now instead of picking from the library, do this:
6. Hold down “Shift” key (Press “Option” key if you are using a Mac), go to "File > Convert > Convert to [the format you want]".
7. Pick the folder that has the music you want to convert. iTunes will just convert all the songs in that folder.
The original songs and converted songs will appear in your library.
Free Way to Transfer Music to iPhone iOS 13 - For All Audio Formats
Once you convert songs with iTunes, you may want to add these songs to your iPhone so you can enjoy them on the go. If you use iTunes to sync the music , your existing music on iPhone will be deleted as well.
To avoid losing any music, you might want to check out iMyFone TunesMate iPhone Transfer. This is a smart iPhone transfer tool that allows you to transfer music to iPhone from iTunes library/computer without music deletion.
Key Features of TunesMate:
- Freely transfer music to iPhone from computer/iTunes/external hard drive/CDs/music players, etc.
- Extract music from iPhone, including purchases and non-purchases.
- Feature in automatic music converter that will convert incompatible iPhone music formats when transferring.
- Enrich & Share iTunes Library: Enrich iTunes library from unlimited iPhones and share it to friends, even in different Apple IDs.
- Fully support iOS 13 and highly spoken of by well-known media, like Geekreply, tricksworldzz.com, etc.
How to Transfer Music to iPhone Directly from Computer?
You can download its free version and follow to have a try.
Step 1: Install iMyFone TunesMate to your computer and launch it. Plug in your iPhone.
Step 2: When TunesMate detects your iPhone, go to "Music" tab. All your iPhone music will be listed there. Click "Add > Add File."
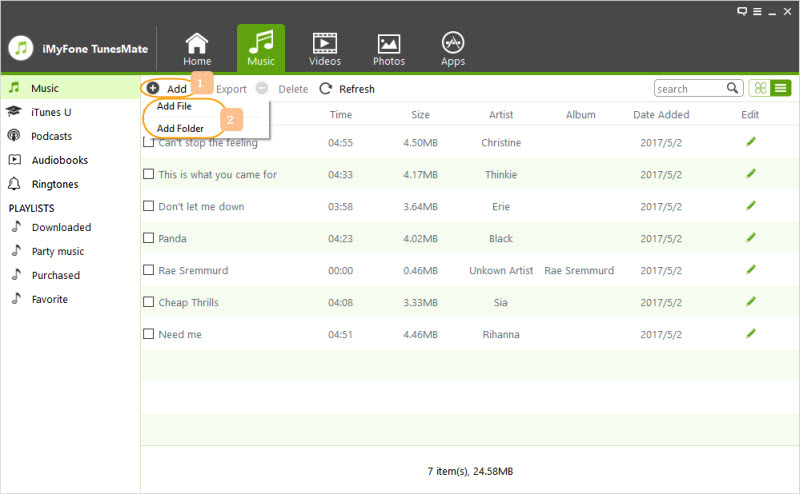
Step 3: Browse and select the music on your computer. Once selected, click on "Open" to transfer.
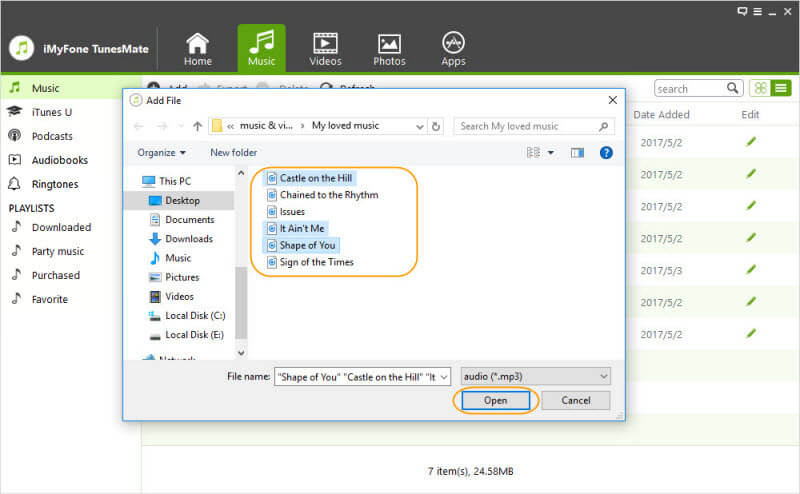
That’s it. As you can see, it’s extremely simple and intuitive. You can open Music app on iPhone to enjoy the newly-added music. Of course, you can sync iTunes music to iPhone by using Transfer iTunes Media to iDevice.
If the music with incompatible formats, TunesMate will automatically convert it to iPhone-supported one when transferring.
Advantages of Using TunesMate Instead of iTunes:
- You won’t lose any of your music files when you transfer, even if you didn’t buy them from the official store.
- iPhone Music formats will be automatically converted to iPhone-supported version. You don't need to convert in advance.
- Even your iPhone is synced with one iTunes libraries, you can transfer music to iPhone from other iTunes/computer without erasing.
- You can edit music info tags and playlists at will.
- It’s easy to use with 1-click transfer or drag-and-drop process, and has a simple interface.
If you want to convert music format for iPhone or transfer music to iPhone and vice versa, then download TunesMate and give yourself some extra freedom.
Note
If you use "Transfer iDevice Media to iTunes" and "Transfer iTunes Media to iDevice" on iMyFone together, you will find that you can share your purchased music with friends
- Step 1: Apply "Transfer iDevice Media to iTunes" to have a large music collection on iTunes from different iPhone/iPad/iPod even signed in different Apple IDs.
- Step 2: Use "Transfer iTunes Media to iDevice" as steps above to sync the large music collection back to different iDevices.


 January 21, 2022
