Apple's most recent iPhone version is still liked by lots of people. Maybe you just got a new iPhone and you intend to transfer all the songs from your old iPhone to the brand-new one? Here, we will show you the easiest method to transfer playlist from your old iPhone to a new iPhone. When it comes to bought songs, you could just log in your Apple ID and download and download tracks to your new iPhone. If you wish to send out non-purchased tracks from one iPhone to another, here is a great tool for you.
Transfer Playlist from Old iPhone to New iPhone with Transfer Tool (iPhone 14/13/12 Supported)
When you got a new iPhone you may want to transfer everything from your old iPhone to your new iPhone running iOS 16, especially transfer your media files like songs, playlist, videos and other files. Are there any convenient ways to perform such a task? Sure. - iMyFone TunesMate iPhone media file manager can help you and make things easier for you. It can help you transfer playlist from old iPhone to new iPhone in just simple steps. It can overcome the restriction of iTunes and give you a better experience.
Main features of iMyFone TunesMate:
- You can transfer playlist from your old iPhone to new iPhone all at once or selectively.
- You can transfer media files between your device, iTunes and computer with simple steps.
- You can also transfer your playlist to other media device like your MP3, external drive and pc.
- You can also transfer those non-purchased files and purchased files to your new device without restriction.
- Available for all iOS devices in iOS 16/15/14/13.
Here’s how to transfer playlist from old iPhone to new iPhone:
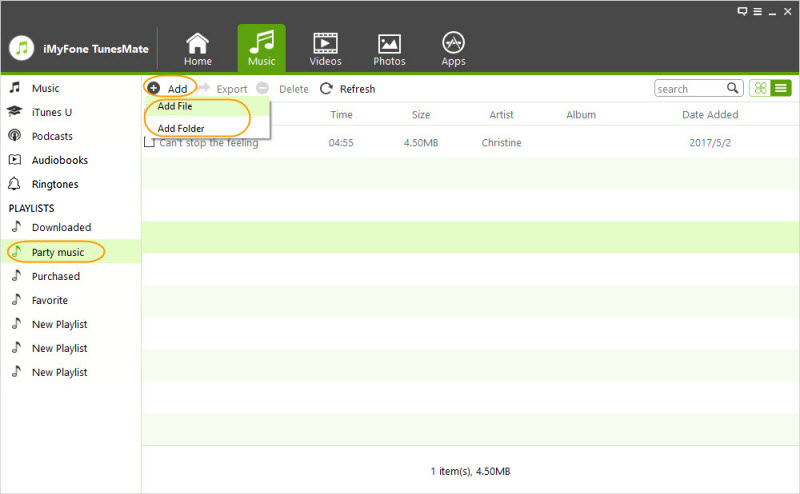
Step 1: Connect your iPhone to your computer and launch the program.
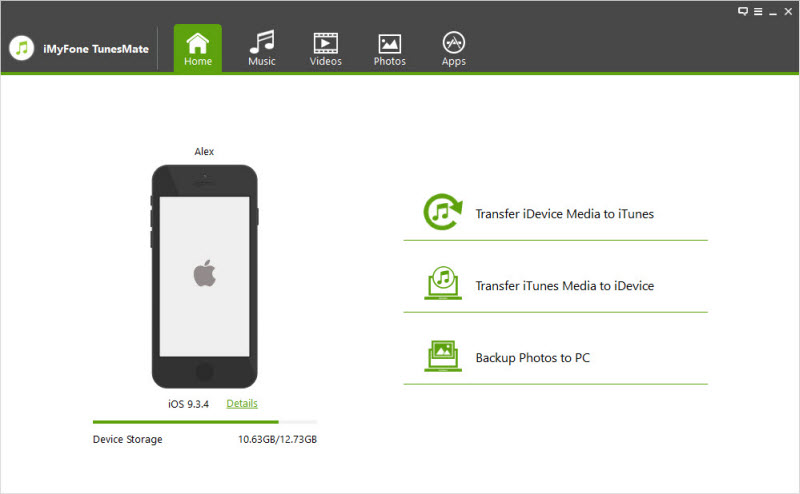
Step 2: Choose Music, and then you can select a playlist under the option and choose the songs you want to copy. You can transfer them all at once or selectively.
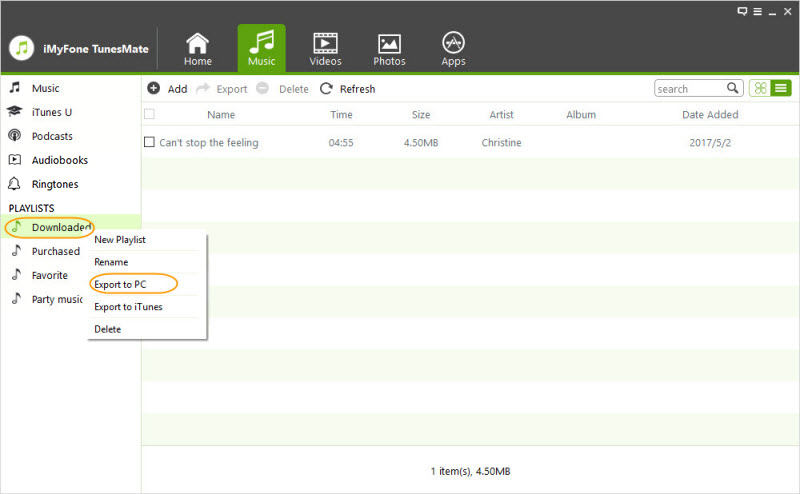
Step 3: Choose one folder on your computer and export the files.
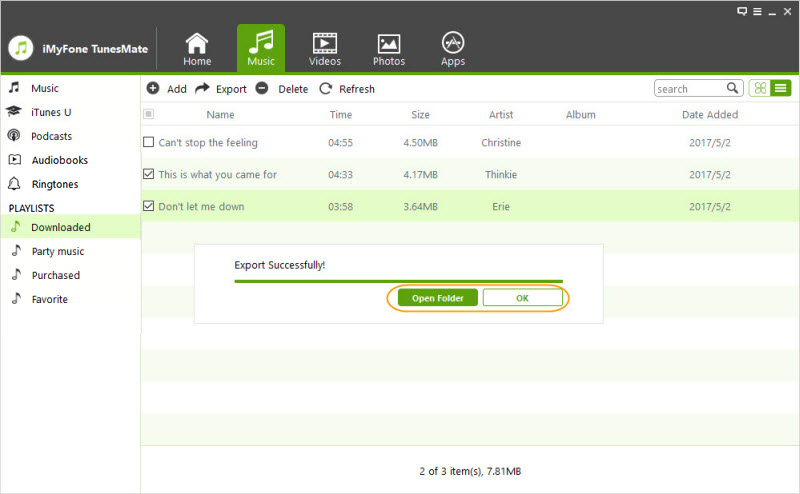
Step 4: Then disconnect your old iPhone and connect your new iPhone to it. Choose Music again, and tap on Add to find the songs you need and add them to it, and then you can transfer them successfully.
Transfer Playlist from Old iPhone to New iPhone with iTunes
Apple iTunes has been redesigned, and also figuring out the new user interface can be a bit difficult. Copying playlists to an iPhone is a bit different depending upon the version you are making use of. Check out how it is done below;
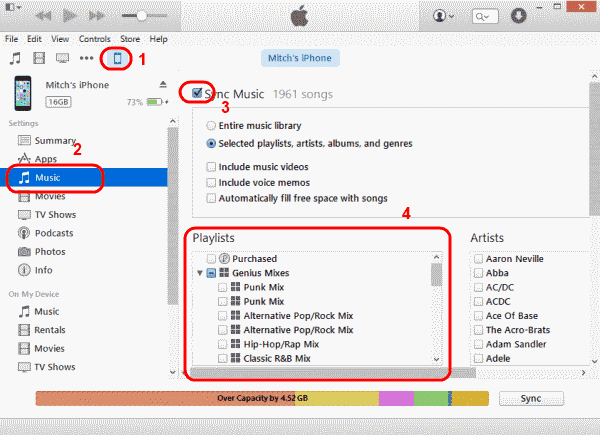
For iTunes 12
- Connect your device to the computer.
- Select the symbol for your gadget, situated at the upper-left portion of the screen.
- Select the "Music" choice on the left pane.
- Select the "Sync Songs" check-box is picked. In the "Playlists" area, check the playlists you desire to sync with your iPhone gadget.
- Select "Sync" and your playlist should sync.
For iTunes 11
- Connect your gadget to the computer.
- Click your gadget switch at the upper-right section of the screen.
- Select Contribute to ... This will make a materials food selection offered on the ideal side.
- Select "Playlists" at the top of the display.
- Drag any kind of playlist from the left side to the right side.
- Click "Done", after that select the "Sync" switch in the reduced right edge of the screen to sync your adjustments.
You have actually successfully moved a playlist to your Apple tool.
Transfer Playlist from Old iPhone to New iPhone with iCloud
Follow the steps in this section to back up your previous device in iCloud and to move the back-up to your new gadget.
- Make an iCloud backup
- Connect your previous iPhone to the Web with Wi-Fi.
- Go to Setups > [your name] > iCloud > iCloud Backup. If you're making use of iPhone 10.2 or earlier, go to Settings > iCloud > Back-up. Ensure that iCloud Backup is turned on.
- Click Back Up Now. Stay connected to Wi-Fi until the process finishes.
Transfer your iCloud backup to your new gadget:
- Turn on your new device. A "Hello" display needs to appear. If you've already established your new device, you need to erase it prior so you can follow these steps. Stay connected until you see the Wi-Fi display.
- Touch a Wi-Fi network to sign up with. Follow the steps until you see the Apps & Data screen, after that touch Restore from iCloud Back-up. Check in to iCloud with your Apple ID as well as password.
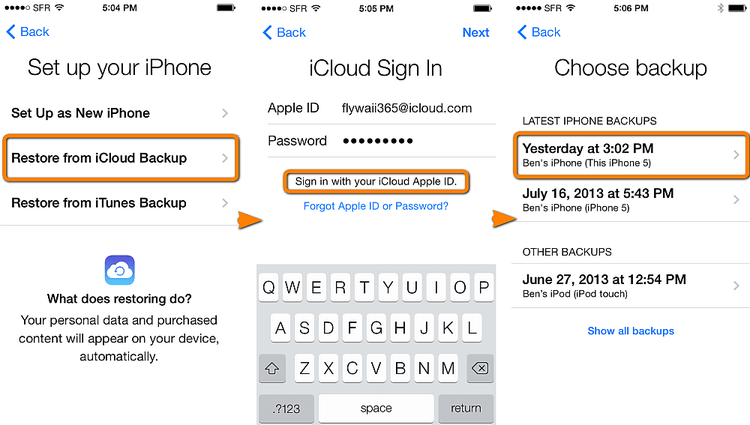
Stay connected and waits on the recover process to complete, and then finish the remainder of the onscreen configuration steps. Erase any data left after transferring from iCloud to your device by going to Settings > General > Reset > Eliminate All Material and also Setups. This will certainly erase any kind of data that's presently on your device. After you remove it, your iPhone restarts as well as the "Hello" display appears and you are good to go.
Transfer Playlist from Old iPhone to New iPhone with AirDrop
AirDrop is a powerful tool for sharing files between iPhones, and can also be used to share playlists and music. To use AirDrop to share music, both you and the recipient need to have AirDrop enabled on your iPhones. Once you've both enabled AirDrop, follow these steps to share music:
- Open the Music app on your iPhone and find the song or playlist you want to share.
- Tap on the "Share" icon.
- Select "AirDrop" from the list of options.
- Choose the recipient's iPhone from the list of AirDrop-enabled devices that appear.
- Tap "Send" to share the music.
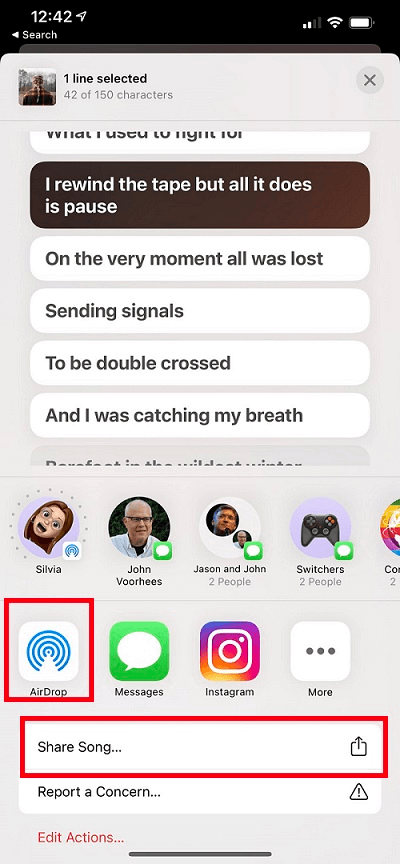
When the recipient receives the music, they won't receive the actual file. Instead, they'll receive a link to the song or playlist. When they tap on the link, it will launch the Music app on their iPhone, allowing them to access the file on Apple Music.
To transfer playlist from old iPhone to new iPhone with iTunes, without iTunes or with iCloud is as straight up as the above if you could follow the steps. Obviously, the easiest way to do so is to perform it with the transfer tool, which is easy to operate and time-saving.


 April 17, 2023

