Most smartphone users choose to have their own unique ringtone. The only issue is that unlike Android phones, making ringtones for iPhone isn’t a simple task. Go ahead and take a look at the iTunes Store – you’ll quickly realize that you have to buy most of the custom ringtones. Fortunately, we are going to be showing you how to create your own custom ringtones on iTunes for free – so let’s jump right in!
How to Make Custom Ringtones on iTunes for Free
In this first method, we are going to be focusing on iTunes. We’ll discuss why later in this article, although we don’t recommend using iTunes for making your own iTunes.
Step 1. Launch iTunes on your computer, and drop the music file that you want to turn into a ringtone onto the iTunes library (Or you can apply the feature in “File > Add File to Library”).
Step 2. Right-click on the song and then select the “Get Info” option.
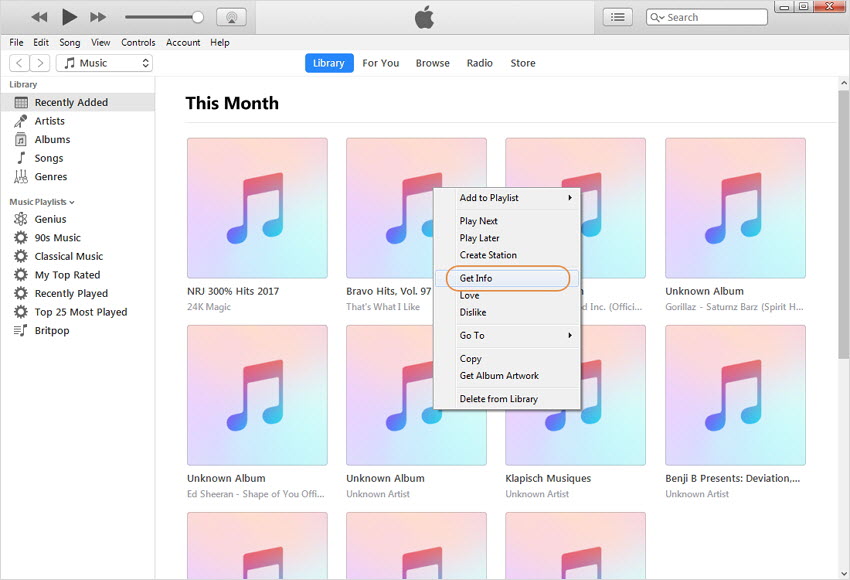
Step 3. Click on the “Options” tab and from here, customize the track by setting the Start and Stop time. (Note that you should aim to have your ringtone at roughly 30-40 seconds long.)
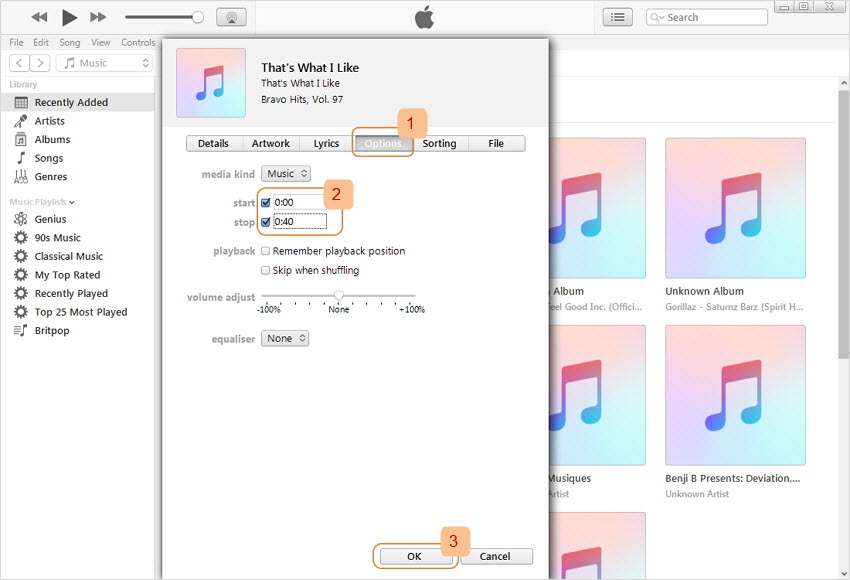
Step 4. After customizing the music, click “OK” and it will be saved as such.
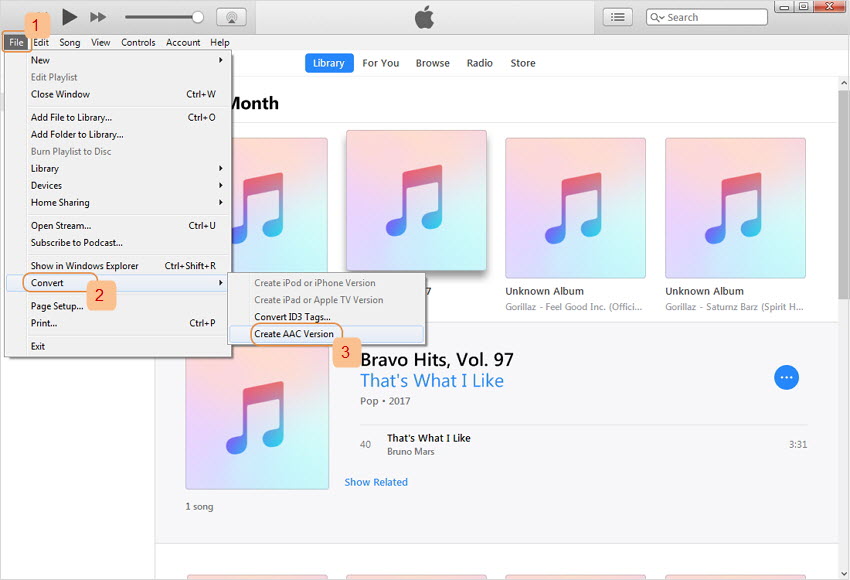
Step 5. Click on the song to select it, and go to “File > Convert > Create AAC Version”.
Step 6. Right-click on the newly created AAC file and click on “Show in Windows Explorer” (if you use a Mac, select “Show in Finder").
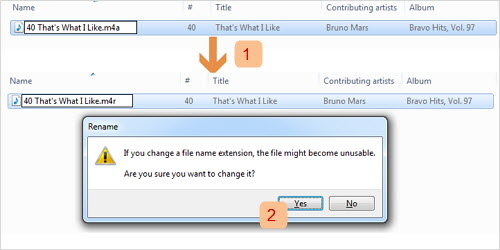
Step 7. The new song will be shown in your Windows Explorer. Rename the track’ extension from .m4a to .m4r.
Step 8. From the pop-up window, click Yes to confirm the changes. (If you are using a Mac, choose “Use .m4r” to confirm.
Step 9. Go back to iTunes , right-click and delete the newly created AAC song. Respectively click “Delete Song” and then “Keep File” from the pop-up windows.
Then Sync the Created Ringtone to Your iPhone 6
Following these steps will quickly create a ringtone that you are happy with and which you made on your own. After creating it, it’s time to transfer it.
- Go back to Finder or or Windows Explorer, and double click on the .m4r file you created. This tone will be automatically moved to your iTunes library.
- Connect your iPhone to iTunes.
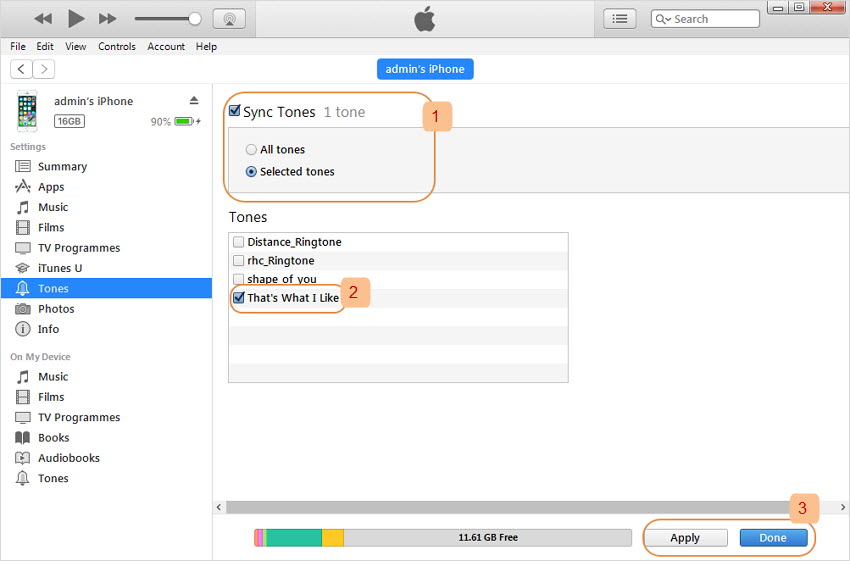
- Click Device tab from the upper left corner, click on the “Tones” option on the left menu.
- Check “Sync Tones” and select the tone you created just now.
- Click on “Apply” to begin syncing.
Cons of Using iTunes:
- You cannot set up the start and stop time while listening the song. You can preview the songs and record when to start and stop the ringtone in advance.
- You can preview the ringtone to see it’s correct or not before you save it.
- Even though this will be the most convenient method for a lot of iPhone users, it doesn’t give you a lot of customization over your ringtones and more importantly, if you have any other ringtones on your iPhone then they’ll be removed upon syncing.
- It still lacks of ringtone customization.
How to Make Ringtones for iPhone 6 without iTunes(iOS 13/12 supported)
If you are fed up with iTunes, you can also use iTunes alternative called iMyFone TunesMate iPhone Manager. To make ringtones, it offers you one-stop solution to create ringtones and transfer ringtones to iPhone without erasing the existing tones. It also offers you two-way transfer that you can even extract your custom ringtones from your iPhone and share them with your friend’s device.
Advantages:
- It allows you decide the precise section for ringtone while listening the song.
- You can preview the created ringtone before you save it.
- You can make ringtones from any songs, on computer or in iPhone.
- Syncing ringtone to your iPhone won't cause any data loss.
- Extracting purchased and non-purchased ringtones from iPhone to computer is easy.
How to Easily Create Ringtones for iPhone 6 without iTunes(iOS 13/12 supported)
Step 1. Make sure you have the iMyFone TunesMate manager on your computer and connect your iPhone.
Step 2. Choose Music tab from the top bar and then Ringtones. Choose Ringtone Maker tab.
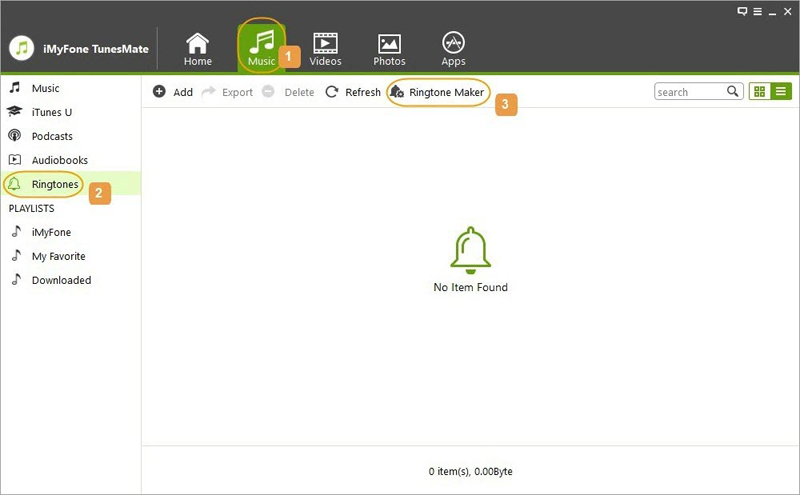
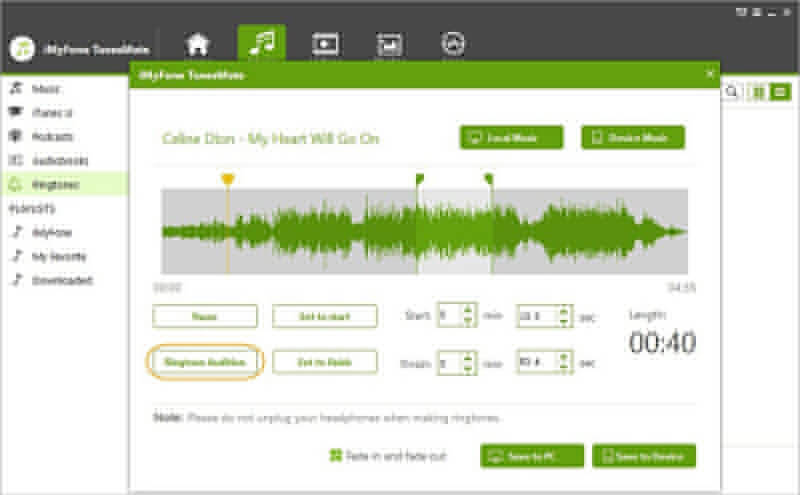
Step 3. TunesMate will play the song from start to end. While listening, you can use the "Set to start" and "Set to finish" buttons to determine the tone.
Step 4. After you are happy with the ringtone, click on “Save to Device” and it’ll be transferred to your iPhone. Or click on “Save to PC” and you can select a folder to store it on your computer.
Note: You can also use the Ringtone Audition to preview the ringtone before you save it.
Key Features of iMyFone iPhone Manager
- Transfer to/from iPhone: Transfer files to iPhone from computer, iTunes library, external hard drive and more; Extract files from iPhone, including purchases and non-purchases.
- Transfer to/from iTunes: Enrich your iTunes library from unlimited iOS devices (even in different Apple IDs); Sync iTunes library to iPhone without deleting data.
- Smart Management: Manage files in the right way, like to export, import, delete, add, rename, edit, etc.
- All Media Files Supported: It can transfer or manage music, movies, playlists, photos, albums, podcasts, audiobooks, ringtones, etc.
- Full Compatibility: It's compatible with all iOS versions and devices. Besides, all audio and video formats are supported.
There is no doubt in our minds that if you check out iMyFone TunesMate for yourself then you’ll quickly realise that this program is essential for iOS data management. Even if you have no interest in learning how to make ringtones for your iPhone(iOS 13/12 supported) , you should definitely download this program.
How to Set Up Custom Ringtones on iPhone 6 (iOS 13/12 supported)
Now that you’ve created a ringtone and you have transferred it to your iPhone, it’s time to change your iPhone’s ringtone settings.
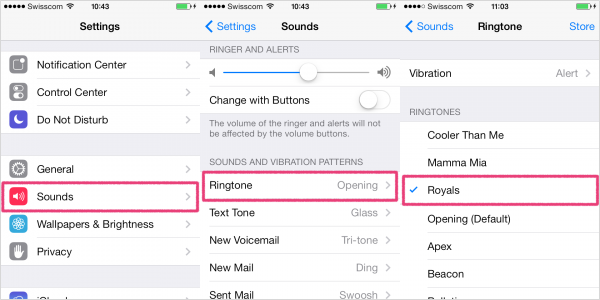
Step 1. Unlock your iPhone and tap on the “Settings” app.
Step 2. Swipe down and tap on “Sounds”, and then swipe down to the ringtone settings.
Step 3. Tap on “Ringtone”, or any other ringtone options, and tap on your newly created custom ringtone.
It’s that simple – using either of the methods that we’ve discussed in this article (preferably iMyFone TunesMate) to create your own ringtone will provide you with a truly unique iPhone.


 November 26, 2021
