AirDrop is a very useful service that comes with the Apple ecosystem. Instead of using physical media or email, you can simply transfer files using your WIFI network. While Apple isn’t unique in implementing this kind of feature, it can still be very useful, especially if you use more than one Apple product.
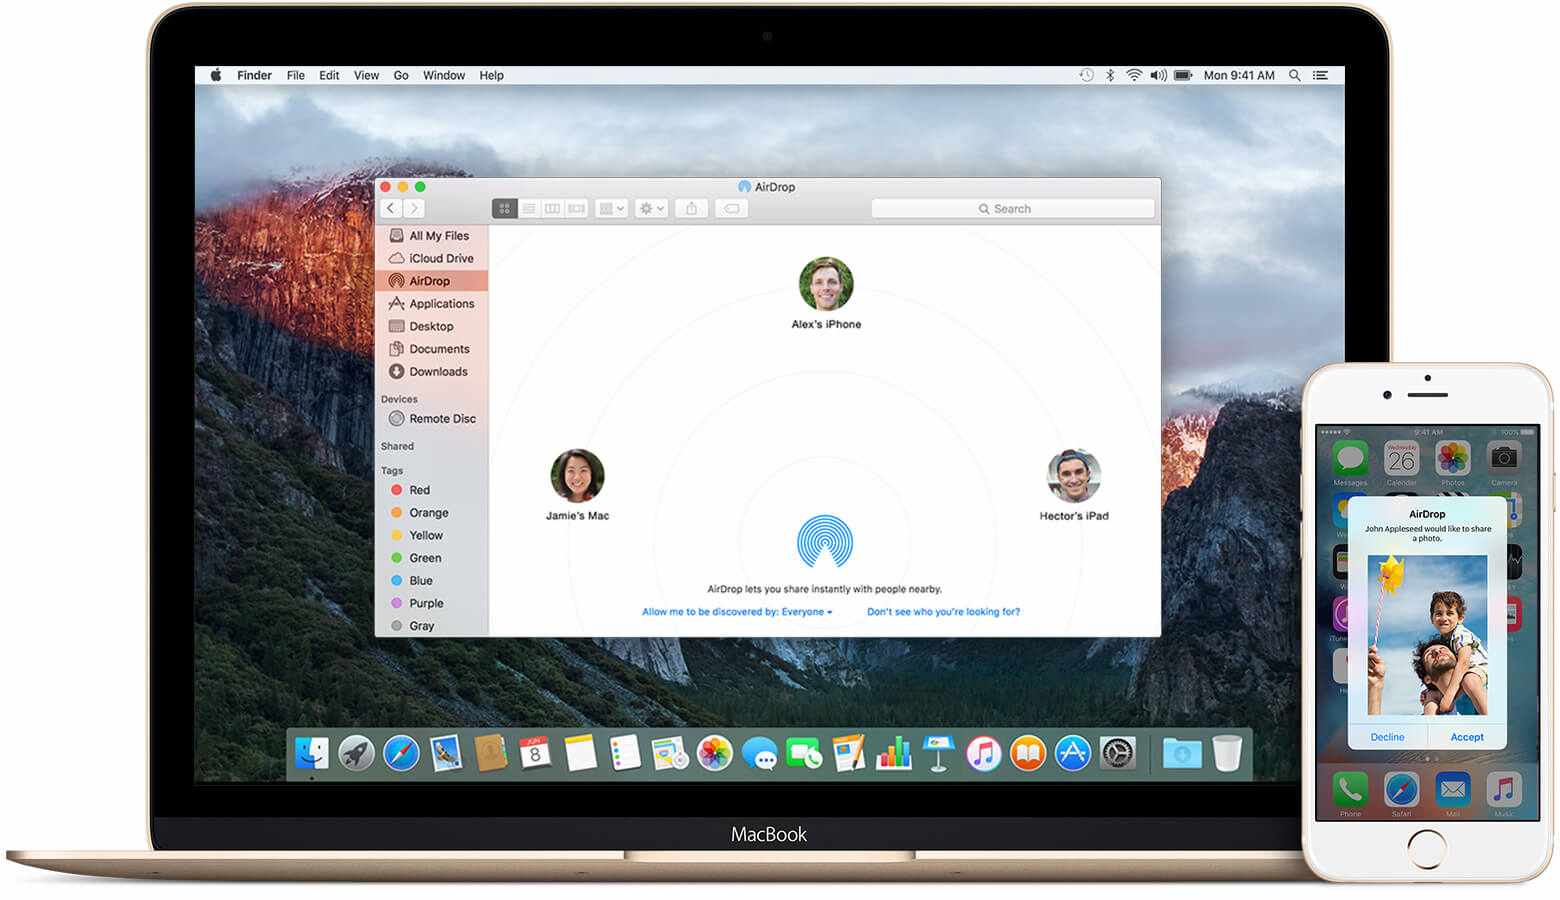
If you’re not sure how to AirDrop your files from your iPhone to your Mac, take a look at the instructions below:
Check If Your Devices Support AirDrop
First of all, you need to make sure that your devices even support AirDrop in the first place. There are system requirements for iOS-to-Mac transfers for both platforms.
Your iPhone must be running iOS 8 or later. Your Mac must be running OS X Yosemite or later. Also, it must be:
- A Macbook Air or Macbook Pro from mid-2012.
- An iMac or Mac Mini from late 2012.
- A Macbook with a 12-inch retina display from 2015.
- A Mac Pro from late 2013.
- A model of Mac that is later than all the previously listed ones.
You can also check to see if your mac supports AirDrop by clicking on the Go menu in OSX and seeing if AirDrop is listed as an option there.
How to Airdrop from iPhone to Mac
If you determine that you can indeed use AirDrop with your iPhone and Mac, here is how you can do it:
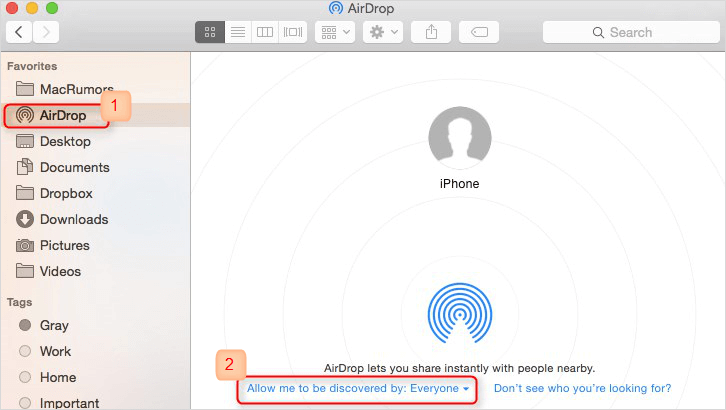
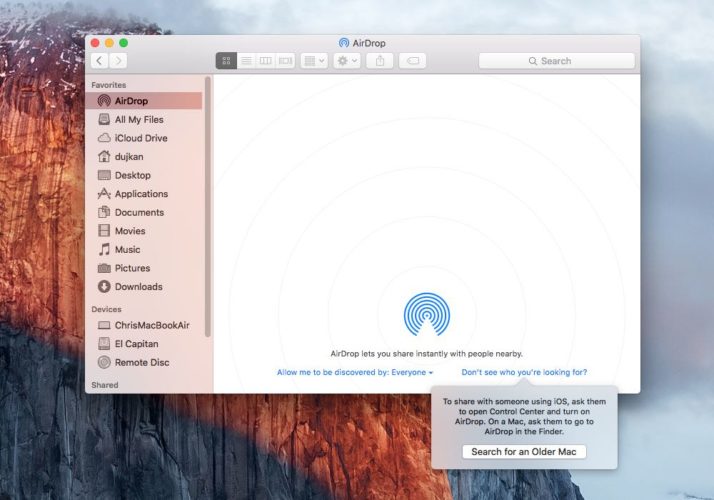
Step 1: Make sure your WIFI is on on your Mac, then go to Finder and click where you see AirDrop.
Step 2: Select “Allow me to be discovered by everyone.” (Or you can also just set yourself to be discoverable by “contacts only”.)
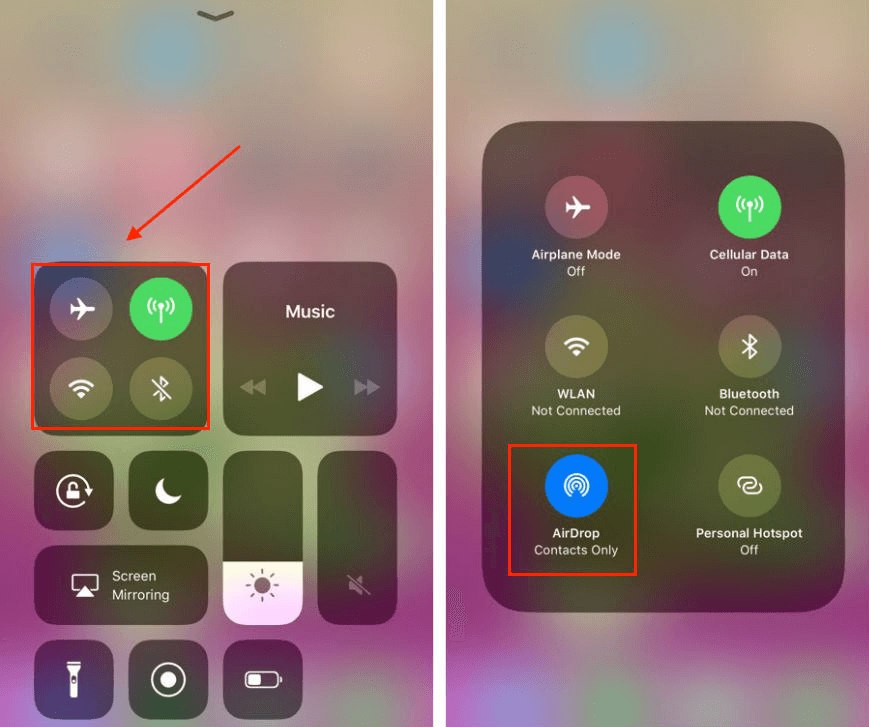
Step 3: AirDrop should already be enabled on your iPhone if you turn on WIFI and Bluetooth, but just in case it’s not, go to your control center and long-press on the networking module (that has the WIFI symbol, the airplane symbol, etc). A window will then come up that has an option for you to enable AirDrop. Enable it and set it to be open to Contacts Only or to Everyone.
Step 4: When you see the Mac listed after a few seconds, tap on it to start sharing data to the Mac.
7 Common Problems with Airdrop and How to Fix Them
Here are some tips if you’re having problems with AirDrop:
1) Airdrop not showing up in control center
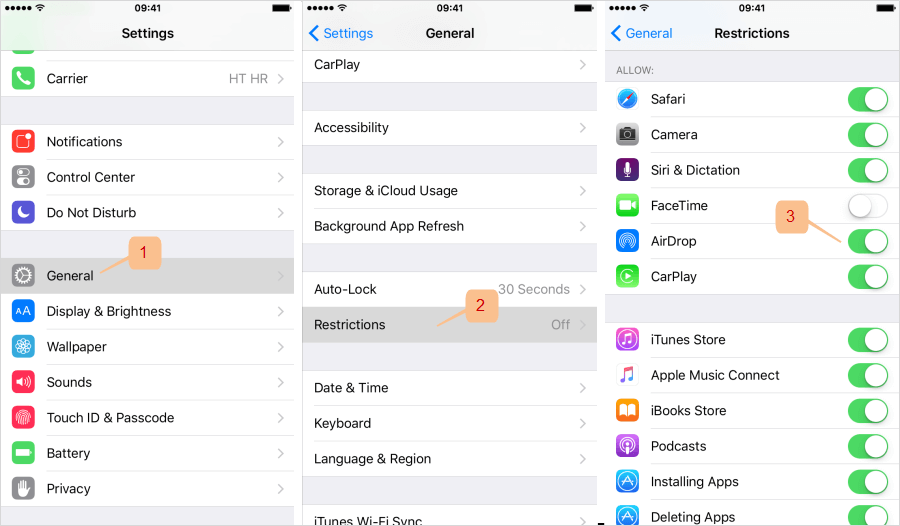
If you are not seeing AirDrop in your control center on iPhone, double-check first of all that your iPhone is indeed compatible. Also, there may be parental restrictions on your phone that have disabled AirDrop. Go to Settings > General > Restrictions and use the passcode to turn off any restrictions for AirDrop service.
2) Airdrop not showing up in Finder
If you’re sure that your Mac is compatible, then disabling then re-enabling AirDrop might help if it is not showing up in Finder or anywhere else. You can do this by opening up a terminal and typing:
defaults write com.apple.NetworkBrowser DisableAirDrop -bool YES
Press enter. After that, type:
defaults write com.apple.NetworkBrowser DisableAirDrop -bool NO
Press enter again.
Now look to see if AirDrop is listed in Finder.
3) Your Mac can't find the iPhone
Make sure that your network is working correctly. Check the router and your computer’s adapter. Restart both devices to try. Make sure that AirDrop is enabled on both your devices, and set to be discoverable by everyone.
4) Can't AirDrop music
Sometimes, for copyright reasons, you won’t be able to AirDrop music. The native Music app simply won’t AirDrop music files. If it’s a third-party app, talk to the developer and see if you can AirDrop the files from that app and how you should do it.
Or you can use the professional iMyFone iPhone Transfer tool to airdrop music freely between iPhone and Mac, including purchased iTunes music or free-downloaded songs. It's recommended by lots of profession software review website, like getintopc.com, tricksworldzz.com, crunchytricks.com, etc.
5) Multi-file transfers failing
If you’re getting an error “Cannot receive all of these items at the same time”, then it means you tried to transfer more than one file type together. With AirDrop, your files need to be the same type if you’re sending them all at the same time. For example, transfer all of your .DOCX files at once and then in a separate transfer, you can send your .TXT files.

6) AirDropping to an older Mac
If your Mac is older, you may need to switch to legacy mode before you AirDrop. You can do this by clicking the “Don’t see who you’re looking for?” link in AirDrop on your Mac, then clicking “Search for an Older Mac.”
7) Other issues
If you’re having other problems and that you can’t get around, then you may want to try a versatile AirDrop alternative: iMyFone TunesMate. This is iPhone transfer software that can help you transfer all kinds of files easily between iPhone and computers, and between iPhone and iTunes.
Key Features:
- Transfer almost any kind of file, including music, movies, photos, videos, playlists, albums, podcasts, audiobooks, and more.
- 1 click to airdrop all media files from iPhone to iTunes (it support multi-file transferring).
- Airdrop media files from iPhone to Mac, or from Mac to iPhone, including purchases and non-purchases.
- Airdrop files even in different networks and different Apple IDs.
- It's recommended by lots of profession software review website, like getintopc.com, tricksworldzz.com, crunchytricks.com, etc.
Airdropping Files from iPhone to Mac just 3 Steps Away :
Step 1: Download and install TunesMate to your Mac. Plug your iPhone into your Mac and open up TunesMate.
Step 2: In TunesMate’s main screen, you can head to “Transfer iDevice Media to iTunes” and transfer all the media files from iPhone to iTunes library at once. Or you can choose tabs at the top with different file types—for example, Photo, Music, and Video. You can click on one of the tabs to see the files of that type that are on your device.
Step 3: Simply select which files you want to transfer and click Export > Export to Mac. Browse for the place on your hard drive where you would like to drop the files and click Select Folder.
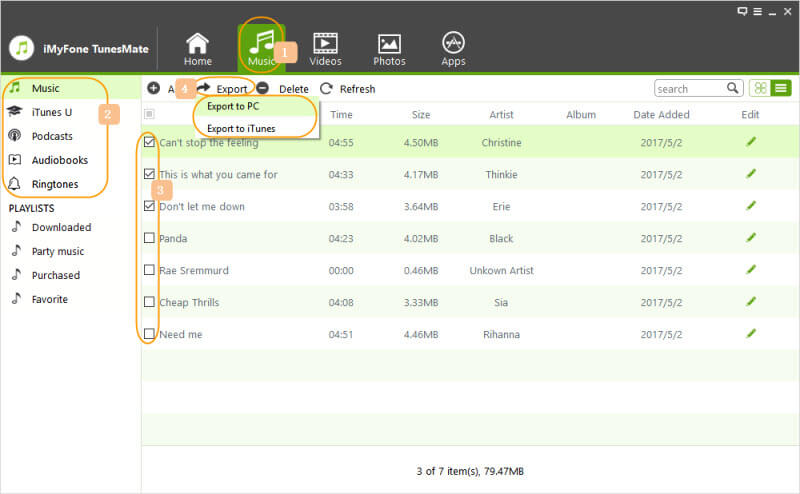
As you can see, this is a lot easier. You don’t need a network connection and it’s also less prone to bugs and issues than AirDrop. TunesMate also works with nearly all modern Macs and iOS devices.


 June 28, 2021
