You can also read this guide in Français.
For various reasons you may want to transfer media from iPhone to PC. Maybe you would like to back up individual files, or you simply feel that you can manage them better on your computer. Maybe you downloaded some files on your iPhone and now you want to edit them using your PC’s software. Whatever the reason, there are different ways that you can go about doing this, and each one has its advantages and disadvantages.
How to Transfer Media From iPhone to PC/Mac With iTunes
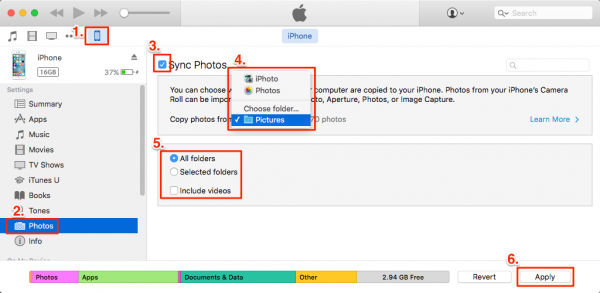
The first method that most people think of is to simply use the native iTunes application to interface with their device and transfer media from iPhone to PC. This can be done in just several steps. Here we take transfer photos for example:
- Run iTunes on your computer and wait for it to load.
- Connect your device via USB to your computer.
- Tap “Device” tab and click “Photos” tab at the left-hand side menu.
- Check “Sync Photos” and choose where you want to sync photos, like iPhoto, Photos or specific folder.
- Hit “Apply” button at the bottom.

This is all very simple, but there are a few problems that you might encounter when using iTunes to transfer media from iPhone to PC or vice versa. The biggest of these issues is freedom. Apple’s software is inherently restrictive, especially if you’re trying to transfer music. You may not be able to transfer certain files back and forth, and even if you can, you may not be able to do much to manipulate them if you need to. For example, iTunes will not automatically convert your files into a usable format when you transfer media from iPhone to PC.
How to Transfer Media From iPhone to PC/Mac Without iTunes
iPhone media transfer without iTunes is ever more simple than with iTunes. Many times, third-party software such as iMyFone TunesMate — which basically replaces iTunes—loads faster, is less bloated, and offers more functionality than iTunes. TunesMate can transfer music, video, photos, movies, audio books, contacts, and many other kinds of data easily.
It also has extras like the ability to convert files that makes it a huge step ahead of iTunes. Best of all, you can bypass many of iTunes restrictions and transfer files that you may have otherwise been unable to. You can share purchased music with different Apple ID’s and you can transfer these files back and forth between devices.
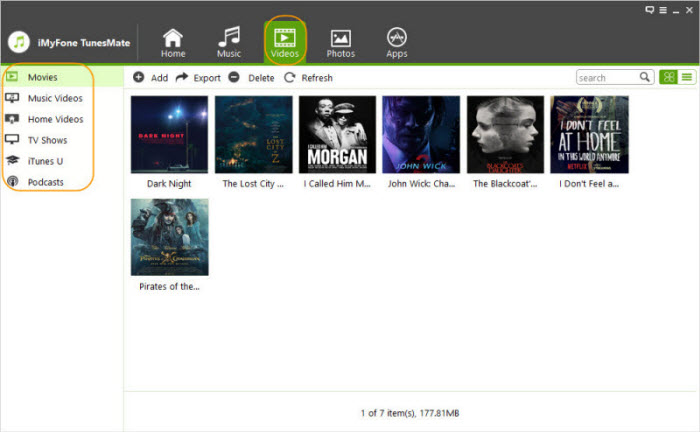
The interface of TunesMate is also very simple and easy to use. You can get everything done within a few minutes and a couple of clicks. Here are the steps to transferring media from iPhone to PC:
Step 1: Download TunesMate first on your computer and then install it. Run it and connect your device to it using a USB cable.
Step 2: Hit “Media” tab at the left-hand side menu. At the top, choose the media type you would like to transfer.
Step 3: After that, you should see a list of files appear on the screen. From there, you can select individual files. Next you can click “Export to” and choose a destination folder to send the files. Once you have transferred the files, be sure to check the destination folder just to make sure that you did everything right.

It’s as simple as that. As you can see, this method is more advantageous than simply using iTunes because you have a lot more control over what you can transfer from your device. If you really want a good device manager that lets you do what you need to do, try iMyFone TunesMate.


 June 28, 2021