Have you ever been so excited to show the moment on your phone screen to others but could not.Because it's your iPhone and you do not know how to screenshot on iPhone?
In many cases, we wish to share our favorite videos, conversations on social networks such as Facebook or Twitter, high scores from games, etc. with our loved ones. If you wish to do so and need knowledge about taking a screenshot on an iPhone without a keypad, then this article is going to be very helpful for you.
- How to Screenshot for iPhone with Keypad?
- With Face ID (iPhone X to later)
- With Touch ID and Side Button (iPhone 6s to iPhone SE)
- With Touch ID and Top Button (iPhone 4 to iPhone 6)
- How to Screenshot for iPhone without Keypad?
- Recommended Screenshot App for iOS
- How to Batch Processing Picture?
- FAQs about Screenshot on iPhone
How to Screenshot for iPhone with Keypad?
There is no rocket science involved in taking a screenshot on iPhone models. Rather, it is just a matter of tips and tricks and depending upon the model, the resolution of an iPhone screenshot may differ accordingly. While having a keypad, here are a few ways you can screenshot on your iPhone.
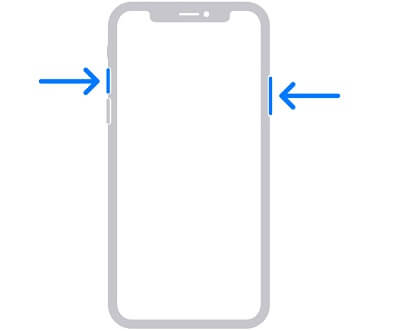
With Face ID (iPhone X to later)
Starting with the Face ID method, here is all that you have to do to take a screenshot on your iPhone.
- Hold down both the volume up button and the side button at the same time.
- Release both buttons quickly and simultaneously. The screenshot is taken.
- As you screenshot, a temporary thumbnail appears on the screen in the lower left corner. It can be closed by swiping left on it or it can be opened by tapping on it.
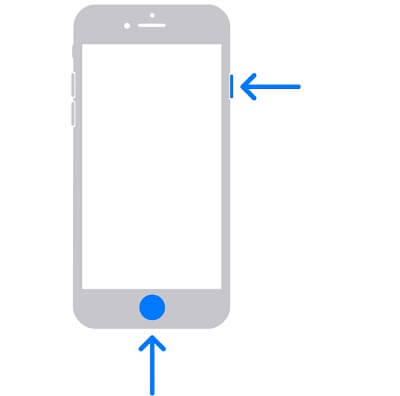
With Touch ID and Side Button (iPhone 6s to iPhone SE)
- Press the home button and side button simultaneously.
- Release both buttons quickly and simultaneously. The screenshot is taken.
- As you screenshot, a temporary thumbnail appears on the screen in the lower left corner. It can be closed by swiping left on it or it can be opened by tapping on it.
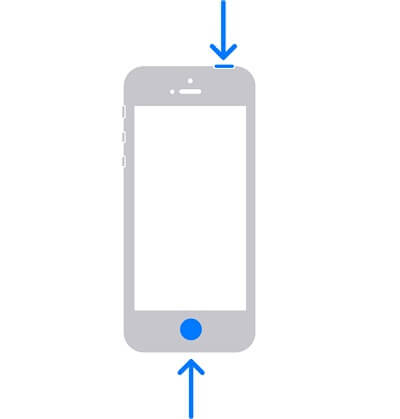
With Touch ID and Top Button (iPhone 4 to iPhone 6)
- Press the home button and top button simultaneously.
- Release both buttons quickly and simultaneously. The screenshot is taken.
- As you screenshot, a temporary thumbnail appears on the screen in the lower left corner. It can be closed by swiping left on it or it can be opened by tapping on it.
How to Screenshot for iPhone without Keypad?
It may seem difficult to take a screenshot on an iPhone without using the keypad. But again, we have got you. How to screenshot on iPhone without a keypad is no longer a problem with assistive touch. All you have to do is to turn on the assistive touch. But how to turn it on? We have got some step-by-step guides for various methods to turn on assistive touch for screenshot on iPhone:
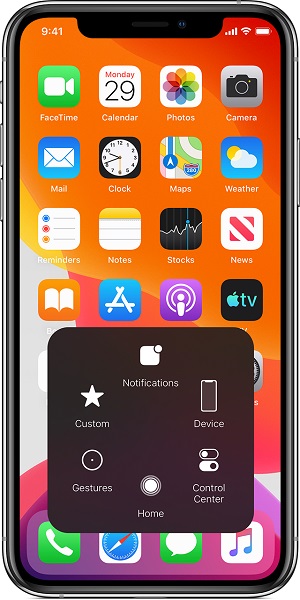
- Set Assistive Touch to On in the settings > Accessibility.
- Turn on Assistive Touch using “Hey Siri”.
- You can enable Assistive Touch by going to Settings > Accessibility > Accessibility shortcut.
Recommended Screenshot Apps for iOS
Taking a screenshot on iPhone has never been so easy. Lately, people got confused about how to screenshot on iPhone. Screenshot without keypad has been much like magic for many of the new users.
But nowadays, with the introduction of some amazing apps and software, nothing is difficult. Although screenshot on iPhone has never been difficult, it has become much easier with these apps.
Here we recommend some amazing apps that you can use to take a screenshot on your iPhone.
Awesome Screenshot
Awesome Screenshot is a free extension for browsers and enables to take screenshots, screen recording, annotations, creating custom shapes etc. you can capture all visible portions or selective areas on your screen. It can capture desktop screens and can support horizontal scrolling as well. Cropping, scrolling, and blurring certain sections to hide are some other features of awesome screenshot.
Screenshot - Frame Maker

Screenshot - Frame Maker is another amazing app to take screenshot on iPhone. It adds quality and an elegant touch to your screenshot pictures. A beautiful frame is automatically added to your pictures with this Screenshot - Frame Maker app. With this app, you can share your screenshot pictures with others - be it a single picture or in bulk. It proves to be helpful for all the users dealing with screenshots including designers, developers, bloggers, reviewers, artists etc.
Screenshot Maker Pro

With its amazing features, Screenshot Maker Pro makes screenshots even more beautiful. Your iPhone screenshots will be framed while you use this app. It has several features such as display reflection, shadow, 3D background, ground reflection. Taking a screenshot using this app, you can also process it further by PhotoShop since it outputs in the .PNG format.
How to Batch Processing Pictures?
Batch processing pictures in an iPhone or any other phone generally requires a separate app. If you are up to batch editing some pictures, or more specifically screenshot pictures, there are a very few apps that would really work to batch process.

Rather, you will find various apps that will process your pictures individually. On the other hand, if we talk about batch deleting screenshot pictures in an iPhone, you can simply do so by going to the screenshots album in photos where you can easily batch delete all the screenshots by hitting the select button and select all.
FAQs about Screenshot on iPhone
1 Why screenshot pictures are vague?
The screenshots taken on the iPhone are never blurry. Rather they are saved as a lossless file format i.e. .PNG. If you see a vague screenshot on an iPhone, it means that you took a screenshot of the image that was originally blurred. The .PNG file may also convert into a different format if forwarded to anyone, and this could create blurry images. Or you may need sto check the picture with your reading glasses on as well.
2 How to scrolling screenshot on iPhone?
Taking a scrolling screenshot on an iPhone is no problem. Just take a normal screenshot and tap the preview before it disappears. From the top right corner, choose the “Full Page” option. Before saving, you can use markups, preview all the pages, edit, and much more. Again, there are two options available - tap either the share button from the top right corner or choose “Done” in the top left to save it into your screenshot folder depending upon your purpose of taking the screenshot.
3 How to recover screenshot pictures?
Mistakes are a common part of our everyday lives. If you ever mistakenly or purposefully deleted a screenshot and want to recover it, here is a quick way to recover iPhone screenshots. Just open photos on your iPhone and look for “Recently Deleted“ album. This is where you can look at all the deleted files. Now tap on the “Select” option and choose the ones you need to recover. Tap on the “Recover” option to bring them back to your iPhone.
Conclusion
Taking a screenshot of memories to keep them safe or to share with loved ones is a common thing nowadays. But many people get confused about how to screenshot on iPhone.
You will get your answer here whether you want to screenshot without keypad or with a keypad, we have discussed all the tips and tricks to take a screenshot on your iPhone. Also, there are a few apps that will help you take screenshot on every phone, be it your iPhone or Android. Also, if you need to batch process your screenshots on your iPhone, it is no longer a problem.


 April 26, 2024