Do you, the users of Mac OS X, know that you have a significant utility that can verify and repair hard disks on your MacBook Air/Pro and iMac? In the folds of the Utilities folder, which can be found in the folder of Applications is a Mac disk repair software called the Disk Utility, which is there solely for this purpose.
If your Mac doesn't start properly, you may launch the Disk Utility and find your solutions. But how to use Disk Utility on Mac? We will tell you all that is there to know about this and much more in this guide. So, let’s start right away!
Know More About Disk Utility And Its Purpose
As we mentioned above, Disk Utility is a build-in application that comes with your Mac. Amazingly, the Disk Utility has a lot of uses and purpose, which perhaps you were not aware of. Here are a few of its most common features:
- It can be used to format, erase, or manage the internal disks, and other devices of external storage.
- It can be used to manage and add volumes, or if you wish to partition your dates.
- It is handy while working with RAID sets. If you combine a few disks to form a RAID set, then it starts acting as a single disk, which in return can increase storage space, reliability, and overall performance.
- It can be used to create disk images of various files that you have planned to move to a different device, send to archive, or back up.
- Mainly, it can be used to fix any problems regarding any damaged volumes or the disk.
How to Check If Your Mac Needs Disk Utility
Now that you know a little about what the Disk Utility is and its uses, you now have to know when should it become useful to you. Listed below are a few conditions that will signal you that it is time for you to let the Disk Utility do its job:
- If multiple apps start quitting all of a sudden.
- If you have any corrupted files and access errors.
- If you need to eject, unmount or mount a disk.
- If the external devices do not work properly.
- If your computer won’t startup.
How To Open Disk Utility On Mac If You Need It
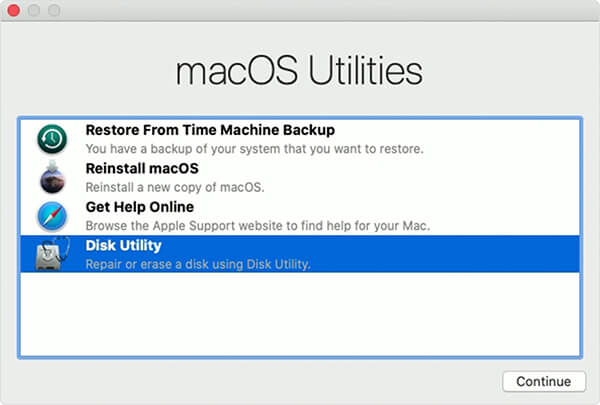
If your Mac has the same situations like we listed above, then you can access the tool and use it to repair the disk on your Mac. There are two ways by which you may access the Disk Utility on your Mac:
- Start by opening a Finder window.
- Click on the Applications option in the left window.
- Find the Utilities folder by scrolling down.
- Find Disk Utility and click on it.
How to Use Disk Utility On Mac for Different Purpose
So far, we have understood a bit about the Disk Utility app, its purpose, and how you can access it. Up next, we would take a look at the most crucial bit, that is, how to run Disk Utility on Mac. Once you open the Disk Utility app, you will find these five options right at the top of the menu of Disk Utility: First Aid, Partition, Erase, Restore, Mount. You may opt for any of these options and perform them, based on your needs. Let us quickly understand each of these options and when and how they may be run.
1. Repair Your Hard Drive With Disk Utility's First Aid
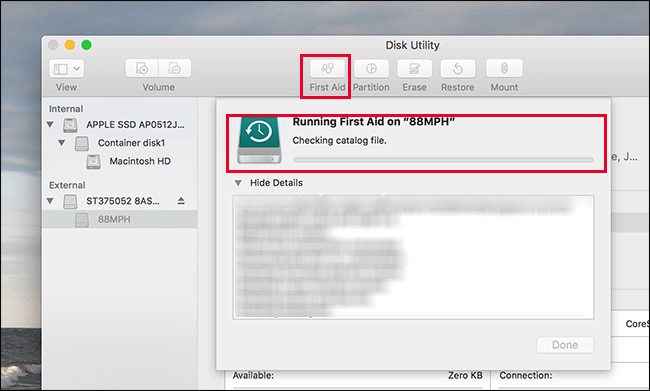
An easy way for disk repair on Mac is via Disk Utility’s First Aid option. It is a function that can be utilised to check and repair errors of the file system. If your computer keeps crashing and displaying error (cryptic) messages, you may take the assistance of the First Aid option as an initial step to look for defects, and, in various cases, repair them altogether. Follow the steps to run the First Aid option.
- Restart your device after inserting the DVD. If you need to boot your device from the DVD forcefully, you may press down the C key.
- Go through with the instructions that will appear on your screen once the Menu bar appears, from the Utilities or Disk Utilities menu, select Disk Utility.
- From the left-side column, select the volume that requires repair. From the right, select the First Aid tab. In case you want to select more than one volume, press down the Command key while selecting the desired volumes.
- You then need to start a verification process by clicking ‘Verify Disk.’ To run disk repair on Mac, you may click on the ‘Repair Disk’ option. This will initiate a scan that will repair any faults in the volumes you have selected. You may stop the scan by clicking on ‘Stop Repair’ or ‘Stop Verify' at any time.
Tips
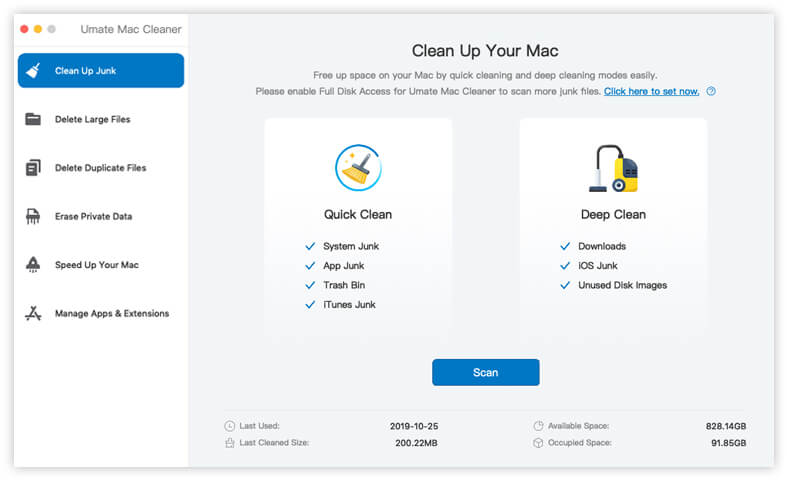
If your Hard Drive is having problems, such as slow access time or low memory, you can turn to another useful utility to free up more space on your Mac, which is called Umate Mac Cleaner. The app supports to delete 40+ junk files, large files, duplicates, and extensions, etc. After using this app, your Mac will get 4x free space than before. With enough storage space, your Mac’s Hard Drive can definitely run better.
Get More Available Storage Space with Umate Mac Cleaner
2. Partition Your Mac's Hard Drive with Disk Utility
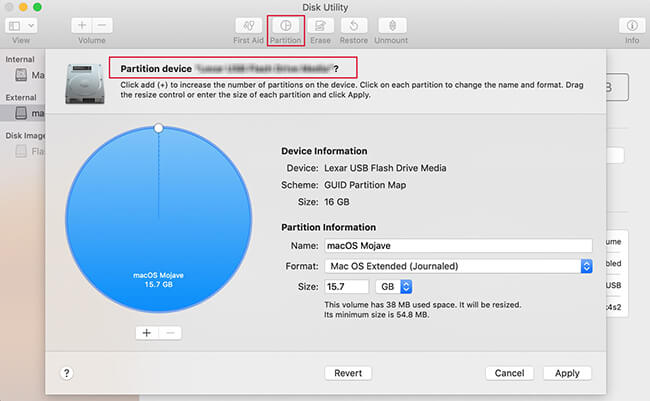
You may partition your Mac's Hard Drive with Disk Utility. This option allows you to partition the hard drive into separate systems. This way, you may run two individual operating systems one the same device. Keep in mind that each partition will take space up of the usable storage of your device. To create a partition, follow the following steps:
- After opening the Disk Utility app, click in the Partition option. You will then have to either add a Partition or an APFS volume.
- Choose Partition.
- Click the (+) option. This will add a partition.
- By dragging the resizing controls, change the proportion of the partition you wish to utilise. The part represented in blue will denote used space.
- Give a name to the new partition.
- Then you may mention which format of file system you want to employ.
- Click Apply.
3. Erase All Data on Your Hard Disk (Format Your Hard Drive) with Disk Utility
You can erase all data on your Hard Disk or format your Hard Drive with the help of this option from the Disk Utility. However, it may be a bit risky if you click on things that you do not understand. You might end up losing files that you do not want to lose, as the Erase option does what it sounds like — it erases data. And here, the undo option won’t work. Therefore, select this option only when you are sure that you really want to delete data on your drive. Also, make sure you choose the right drive.
To Erase a drive, all you need to do is after booting with the DVD (follow steps 1 & 2 of First Aid), select the drives/volume you want to clean, then select the Erase option.
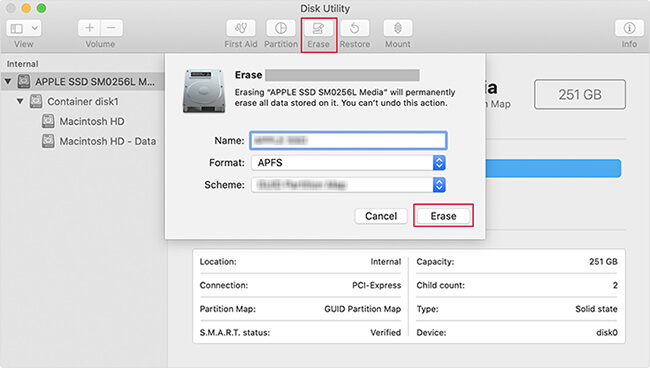
As mentioned earlier, this method is quite risky, as you may lose files that you otherwise did not want to erase. However, with Umate Mac Cleaner, you can delete your files selectively and securely. It will efficiently erase the files you want to delete and never affect the other important ones.
4. Restore A Disk with Disk Utility
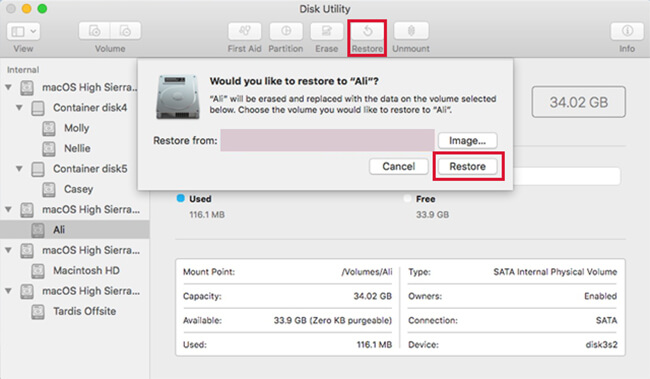
The Restore option in Disk Utility is quite simple. Working almost like a ‘Duplicate’ option, with this option, you may copy an entire drive and copy it to another location. To avail of this option, follow the steps as directed below:
- Select the drive first which you want to restore.
- Select the destination where you want it restored.
- Then select ‘Restore.’ This will initiate the copying procedure.
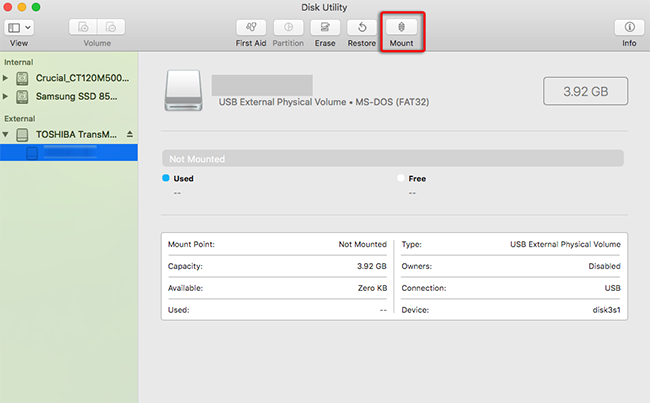
5. Mount A Disk with Disk Utility
You may mount a Disk with this disk repair utility’s Mount option. Mounting basically means making a hard disk in a computer accessible by it. It is a process of the software wherein it enables the operating system to access the data, read, as well as write it. To mount a drive, follow the steps below:
- Select the drive you want to mount.
- Then select Mount. Your drive will now be accessible by the system.
Learn How to Protect Your Hard Drive From Failure And Keep It Clean In The Future
Your Mac would mean a lot to you. If it is used for your business or even for your personal use, you would not want it to crash suddenly. Herefore, it becomes necessary that you protect your hard drive from any failure and also keep it clean. Below are a few tips for you to take care of your hard drive:
- Update the operating system: This way, you will get all the critical updates that will help run your device better, decreasing the chance of the failure of the hard disk.
- Clean out the large and duplicate files: Those large and duplicate files are taking up lots of space on your Hard Drive, which may slow down your device with low memory. (Umate Mac Cleaner can delete them thoroughly in a flash. )
- Uninstall unwanted program: By removing them, you save more space in your hard disk, enabling smooth functioning. (Umate Mac Cleaner can uninstall all the unneeded apps with just one click. )
- Keep your desktop clean: You need to know that your Mac needs to contribute RAM to display every single icon on your desktop. So keeping your desktop clean is very important to run a Hard Drive normally.
- Maintain device security: Be aware of external viruses or malware. Be prepared by always having a back-up plan and a good security plan.
And Umate Mac Cleaner Is Always There to Help!
You need a clean hard drive with enough space to run your Mac smoothly, and then you will never need to use a hard disk repair tool like Disk Utility anymore. And Umate Mac Cleaner is always there to help and clean up your Hard Drive efficiently and securely. It can do everything for you! Just try it out!


 September 18, 2021
