Whilst we all love our MacBooks, iMacs, and Map Pros, they can begin to slow down over time, no matter how carefully we use them. This can happen for a variety of reasons, such as software updates creating bigger and more memory-intensive apps as well as taking up more hard drive space, or bugs can creep in with installed programs. Let’s look at how to speed up Mac computers.

Part 1: Check Your Mac
Establishing the Age of Your Mac
The first thing we need to do is figure out which version of Mac you have. Each new model of Apple's lineup replaces the previous version, but the product names are not differentiated. Apple distinguishes one model from another by its year, period, and screen size. For example, the MacBook (13-Inch, Mid 2010) is a somewhat different machine that the MacBook (13-Inch, Late 2008).
To obtain your model details, here is what to do:- On your Mac, go to the Apple Menu (Upper-left corner).
- On the panel that opens, click on About This Mac.
- A window will pop up showing your device details. Select the Serial number and copy it.
- Go to Apple's Check Your Service and Support Coverage.
- Paste in your serial number and click Continue. Your model will now be displayed.
Apple Hardware Test
Before launching into software fixes, we should first check whether there are any hardware issues.
Follow these simple steps:
- Shut down your Mac.
- Disconnect all external devices, except keyboard, mouse, display, and ethernet cable.
- Be sure that your Mac is on a flat hard surface and is well ventilated.
For Apple silicon
- Turn your Mac on and continue to hold the power button down.
- When the start-up options appear, release the power button and press ⌘ and D together.
For Intel processors
- Turn on your mac and then immediately press and hold D whilst your Mac starts up.
- Release the key once the progress bar or language selection options appear.
Once the diagnostic is complete, the results will be shown. If there are any problems, you will receive a code, which you can look up here.
Part 2: How to Make Your Mac Run Faster
Whether you need to know how to speed up a Macbook Pro or an old Macbook Air, running through these fixes should return a little more spring in the step of your old machine. If you’re wondering 'How can I make my Mac run faster?' then hold on tight, as we're launching straight into the top 12 ways to optimize your Mac computer.
Way 1 Disable Resource-hogging Processes
When your Mac's system resources are split multiple ways, it becomes less responsive. You may have many programs installed that each take a portion of memory or CPU power. By finding out what is active, and disabling anything you no longer need, you will regain some processing power.
Here is what you need to do.
- Go to Finder > Applications > Utilities > Activity Monitor.
- Go to the CPU tab. If you click this, it will sort the processes in order of highest usage.
- Double click on any app with high CPU usage. Be sure that you know what process you are checking before you take any further steps.
- Click Quit on any apps you wish to kill.
- Click Confirm.
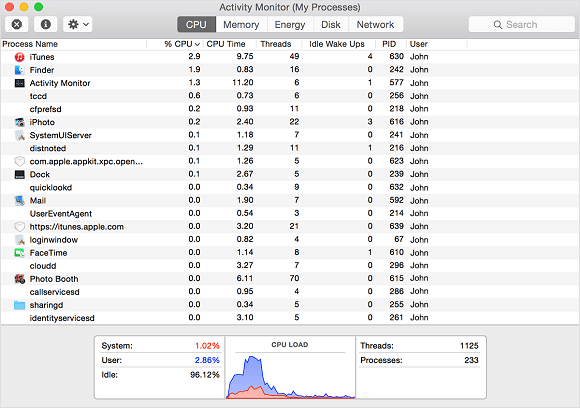
In addition to killing resource hogs, pay attention to any strange and unknown apps that have very high CPU usage, these could be viruses. Take a note of unknown process names and search for them online to get an idea of what they are.
Way 2 Manage Your Start-up Routine
Some programs like to launch on start-ups, such as Dropbox, OneDrive, Spotify, or Discord. If you rarely use them, remove them, which should result in a faster start-up.
The solution is simple.
- Click the Apple logo in the top left corner. Navigate to System Preferences > Users & Groups > Login Items.
- Here you will see a list of items that launch parts of their program on startup. Anything you no longer need should be disabled by clicking on the minus icon.
- Now click Go on your macOS menu bar whilst also holding the OPTION key.
- On the Library panel that opens, scroll down to LaunchDaemons and LaunchAgents. These are parts of programs that launch on start-up. Remove anything you no longer need.
Way 3 Clear Unwanted Files from Your Hard Drive
Macs will slow down if they begin to run out of any resources, including hard drive space. Always keep at least 20GB of free hard drive space available, as our Mac will use this for swap files and cache files. Here’s how to clean up your Mac’s hard drive.
- Click the Apple Logo > About this Mac > Storage > Manage.
- In the Optimize Storage section, click Optimize to remove films and shows you have already watched.
- Under the Reduce Clutter section, click Review Files to delete unwanted data.
- Select the unwanted files and click delete.
A faster way to do this is with software like Umate cleaner, which we’ve reviewed towards the end of this article.
Way 4 Check on How Your Mac is Set to Sync
Synchronization using iCloud on Mac is done so smoothly that many people forget that they’ve even got it set and just get used to the fact that their files will appear in multiple places at once. However, this can cause slowdowns while the system updates in the background.
First and foremost, if you use iCloud Desktop, be sure not to drop large files there unnecessarily, as these will then need to be transferred to the other locations. Only store necessary documents that you absolutely must have at the other locations here. This will put less strain on the system, reducing stuttering and pauses.
Way 5 Move Old Photographs and Videos
Home video and photographs can take up a surprising amount of your Mac’s storage. These are not the type of files that you want to delete under the previous method. Unfortunately, iCloud storage syncs up all your devices, so you might find that images shot on your iPhone are clogging up your Mac as they get automatically downloaded. There are other cloud options, such as Dropbox and Google Drive, that will allow you to move your images from your Mac and into the cloud, releasing much-needed space. However, you might want to consider moving them off to an external hard drive.
Way 6 Turn Off Visual Effects
The slick visual effects on Macs are certainly part of their appeal, but if your machine is aging and you need to pull a little performance back, you should disable some of these.
- Click System Preferences > Dock & Menu Bar.
- Untick Animate Opening Applications, Automatically Hide and Show the Dock.
- Under the option Minimise Windows Using : select Scale Effect.
Way 7 Remove Browser Extensions
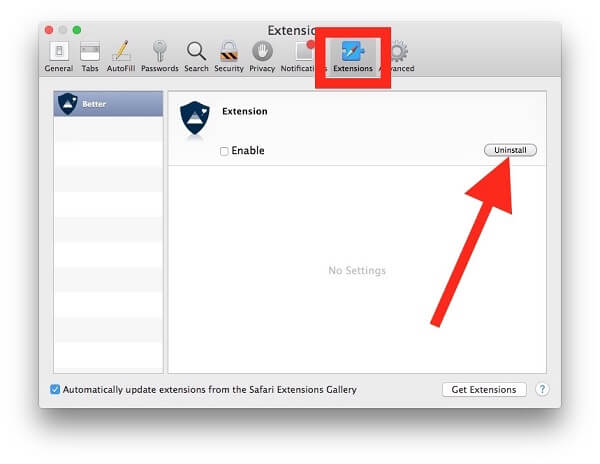
No article would be complete without mention of the browsers we like to use on our Macs. Whether it is Safari, Chrome, or Firefox, we love them for the ease with which they let us browse the internet, and add-on functions like grammar checkers are brilliant in how easily they can be added and function within the browser. But whilst these are very useful to have, they do place a strain on your resources. To maximize efficiency, keep the number of open tabs low, and remove any unnecessary extensions.
- Sarafi: Go to the top menu, click Safari Extensions.
- Chrome: Click the 3-dot icon in the top right. Navigate to More tools and then Extensions.
- Firefox: Click the hamburger icon in the top right. Choose Add-ons.
Way 8 Edit the System Preferences Panel
Open your System Preferences panel and check the row at the bottom. This is where optional preference settings lurk, added by programs you’ve installed. If you are not actively using these preferences then remove them, as they are taking up CPU capacity needlessly. Simply right-click on an item and choose Remove From Preference Pane.
Way 9 Remove Unwanted Programs, Apps, and Widgets
It should go without saying, but if we are trying to return our machines to their former glory, it is important to take the time to remove old and unused programs.
Here’s what you need to do:
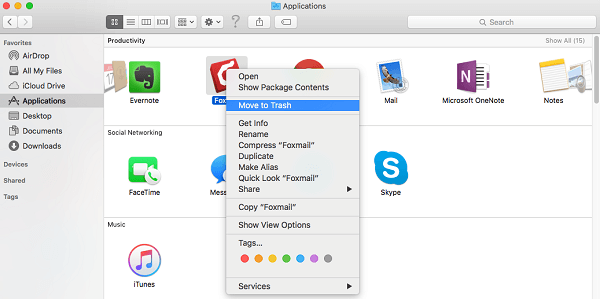
- Open Finder > Applications
- Scroll down the list and select apps that you no longer use.
- Press Command + Delete together.
- Don't forget to empty the trash.
You can also recover space by removing unnecessary widgets that are used in the Notification Centre. Click on the bullet list icon on the top right of your screen. Click on Today view. For any widgets shown that you do not use, such as the Stocks widget, simply click Edit and select the minus icon. Finally, click Done to be finished.
Way 10 Keep Your macOS Software Up to Date
You should regularly update your macOS software. Although you may have heard that in the past new macOS releases could slow you’re your Mac, you’ll be pleased to know that this is a thing of the past. Apple has taken to paring down the feature set and releasing resources back to the machines, effectively extending their productive lifespan. Here is how to check for macOS updates.
- Click the Apple icon in the top-left corner, then System preferences > Software Update.
- macOS will search for available updates.
- If a new update is found, click Update Now and wait – this may take a while. Once completed, restart your machine and reap the performance boost. It is a good idea, whilst in the updates pane, to tick Automatically keep my Mac up to date.
Way 11 Upgrade Your HDD and RAM
We've saved the most expensive option till last. Many of the older machines feature the option to upgrade the RAM and Hard drives. If you locate your exact model, as we advised at the start of this article, you will be able to check the Apple support pages to see whether yours will allow Ram upgrades, as many of the newer machines have more limited access.
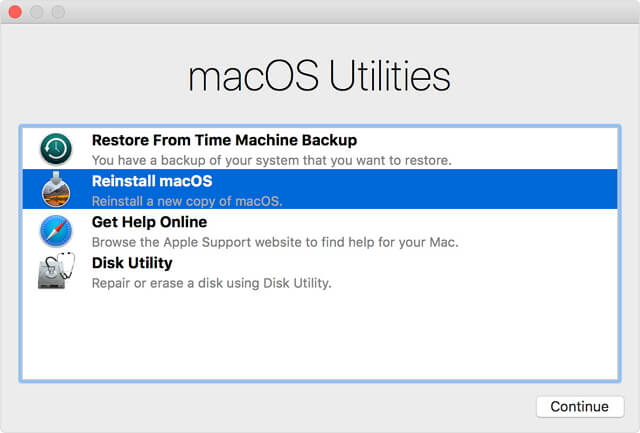
Unless you are doing video rendering or encoding, we don’t recommend upgrading unless you have less than 4GB of RAM. 8GB should easily satisfy most users. Upgrading from 1, 2, or 4GB will result in a big jump in performance.
For the ultimate boost though, swap your HDD to an SSD. These solid-state drives are significantly faster and the performance gain is massive. As SSDs are relatively cheap now, this is the best bang-for-buck way to upgrade your machine. Use Apple’s Time Machine tool to back up your entire Mac before you go ahead and swap out the drives. Ensure you format the drive in a Mac-friendly format, preferably APFS+.
Way 12 Accelerate Your Mac with One Click – Umate Mac Cleaner
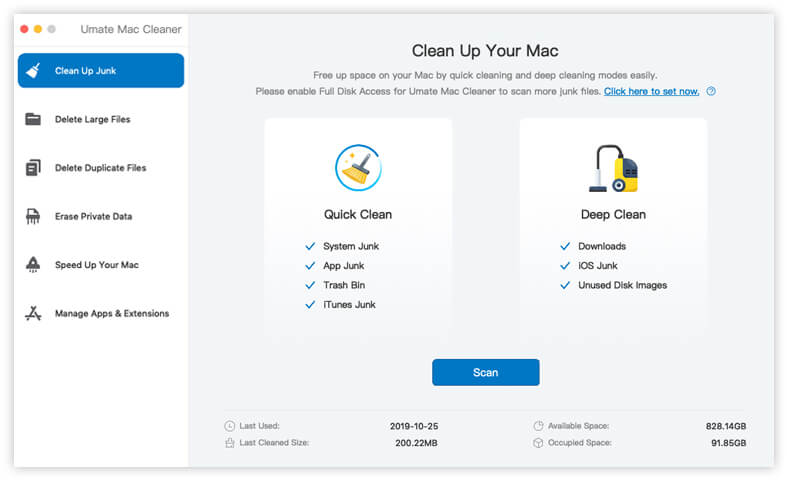
As we mentioned earlier in the article, Umate Mac Cleaner is a simple tool that allows a one-click solution to speeding up your machine. It is a versatile tool that can achieve many of the tips shared above, in just one click.
With Umate Mac Cleaner You Can
- Clear out junk files selectively in a safe manner.
- Locate files over 50MB and allows you to decide whether to keep or remove them.
- Spot duplicate files for removal (very handy!) .
- Manage unused apps and browser extensions.
- Erase personal data to prevent privacy leaks.
Here's how to use Umate Mac Cleaner.
- After installation, launch Umate Mac Cleaner.
- On the left-hand options bar, under Clean Up Junk, click Scan.
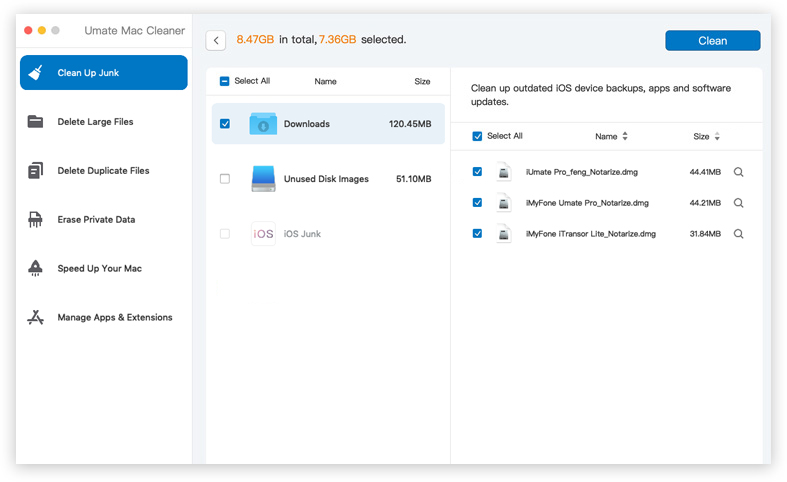
- Wait for the scan to be completed. This will then show you any detected problems, such as large files, duplicate files, etc.
- You will now be shown a list of safe to remove files.
- Click Clean to remove the discovered items.

Part 3: FAQs about Speed Up Mac
Why is my Mac so slow?
Computers of all types will slow down over time. Often this is due to the programs that we use auto-updating to ever more complete versions that take up additional resources. In addition, there is always the risk of a hardware problem developing if your machine is aging.
Should I clear the cache on my Mac?
You should consider clearing the cache now and then to remove all the obsolete data that builds up, but don’t make a daily habit of this, as the cache provides a useful function to speed up future visits to your favorite websites. We would recommend a weekly clean-out to be sufficient.
How do I fix a slow Mac?
We have laid out 10 of the best options in the article above to help speed up mac computers. Most are free, though there are software options such as Umate that costs $29.95 for a year, or hardware options such as new RAM or SSDs that will cost several times that.


 August 24, 2021

