If you use a Mac you’ve probably already realized that the autofill feature is convenient. The problem is, it’s also extremely dangerous. That’s because anyone who accesses your websites through your Mac automatically has access to your passwords. Unfortunately, if you’ve been trying to get rid of the autofill on each browser individually you know how time consuming it is, especially since it wants to save that information by default. That’s why we’re going to talk about the easiest way to clear autofill on Mac.
- What Does Autofill Mean
- Why You Should Delete Autofill on Mac
- How Do I Delete Autofill on Mac in Popular Browsers Manually
- How to Delete Autofill on Mac with One Click
- If You Want, You Can Completely Turn off Autofill in Safari, Chrome and Firefox
What Does Autofill Mean
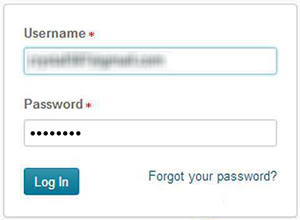
If you’ve never used autofill before let’s take a minute to go over just what it means. When you fill in a form it takes a lot of time, right? You have to fill in things like your name, address, phone number, email address and possibly more. Every time you want to purchase something from a company you have to fill in that information and that can get a little annoying, right? But you don’t have to with a Mac.
Your Mac actually has the ability to save the information that you put in. That means you only have to put the information in a single time. Then, the next time that you go to put your information into a form, the computer itself will actually fill in that information for you. It saves you a whole lot of time and effort, but there are some downsides to this as well. Let’s discover more in next part.
Why You Should Delete Autofill on Mac
Now, when you’ve heard about how much more convenient and time-saving it can be to use autofill why would you want to delete it? Well, the number one reason that you should learn how to remove autofill on Mac as quickly as possible is that it’s actually dangerous. When you have autofill you don’t have to fill in any information anymore. Your computer recognizes what your address is, what your date of birth is, even what your credit card number is. That means anyone with access to your computer has access to that information.
Now, it’s very difficult for someone to actually copy the information from your autofill and use it elsewhere. But it’s extremely easy for them to access your computer and use it to do whatever they want. They can use your computer to make a purchase (or several purchase). They can use it to apply for credit cards or loans. They can do anything that they want with that information and you’ll then have to deal with the ramifications that come around as a result. And you may not even realize what they’ve done for months or longer. Or you may not recognize the full extent of the damage until much later.
If that’s what you’re risking, however, what should you do to make sure you don’t have to worry? You should be removing your information from autofill, and that’s going to be a lot easier than you thought.
How Do I Delete Autofill on Mac in Every Browser Manually
Let’s take a look at the three most popular browsers and how to remove autofill on Mac manually. We’ll talk you through the process so if this is what you want to do, you can absolutely jump in and take care of your information.
Remove AutoFill in Safari
Safari is one of relatively popular browsers and we’ll take a look at the process here. It’s actually a little more in depth to get it done. A distant 10.54% of people choose Safari as their favorite browser. That puts this browser as the third out of the top three web browsers, only slightly ahead of Internet Explorer, which is the fourth most popular.
- Open the Safari browser.
- Select “Preferences” then “Autofill”.
- Select “User Names and Passwords” and select ‘Edit’ then “Remove”.
- Select “Credit Cards” and select “Edit” then “Remove”.
- Select “Other Forms” and select “Edit” then “Remove”.

Tip: To turn off autofill in Safari on Mac, just turn to "Disable Autofill in Safari" part.
Remove AutoFill in Chrome
Chromeis one of the most popular browsers around and as a result you may need to know how to remove your autofill information from Chrome. Below are the simple steps to do that.
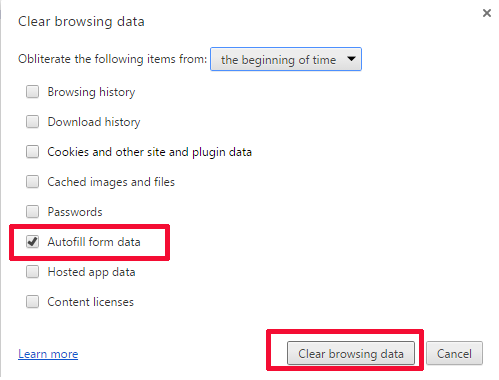
- Open the Chrome browser.
- Select “History” then “Full History”.
- Select “Clear Browsing Data”.
- Select “Passwords” and “Autofill Form Data”.
- Select “Clear Browsing Data” again to confirm.
Tip: To turn off autofill in Chrome on Mac, just turn to "Disable Autofill in Chrome" part.
Remove AutoFill in Firefox
This is another of the most popular browsers out there thought and the process to remove autofill is actually relatively simple.
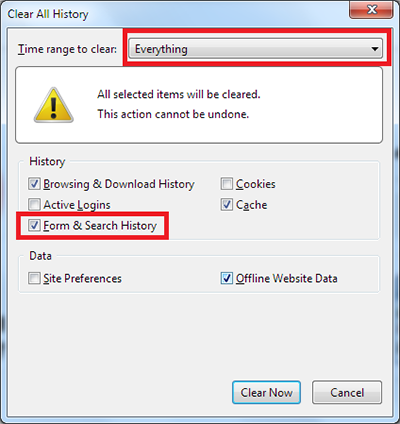
- Open the Firefox browser.
- Click “History” > “Show All History”.
- Select “Everything” in the “Time Range to Clear” menu.
- Choose “Form & Search History”.
- Click “Clear Now”.
Tip: To turn off autofill in Firefox on Mac, just turn to "Disable Autofill in Firefox" part.
Now, if you’re looking at how to remove autofill on Mac this way you’re going to spend a lot of time at it. Going through each browser, one at a time, and deleting all of your information is going to require a little bit of a learning curve too. After all, you have a different process for each of the most popular browsers. But what if you could do it more easily? What if there was a type of Mac cleaning software that could scrub your information from every browser with just the click of a button? You’re in luck, because it absolutely exists. You just need to take a look at the app we are going to talk about next.
How to Delete Autofill on Mac with One Click
Are you ready to learn how to delete the autofill information that each of your browsers store? And do you want to make sure that you can do it even easier than ever before? Well, we’re ready for you and with an app that you’re absolutely going to love. It’s called Umate Mac Cleaner, and it’s going to make a huge difference in the way you protect yourself while on your Mac.
The features of Umate Mac Cleaner are actually somewhat varied. You’re going to love that it does a whole lot more than just removing your private information. It actually cleans up your junk files (however you want it to) and helps to speed up your computer. Of course, the main feature that you’re going to want is getting rid of any type of personal information inlcluding autofills and you can do that super easy.
Ready to start the process to delete autofill on Mac? Well, there are only three steps involved. You just have to:
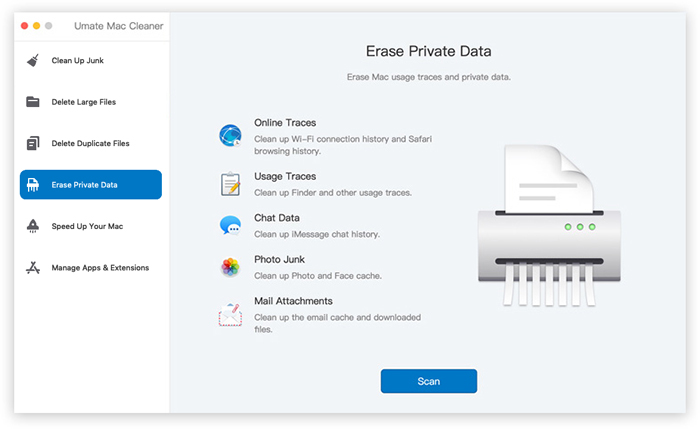
- Download, install and launch app.
- Select "Erase Private Data" tab, then click Scan to begin.
- After scanning, choose "Online Traces" and select the autofill items you want to delete then hit Erase to confirm.
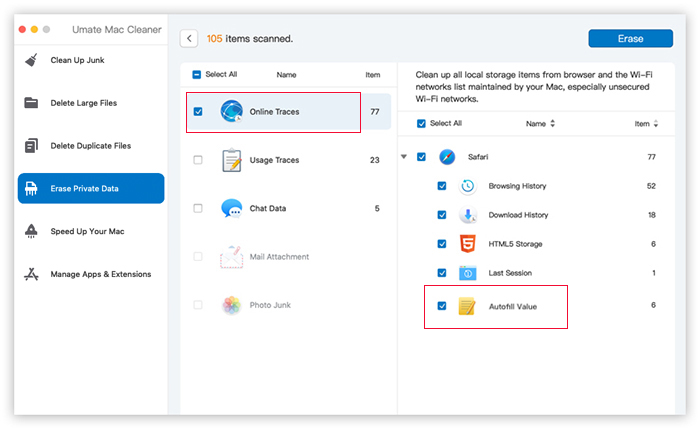
Umate Mac Cleaner is the easiest way to get rid of unwanted autofill on Mac and here’s why:
- Automatically scan and detect unneeded autofill data for safe removal.
- Quickly remove all unnecessary autofill within single click.
- The preview feature is provided to help you decide which autofill can be removed.
- 100% file security without affecting your important files on Mac.
- Extremely easy to use with intuitive user interface.
If You Want, You Can Completely Turn off Autofill in Safari, Chrome and Firefox
If you don’t want to delete those autofill informantion manually or using a software, you can just turn it off permanently. We will guide you the steps to disable autofill on every browser, just take a look below.
Disable Autofill in Safari
If you want to turn off Autofill in Safari, just follow these steps:
- Launch Safari and go to Preferences.
- Click on the Autofill tab in the next window. Then you’ll see a list of the autofill information that Safari stores.
- Uncheck any items you don't want to autofill anymore.

Disable Autofill in Chrome
How to disable autofill in Chrome browser on Mac? below are the detailed steps to do that.
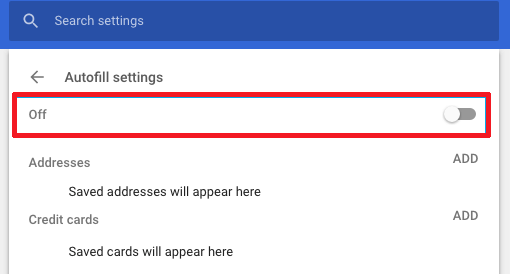
- Launch Chrome and click the menu icon - three dots on the top right corner.
- Click on Settings and go to Advanced, scroll down to the “Autofill” section.
- Select Autofill settings and toggle off autofill.
Disable Autofill in Firefox
Here are the steps to turn off autofill in Firefox on Mac.
- Launch Firefox and click three lines at top right of screen.
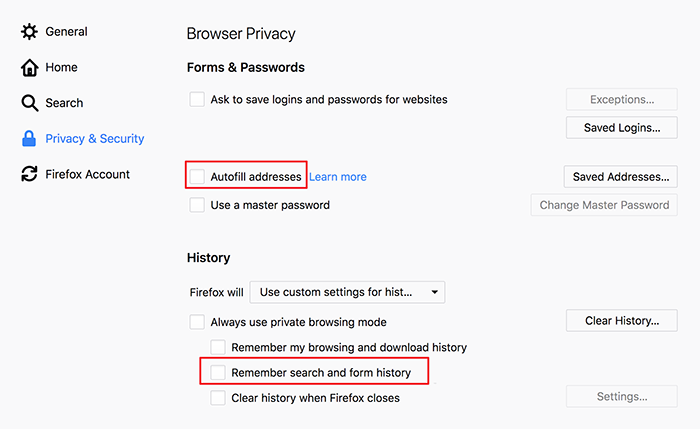
- Go to Preferences > Privacy & Security.
- Uncheck Autofill Addresses In the Forms & Autofill section.
- Uncheck Remember search and form history In the History section.
Conclusion
So, now that you know what the importance is of learning how to delete autofill entry on Mac and you know where you can go to make sure that the information is removed, you should be all set, right? All you need to do is take a look at Umate Mac Cleaner and see how you can use it on your own device. You want to make sure that your information is protected. You want to make sure that no one is able to steal your identity and you absolutely want to make sure that your private information stays that way. Well, you just need this software.


 September 18, 2021
