Are you a mac user looking for a software tool to reduce video file size? Are you still unable to find the answer to the question “how to compress a video on mac?” Then, get your coffee, sit back and read it till the end because we are going to discuss the details of why people want to know how to compress a video on Mac.
Part 1: Reason for Compressing Video on Mac
Videos files are far bigger than image and audio files, and these files take up too much space on a PC. If you are recording a video at 1080 HD resolution, it may take up to several GBs on your PC. So, the biggest reason for compressing video on Mac is to free up extra space that uncompressed video files have reserved.
Video compressors are the tools that are used to reduce video file size and free up space in the pc. Sometimes, you may lose video quality during compression, but it doesn’t happen all the time.
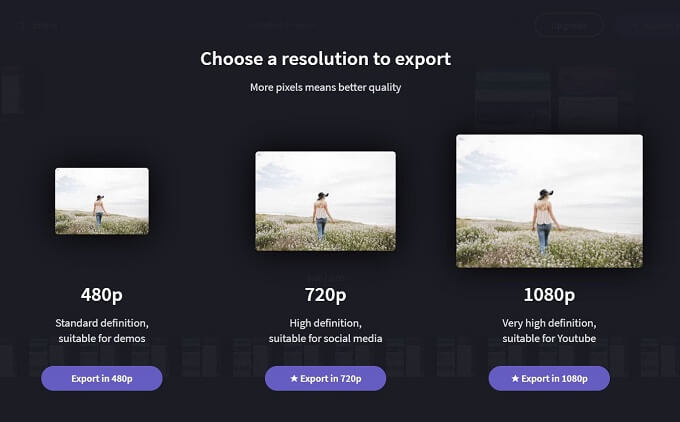
Another reason to compress video size can be to send it to someone else. When you have to send a heavy video, it may take a long time, sometimes hours, to transfer a video. In that case, reducing video file size can accelerate video file size and send it quickly.
Part 2: Basic Information of Video Compression and Video
Before compressing videos, you must understand some basic terminologies and extensions in which a video file is saved on your Mac. You might have come across some significant video file formats, including .mp4, .mkv, and WebM. So, we are here to elaborate on all these file formats so that you can better understand what they mean.

1 .MP4
MP4 is the abbreviation of MPEG-4. This video file format is also called container format, which is suitable for saving digital videos taken from websites, HDTVs, smartphones, and tablets. Its first version was released back in 2001, and the next version was released in 2003.
MP4 video file format also supports codec H.265, but we mainly use codec H.264. MP4 supports video, audio, images. The best thing about it is that it supports Digital Rights Managements which means that content encryption is always ready! Also, you never need a license to share MP4 content.
2 .MKV
.MKV is an abbreviation to Matroska Video, which is an open-source video format. You don’t need any license to share the MKV media. It is probably the most significant reason why many videos software use .mkv extensively.
Just like .mp4, .mkv also support audio and images other than videos. This video file format also supports DRM, which makes it perfect for sharing encrypted media.
3 .WebM
WebM is considered a basic version of MKV. Its limited codec is the main drawback of this video file format. It supports no codec other than VP8 and VP9. The one thing that you must keep in mind is that all the WebM files are MKV, but all MKV files are not WebM. The best thing about WebM is that it is mostly supported in the latest web browsers.
Part 3: 5 Best Ways to Compress Video on Mac
Now, it’s time to introduce some of the best video compressor software that you can use to reduce video file size. We have brought here a list of all the very loved, proven, and trendy video compressors that can help you reduce video file size and save your space in Mac. Nothing more to say, let’s start our video-compressing journey!
1 Hand brake
It is one of the best and free-of-cost software to compress video on Mac that can help you reduce video file size. The best thing about this software is that you can easily convert videos of various codecs to make them compatible with your device. This software has so many incredible features which are super easy to understand.
You don’t need any professional video editing skills to use this software tool. It has all the fabulous preset formats available for all standards like PlayStation, Windows, Android, Matroska, YouTube, Apple, and Vimeo. There is a list of features that hand brake software has brought for you! Let’s have a look at how to compress a video on Mac using the Hand Break software tool!

The following are some of the easy-to-follow steps that you have to follow to reduce video file size using the Hand Break software tool.
- First of all, you have to tap on the “Open Source” to select the video that you want to compress.
- Secondly, you have to select the path where the compressed video should be saved. You can do it by clicking on the “Save As” button and then click on the “To:” option to select the path where you want to save the rendered video.
- Now, you have to check if the video file format is set to “MP4.” If it is not set to MP4, set it before rendering the videos.
- Ensure that the “Web Optimized” is selected.
- Now, click on the “start” button to compress the video file.
- You will see that the green start button will convert to the red stop button.
- When this button is green again, it means that you are ready to view in the selected folder.
2 Media Encoder
Another freeware software that you can use to reduce video size is Media Encoder. This software tool is from Adobe that is used to provide media content for different platforms, including websites and social media.
It also allows you to change the file size so you can easily reduce the video file size by altering the format. Let’s see how to make a file smaller using Media Encoder.
- First of all, launch the application and then tap on the “+” icon to add your video for compression.
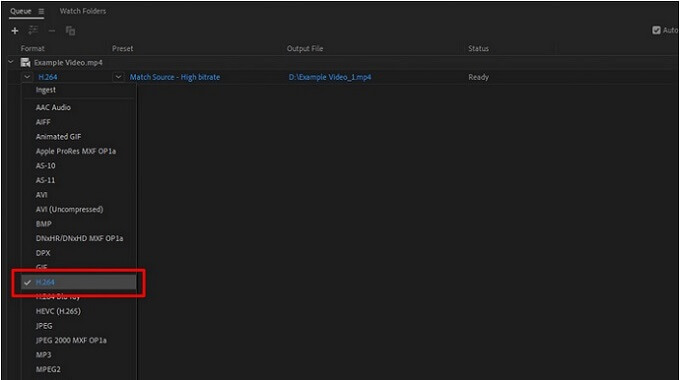
- Now you have to tap on H.246 that you will find under the format tab.
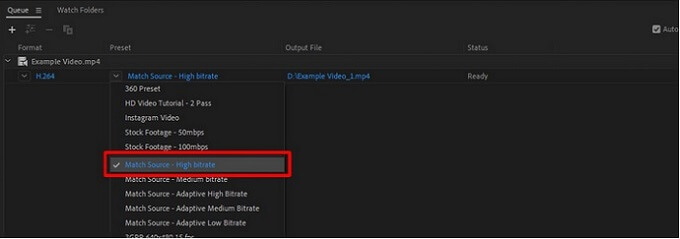
- You can choose Match Source – High bitrate or Match Source – Medium bitrate in the preset tab. This will depend on the amount of compression for your video.
- Now, you have to set the output file size and location before rendering your video. Then tap on the green play button to start the encoder to reduce file size.

3 Movavi
Another intuitive video editor in the list is Movavi which is known for its simplicity that makes it an apple of users’ eyes. Its refined user interface and incredible features make it one of the best video editors.
We are adding this tool to the list of the best video compressors because of its incredible video compression features. So, without any further delay, let’s have a look at how to make a video file smaller with Movavi.
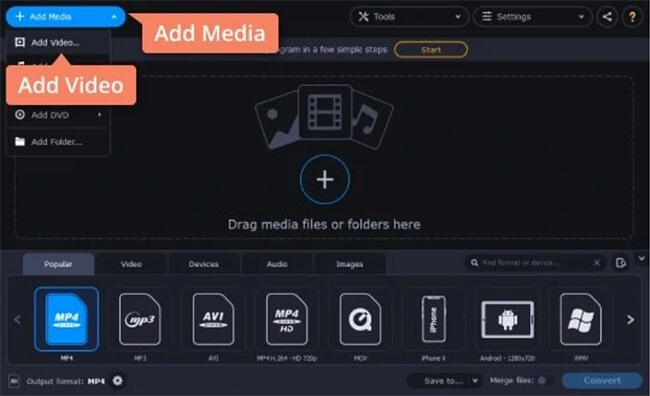
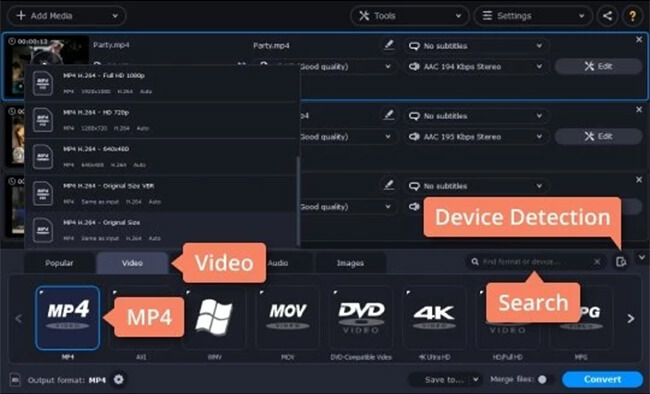
- First of all, you need to add the video to reduce the video file size by tapping on “Add Media” in the uppermost corner of the window.
- Now, you have to select the video format that you want to compress your videos. You can also take advantage of the search option.
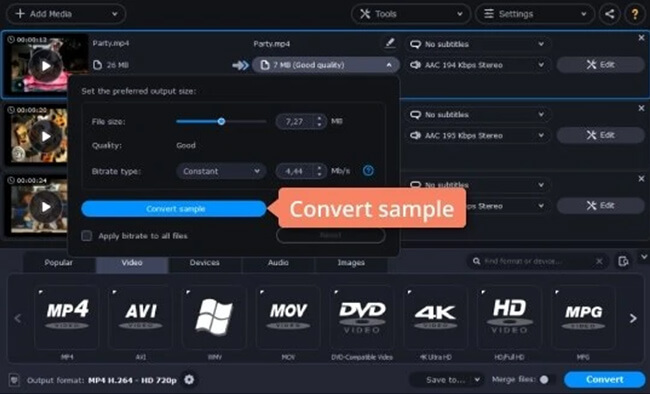
- After that, you have to define the compression rate. Then, you will have to click on the file size in the output information. After that, a dialogue box will appear on which you will have to move the slider to adjust the output file size and bitrate.
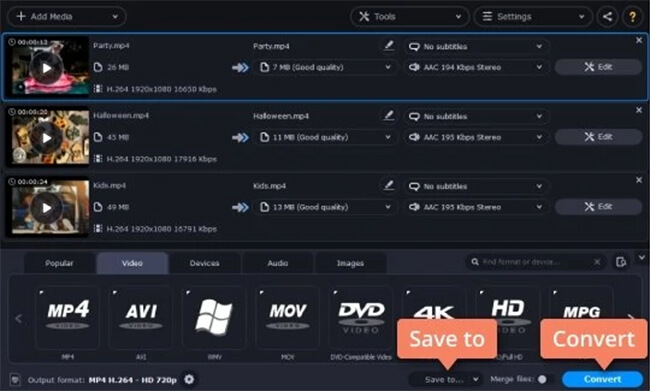
- Now, it’s time to select the output folder to save your video by clicking on the “Save to” button. Then click on the “Convert” button to start compression.
- After the completion of compression, the folder will automatically open, and the video will be in front of your eyes!
4 QuickTime
Let’s extend the list by adding another incredible tool to compress video mp4 and save file space on Mac. This video compressor has so many great options to reduce file size without losing your video quality.

This video editor has made a mark on the list of the best video compressors because of its incredible features, and video file size reduction is one of them! So, without any further ado, let’s get to learn how to reduce video size using QuickTime!
- First of all, launch the application and then select and open the video that you want to compress by going to the “File” option and then clicking on “Open File”.
- Then tap on the “File” menu and click on the “export as” option. There, you have to select the format of the video that you want to compress.
- After selecting the file type, your video will start rendering.
5 Shotcut
Shotcut is one of the most popular video editors that has been standing high in the list of best file reduction tools also. This tool has so many great options, including video file reduction, for which it has become one of the leading tools in the market.

The best thing about this application is that you will not lose your video quality while compressing your video file. Isn’t it incredible! So, with no further delay, let’s have a look at how to reduce video file size using Shotcut.
- First of all, download and install the Shotcut app on your MacBook or PC.
- Launch the application and then click on the “Open File” button to choose the video to compress.
- Then tap on the “Export” button change the format to mp4. And then tap on the “Export File” option.
- Select the path where you want to save the compressed file.
- Wait for the compression completion until the screen says “Done.”
- Close the program and check your rendered file!
FAQs about Compressing Video on Mac
1 Can Handbrake work on a MacBook 10.8.5 version?
The latest version of Handbrake is 1.3.3, and it is available for Mac 10.11 and later. You can also download this version for windows 7, 8.1, and 10; Linux and Command line versions of handbrake software are also available in the market.
2 Are there softwares converting VCD to MP4?
The market is teeming with many video compressor software that also provides the facility to convert VCD to MP4. Not only this, but these efficient tools can also extract audio from the video. You can easily use these software tools to convert any video format, including AVI, MOV, MP4, WMV, and even HD 4K resolution videos.
3 How do I compress a video file to email on a Mac?
Creating a zip file is the easiest and the quickest way of compressing a video file to email on Mac. All you need is a zipping tool installing on your device, and you are good to go!
Last words
Now, you better know how to compress a video for email and how to reduce video size using different video compressors. Some online video compressors are also available in the market, but we shared the list of best video compressors for you to compress video files. So what are you waiting for then? Get your favorite now, and get ahead of the game!


 August 10, 2021
