Do you use Microsoft Outlook and would like a simple way to sync outlook contacts with iPhone? There are several benefits to sync your outlook contacts with iPhone. One of the most obvious ones is being able to access the same contacts across all your devices. The less obvious benefit but even more important is the fact that syncing your Outlook contacts with iPhone will keep them safe when they are uploaded in iCloud.
If you are looking for ways to import your outlook contacts to iPhone, the following free methods should be of great help.
1. Sync Outlook Contacts with iPhone Via Email
You can easily sync your Outlook contacts with iPhone via email. But while this method may be effective, the contacts will not be automatically updated when you make changes to them. That said, here’s how to sync outlook contacts with iPhone via email;
Step 1: In your Outlook account, create .vcf file of all your contacts. You can do this by selecting the contacts and then right-clicking and selecting “Send as a Business Card.” Send this file to your own email address.
Step 2: Open the email in Outlook and save the attached file on your computer like “c:/contacts.”
Step 3: Open command prompt and then enter “c:/contacts” or whatever name you gave the temporary file. Hit enter and then type “copy/a*.vcf c:/contacts and then hit enter again. This will create a copy of the merged .vcf files.
Step 4: Now send this file to your own email address again. And on your iPhone, open the email and open the .vcf file. Tap “Add All Contacts” to sync the contacts.
2. Import Outlook Contacts to iPhone Via iCloud Control Panel
You can also easily sync all the contacts in Outlook to iPhone using iCloud control panel. Here’s how to do that;
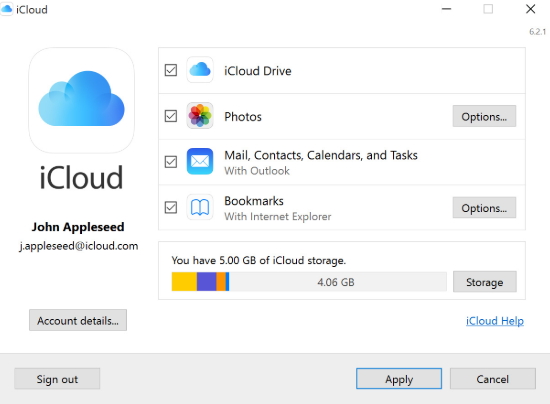
Step 1: Download and install iCloud control panel if you don’t already have it. Open it and then sign in with your iCloud ID and password.
Step 2: In the primary interface, ensure “Contacts, Calendars, & Tasks with Outlook” is selected.
Step 3: Click “Apply” and in a few minutes all the contacts in outlook will be available in iCloud.
Step 4: On your iPhone, go to Settings > iCloud. Sign in and then turn on Contacts & Calendars to complete the process.

3.Transfer Outlook Contacts to iPhone Via iTunes
Ensure that you have the latest version of iTunes installed on your computer and then follow these simple steps to do it;
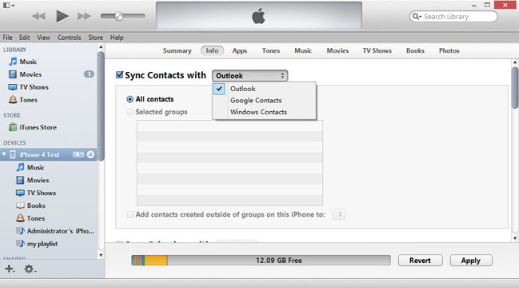
Step 1: Connect the iPhone to the computer and then launch iTunes.
Step 2: Go to “Devices” on the left sidebar and locate the iPhone.
Step 3: Click on the “Info” tab on the upper portion of the screen.
Step 4: Ensure that “Sync Contacts with” is selected and in the drop-down menu select “Outlook.” Here, you can also choose to sync all contacts or sync only a few selected groups. Click “Apply” when you’re happy with your selection.
If Outlook notifies you that iTunes is attempting to access your data, you will need to click “Allow Access” for the process to continue.

4. Sync Outlook with iPhone Using Exchange
If you have Microsoft Exchange on your computer, you can use it to sync iPhone contacts with Outlook. The process is relatively simple. Here’s how to do it;
Step 1: Set up your Outlook account in Exchange.
Step 2: On the iPhone, go to Settings > Mail, Contacts, Calendars > Add Account and choose “Microsoft Exchange.”
Step 3: Sign in using your username and password and then tap “Next”
The iPhone will need to contact the Exchange Server. You may need to enter the server's address.
Once you’ve entered the server, you can then choose the kind of data to be synced between the iPhone and Exchange. You can sync, emails, contacts, calendars and notes.
Bonus Tip: How to Sync iPhone Contacts with Mac
Syncing your iPhone contacts with your Mac is one of the easiest ways to ensure the safety of your contacts. While syncing with iCloud may sometimes allow you to see your iCloud contacts on your Mac, this process doesn’t always work flawlessly. So, what options do you have when you want to sync iPhone contacts with Mac and iCloud won’t work or you don’t want to use iCloud?
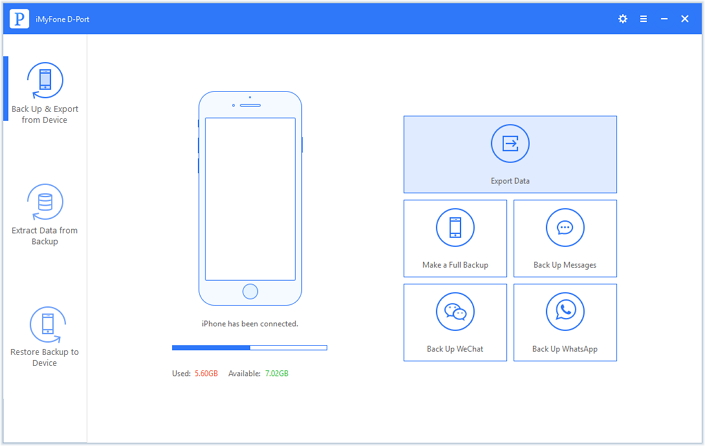
One of the best ways is to export the contacts from your iPhone to Mac. Yet, there is no easy way to do this. Not unless you have a third-party tool designed to help you do that. One of the best is iMyFone D-Port, an iPhone data export tool that can also be very useful when you need to export data from your iPhone to your computer.
To use it to export contacts from your iPhone to the Mac, download and install the program to your computer and then follow these simple steps;
Step 1: Open D-Port on your Mac and then click on “Back Up & Restore from Device.” Connect the iPhone to the computer using USB cable. Once the program successfully detects the device, click on “Export Data.”
Step 2: On the next screen, select “contact” since we want to export contacts to the Mac. Click “Next” to continue.
Step 3: The program will scan the device and display all the contacts found. Preview and select the contacts you’d like to export to the Mac and click “Export” to save them to the Mac.

It is our hope that one of the above solutions have been helpful to you when syncing outlook contacts with iPhone. Share your thoughts with us in the comments section below.


 June 21, 2021