There could be a number of reasons why iOS users wipe and restore their iPhone. It could be done to solve a technical issue that is not being solved via other methods or it may also be necessary if a firmware update goes wrong, etc. There are many methods to wipe and restore iPhone.
How to Wipe and Restore iPhone?
As the name suggests, there are two parts: Wipe iPhone and Restore iPhone.
- Method 1: Erase All Data Completely

- Method 2: Factory Reset iPhone Via Settings App
Step 2. Restore Your iPhone
- Method 1: Restore from iCloud
- Method 2: Restore from iTunes
Step 1. Wipe Your iPhone First
Erase All Data Completely
If protecting your privacy is your top concern, then it is highly recommended that you look for a reset method for your device that permanently erases data. iMyFone Umate Pro is one such software that can help you achieve your goal of erasing all your iPhone data permanently.
How iMyFone Umate Pro Permanently Erases Data?
iMyFone Umate Pro erases the original files in your iPhone as well as the ones marked as deleted. After erasing the data, the software stores random data in that place in order to overwrite them. Then it erases the newly stored random data and refills data again. iMyFone Umate Pro repeats this process until data recovery becomes impossible. So, with advanced data writing and erasing algorithms and techniques, you are assured that not even the FBI will be able to recover your data from your iPhone.
Steps to Wiper iPhone with iMyFone Umate Pro
Step 1. Launch iMyFone Umate Pro and connect your iPhone to your computer.
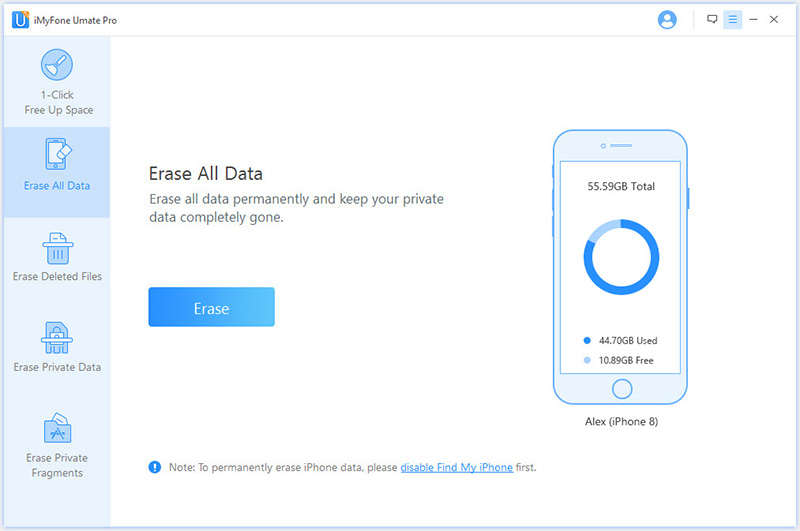
Step 2. Select Erase All Data mode and click on Erase button.
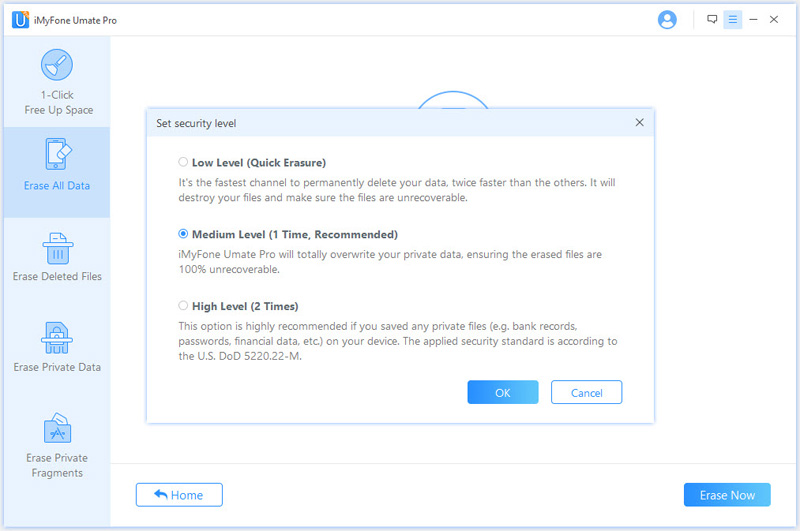
Step 3. Select a security level, here recommend High Level, this level uses the U.S. DoD 5220.22-M security standard, all your data erased won’t be recovered, even the FBI!
Step 4. Manually input ‘delete’ to confirm this deletion and click on Erase Now to completely wipe your iPhone.
Other Features of iMyFone Umate Pro
- Delete your iPhone data permanently. So you can have the peace of mind that no one will be able to recover your private data after you sell your device.
- Permanently erase traces/fragments of your already deleted files.
- Preview and erase your private selectively, including Contacts, Call History, Messages, Photos, Videos, Safari Data etc. (Lear More >)
- Erase third-party app data, such as WhatsApp Messages & Attachments, Viber Messages & Attachments, etc.
- It's recommended by lots of noted media arround the world: MacWorld, iPhoneinCanada, APPKED, etc.
Factory Reset iPhone Via Settings App
Resetting an iPhone via Settings app is one of the standard methods that many iOS users use. You will need your iPhone passcode as well as your Apple ID and password to successfully reset your iPhone via this method. It is recommended that you back up all your data before proceeding so that you can restore it afterwards.
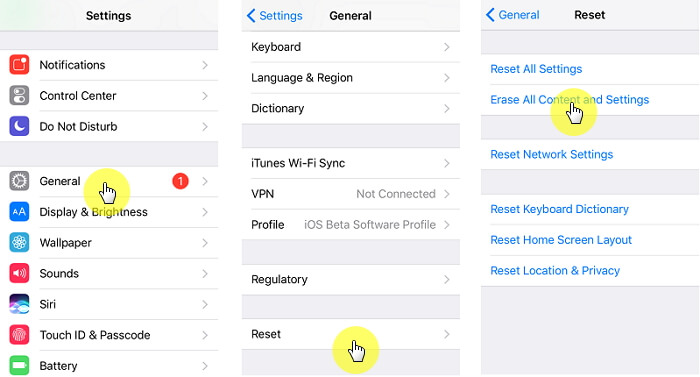
- On your iPhone, open the Settings app.
- In the Settings app, navigate to General > Reset > Erase All Content and Settings.
- Once you tap on Erase All Content and Settings option, you will need to enter your iPhone’s passcode to proceed. After inputting the passcode, tap on Erase iPhone option to continue.
- After the above step, the device will ask you to enter your Apple ID and password that is linked with the device. Enter it to confirm your action. The reset process will begin and all your data and settings will be erased within a few minutes.
Note
The primary con of this method to reset an iPhone is that data erased is not permanent which means it can be easily recovered via a data recovery software. So, this is not the best method to reset your iPhone if protecting your privacy is your primary concern.
Step 2. Restore Your iPhone
There are two primary methods to restore your iPhone from a backup. You can either restore from iCloud or restore from iTunes.
Restore from iCloud
The process of restoring data from iCloud is quite simple if you already have backups available on your iCloud account. Keep in mind that restoring data via iCloud will erase all your existing data on your iPhone. Your iPhone must also be connected to a Wi-Fi throughout the data restore process.
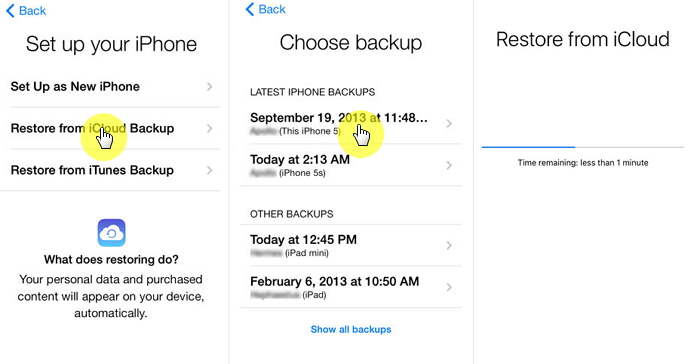
- After the reset, power on your iPhone and follow the on-screen steps of the initial setup.
- On Apps & Data page of the initial setup, you will see an option called Restore from iCloud Backup. Choose that option and then log in using your Apple ID and password.
- After a successful login, you will see a list of your iCloud backups. From that list, tap on the most recent backup. The data restore process will begin automatically.
Restore from iTunes
Just like iCloud, you can also restore your iPhone via iTunes. iTunes is a great tool for creating and restoring local iDevice backups.
- Connect your iPhone to your computer via a compatible lightning or USB cable.
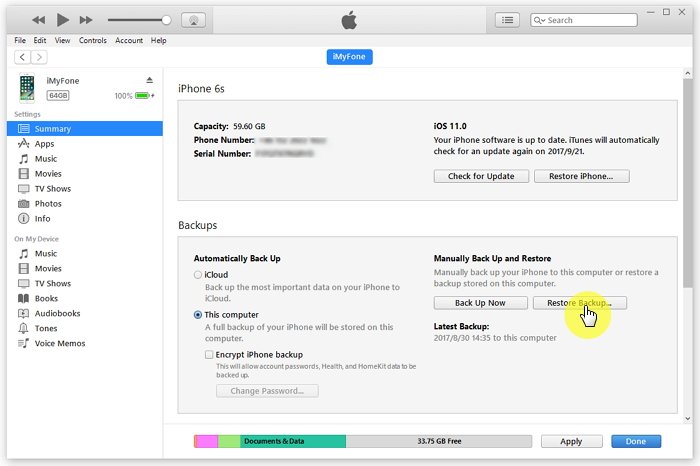
- Launch iTunes and navigate to your iPhone’s summary page. The summary page contains several options for creating and restoring backups for your iPhone.
- Now navigate to the Backup section and find and click on the Restore Backup button.
- If Find My iPhone feature is on then iTunes will notify you to turn it off in order to proceed. To do this, open Settings app on your iPhone and navigate to iCloud section and find and switch off Find My iPhone.
- Now click Restore Backup button again and select the backup that you wish to restore. Then click the Restore button to start the restore process.


 March 12, 2024
