“How to transfer photos from laptop to iPhone with or without iTunes?” is the most disused topic on iPhone data transfer. But there are many other ways to transfer files especially pictures from a laptop to iPhone. These iOS photo transfer procedures such as iExplorer, iCloud, iMyFone Umate, etc. are also efficient in file transfer, and we shall be discussing how to use them as follows.
How to Transfer Pictures from iPhone to Laptop
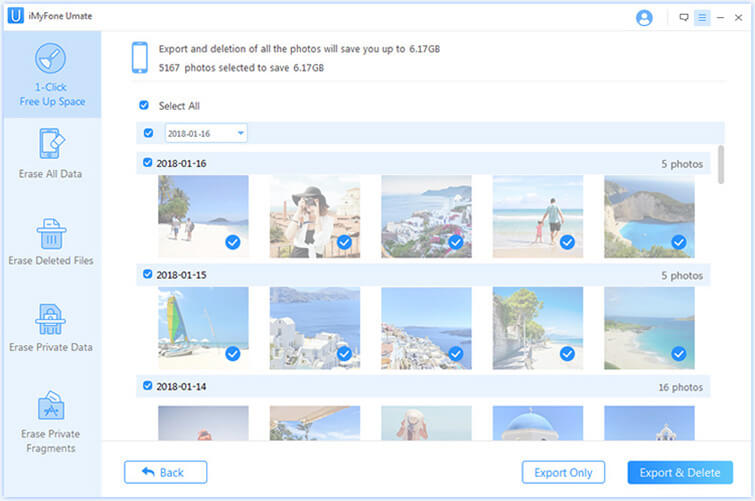
Although iMyFone Umate Pro for Win or for Mac cannot transfer photos from laptop to iPhone, it’s a one-stop-solution for transferring picture and video files safely from iPhone to PC without leaving the traces of such files or data behind for possible recovery. It’s an iPhone, iPad, and iPod touch space saver that permanently erases all your private data such as documents, chats, messages, apps, photos and videos in one click just to protect your privacy. And it's highly recommended by lots of media, like MacWorld, iPhoneinCanada, APPKED, etc.
Key Features:
- Seamlessly backup iOS data and files on your PC, especially for photos.
- Compress your photos losslessly to free up your storage memory.
- Harness the data exporting feature of Umate Pro in exporting your iPad photos to PC/Mac.
- All iOS files and data whether current or deleted can be erased using it.
- Fully compatible with every version of iOS and every model of iDevice and can be used on windows and mac PCs
Steps to transfer pictures from iPhone to laptop:
Step 1: Download and install iMyFone Umate Pro on your PC, then connect your iPhone to your laptop using a USB cable.
Step 2: Click Photos tab on the left hand menu and the program will list out all the photos.

Step 3: There are two options: Backup & Compress or Backup & Delete. Choose the one you want to use.
Step 4: Click Start, the process to transfer pictures will be started.

3 Ways to Transfer Photos from Laptop to iPhone
1. How to Transfer Photos from Laptop to iPhone Manually via iTunes
There are two ways you can setup iTunes to transfer your PC photos to iPhone, iPad or iPod touch – manual and automatic syncing. Syncing photos manually with iTunes updates your iOS device photos to match the albums on your laptop. Hence, if you’ve some photo albums on your PC that are not on your iPhone, you can follow these steps to import them.
- Step 1: Update your iTunes to the latest version.
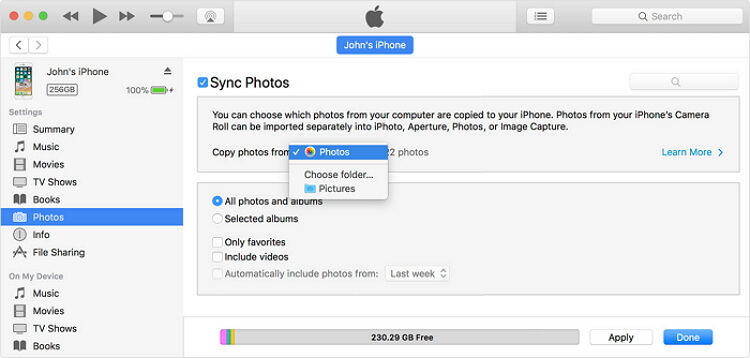
- Step 2: Launch iTunes on your laptop, connect your iOS device with a USB cable and click the device icon on iTunes menu bar when it appears.
- Step 3: Go to the side bar, and click the box next to “Sync Photos”.
- Step 4: Select the app or folder you want to sync from, then choose from the listed syncing options, you can also choose to include videos.
- Step 5: Click Apply.

2. How to Transfer Pictures from Laptop to iPhone via iExplorer
iExplorer is a simple iOS photo transfer tool. It’s easy to use and it gives you a good experience when transferring pictures from laptop to iPhone. However, the Photos section of iExplorer is read-only; it’s only designed for photo transfer and has no other functionalities. Following these steps to transfer your pictures from laptop to iPhone:
Step 1: Download and install iExplorer app on your PC/Mac.
Step 2: Launch and connect your iPhone, iPad or iPod touch to your PC/Mac with a USB cable. The program will automatically detect your device.
Step 3: Click the Video/Photo section, and all your videos and photos will be displayed. Drag and drop the photos from your PC/Mac to iPhone

3. How to Transfer Pictures from Laptop to iPhone via Facebook
Facebook social media services can also be harnessed for file/photo transfer from laptop to iPhone. The first step is to open the Facebook app and click More > Photos > Albums. Then long press the photo you would like to download till the menu bar appears, click on save photos.


 March 12, 2024
