Have you ever noticed that Facebook Messenger is usually active even after deactivating Facebook account? Yes, your Facebook friends can still write you on Messenger app even after deactivating your Facebook account.
Deactivating a service like Facebook Messenger doesn’t connote the same meaning as deleting Facebook account. Deactivating Facebook Messenger is for you to stay away from Messenger for some time, and come back later when you feel like. Therefore, this process doesn’t terminate the account permanently.
How to Deactivate Facebook Messenger on iPhone
If you need a break from Facebook Messenger, you can deactivate it by following these simple steps:
- Open Messenger app on your iPhone.
- Click on your profile picture at the top left corner of the page.
- Click “Privacy & Terms > Deactivate Messenger”.
- Type in your password and click “Continue”.
- Click “Deactivate” tab.
Note that reactivating Facebook Messenger will also reactivate the Facebook account. However, before you can successfully deactivate Facebook Messenger, you need to have deactivated your Facebook account. Therefore, if you’re yet to deactivate your Facebook account, you can check the part 2 of this article to do that.
How to Deactivate Facebook But Keep Messenger Active
If you've tired 0f the overload of information coming from Facebook feeds, feel you’ve had enough of the posts, tired of messages from friends and family members, or feel addicted to checking your social media network site every minute, then the temporary solution is to deactivate your Facebook account. If you later feel different about Facebook in the future, you can activate it again.
Here are the steps to deactivate your Facebook account on iPhone:
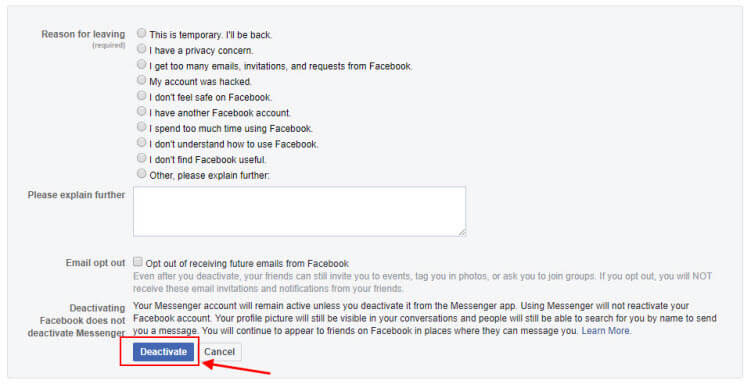
- Go to Facebook’s deactivate account page. Log in if it asks you.
- Ignore the distracting photos of those who will miss you and head to the bottom of the page.
- The last option on the page will notify you that you can continue using Facebook Messenger even after deactivating your Facebook account. Click “Deactivate” tab.
- Confirm it by clicking “Deactivate Now”.

After the deactivation, all your Facebook data will be safe until you’re ready to activate Facebook again.
How to Safely Erase Messenger for Privacy Protection
If you harbor the notion that Facebook Messenger may give away your sensitive and private information, then you need a tool that can erase Facebook Messenger completely from your iPhone. iMyFone Umate Pro is the right tool.
iMyFone Umate Pro can protect your personal information, private chats, deleted messages, third-party app fragments, call logs, browser histories, messages, photos, accounts, videos, in-store purchases, and other iPhone files and data.
Umate Pro Secures 3rd-Party App Experience
- Fully and safely remove any private traces or fragments left by Facebook, Messenger, Snapchat, WhatsApp and 15+ more apps from iPhone, protecting your private info from data leakage.
- Any data or files erased by Umate Pro is 100% unrecoverable, even by FBI!
- With previews, you can erase private messages, call logs, browsing history, photos, notes and many more from iPhone.
- Previously deleted files which are still recoverable will be found and make go forever.
- Being highly spoken of and highly recommended because of the guaranteed 0% recovery rate.
Steps to Completely Erase Facebook Messenger on iPhone
Step 1. Download, install and launch iMyFone Umate Pro on your computer, and connect your iPhone using a USB cable.
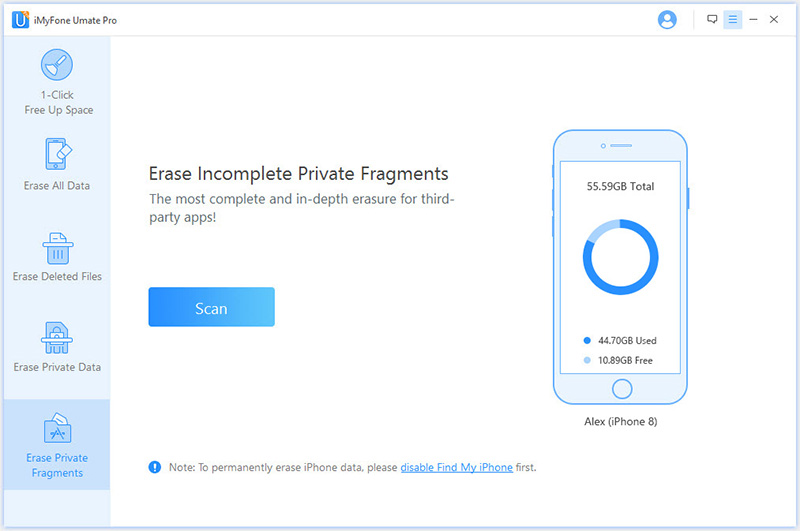
Step 2. Choose “Erase Private Fragments” mode and click “Scan”.

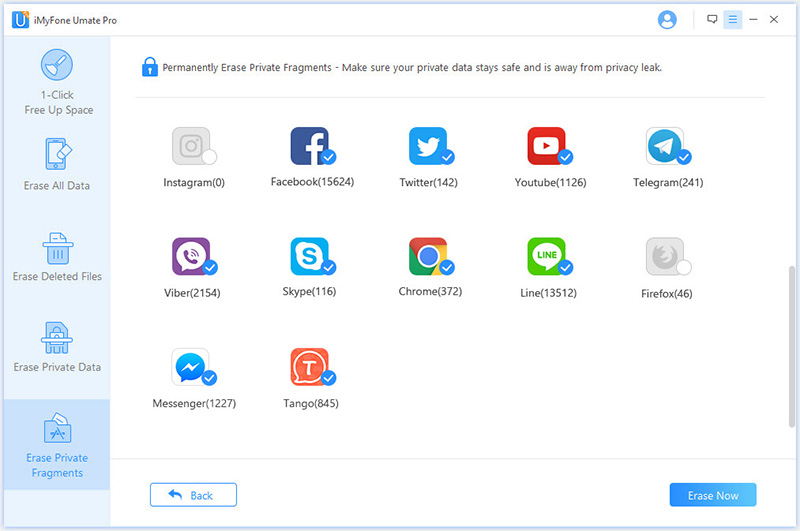
Step 3. After the scan is complete, it will how many leftover traces left by each third-party app. Select the apps, for example, Facebook and Messenger. Click “Erase Now” to proceed.

Step 4. Type “delete” into the box to confirm, and click “Erase Now” again to get started.
You’ve seen how important erasing all sensitive files and data from your iPhone is in protecting your privacy. Therefore, manage your Facebook Messenger app and keep it secured using iMyFone Umate Pro.


 March 12, 2024
