If you’re looking for how to delete Siri suggestions in iPhone spotlight search, then you’re in the right place to know.
Spotlight search, powered by Siri, provides iPhone users with personalized search suggestions based on their app use, browsing history, emails, messages, contacts, calendar and even information from 3rd party apps. With this feature, it becomes very easy to access anything on your device within seconds.
However, the downside for a lot of users is that Spotlight search remembers everything you searched for. Just below suggestion for your current search term, Spotlight search also provides a list of your past search histories. This can be uncomfortable for a lot of users, privacy-wise. So, how to clear Siri's suggestions on iPhone? And how can you turn it off entirely? These questions are answered below.

Part 1. How to Delete Search Suggestions on iPhone
It is possible to clear Siri search suggestions on iPhone, and the steps are different according to the iOS version you’re using. We will talk about how to clear Spotlight search suggestions on iOS 15 and earlier iOS versions below.
1. How to Clear Search History on iOS 12 to iOS 15
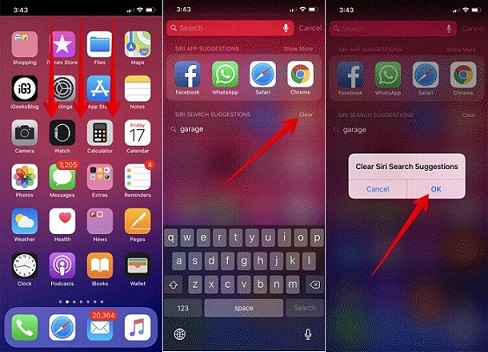
The process of clearing Spotlight Search on iOS 12 to iOS 15 is pretty easy. To clear your iPhone's Siri search suggestions history, follow these simple steps:
- Step 1: Swipe down from the middle of your iPhone screen to bring up Spotlight
- Step 2: You’ll see “Siri Search Suggestions” and an option to “Clear”. Touch and hold “Clear”.
- Step 3: You’ll see a pop up asking to confirm your action. Tap on “OK” to confirm. And that’s it.
2. How to Erase Search Suggestions on iOS 11 and Earlier
Erasing Siri search suggestions on iOS 11 and earlier is a tad trickier. This is because Apple doesn’t provide any option to clear Spotlight Search history on iOS versions earlier than iOS 11.
However, there’s an easy way that you can work around this difficulty. Just follow these steps:
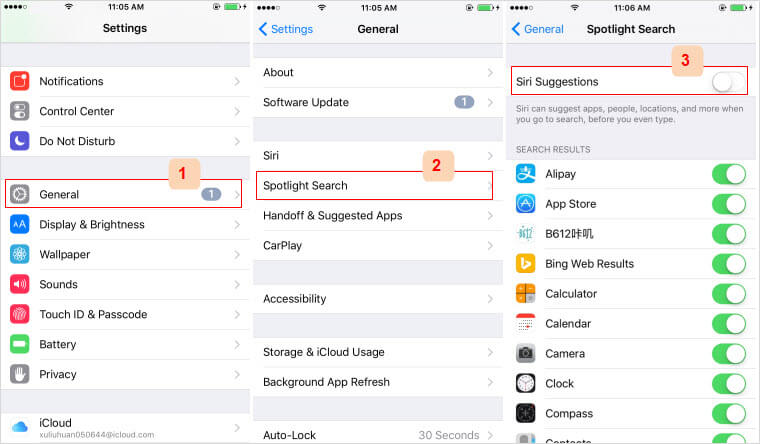
- From your iPhone home screen, tap on “Settings” app.
- When the Settings app opens, tap on “General”.
- On the General screen, scroll down and tap on “Spotlight Search”.
- The first option on the screen is Siri Suggestions. You can toggle this “OFF”, then toggle it back “ON”. Once you do this, previous search history is automatically cleared.
You don’t need to go through much stress to clear your search history with Spotlight Search as the process is pretty easy, even for iOS 10 and earlier. Despite the absence of an official clearing option.
Part 2. How to Permanently Erase Search History from iPhone
If you’ve been using Apple devices for any length of time, you have learned that nothing you delete on an iPhone is truly and absolutely gone. It still remains recoverable in some form. And, to delete Siri search suggestions can't delete the search histories at all.
This is a security risk that most iPhone users have to live with. But you don’t if you use iMyFone Umate Pro, you can delete any kind of data on your iPhone and have it gone for good.
Umate Pro is a market leading iPhone data cleaner and eraser that provides powerful cleaning and erasing options to all iPhone users. With Umate Pro, you can get your private data removed with 100% unrecoverable rate.
Key Features:
- 1-Click Erase All Histories: Delete all the search histories on your iPhone with 0% recovery.
- Erase Private Data: Completely erase all privacy including 3rd party apps like WhatsApp, Snapchat, etc.
- Erase Deleted Files: Erase previously deleted data that still remains on your iPhone.
- Erase All Data: Completely wipe the whole iPhone history and leave no traces.
3 Steps to Run Umate Pro and Erase Search History on iPhone:
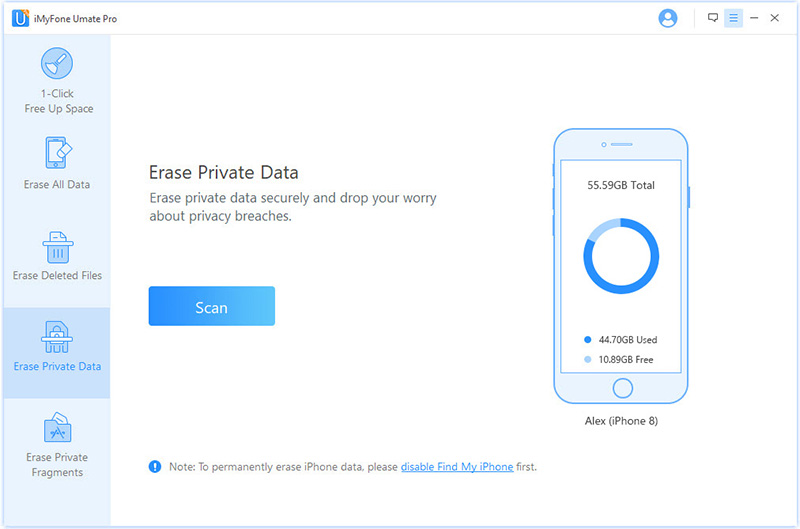
Step 1: After installation, open Umate Pro on your computer and connect your iPhone to it.
Step 2: There are four erasing options available on the left panel. Select the “Erase Private Data” tab and click “Scan”, this can help you to delete all iPhone search histories in one click.
Step 3: Umate Pro will scan your device for and bring up a list of all your search histories in Safari related tab, including Safari history, cookies and caches. You can click to preview any of this data and select the ones you want to erase. Then click “Erase Now”.
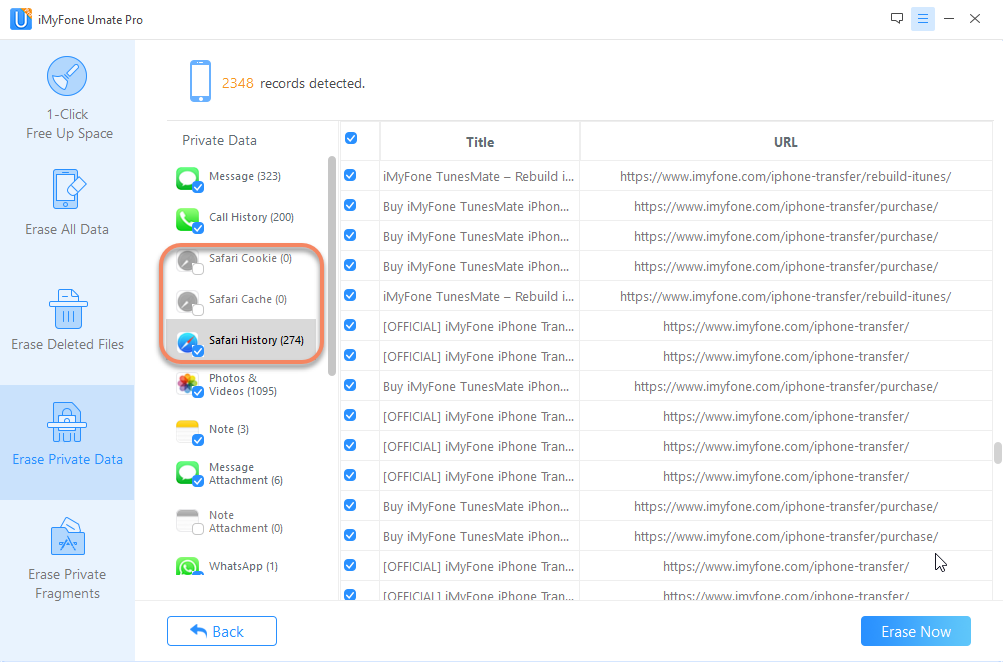
Here, you have erased all your search histories on iPhone. It's so simple to finish with only 3 steps.
Part 3. How to Disable Spotlight Search on iPhone
If you don’t want to have Spotlight Search on at all, you can easily disable it. Just follow these steps:
- From your iPhone home screen, tap on “Settings”.
- When the Settings app opens, tap on “General”.
- On the General screen, scroll down and tap on “Spotlight Search”.
- The first option on the screen is Siri Suggestions. You can toggle this “OFF”. And also toggle all the apps off under Search Results.


 March 12, 2024

