Apple’s Safari browser is great. However, we all love change. Maybe at some point, you have thought of changing the default iOS browser from Safari to a new browser, say Chrome. In this article we intend to show you how to change default browser on iOS. But, is this really possible?
Is It Possible to Change Default Browser On iOS 13/14/15?
It is not possible to change default browser on iOS without jailbreak. This is understandable given both iOS and Safari are Apple products. If you have to change your default browser on your iOS device, you will have to jailbreak your iPhone. This is not very recommendable since jailbreaking the iPhone sabotages the device security. We will show you how to change default browser on iOS 13/14/15 after jailbreaking it below.
What if You Want to Make Chrome Default Browser on iOS 13/14/15?
As we had mentioned earlier on, you have to jailbreak your iOS device for you to change default browser on iOS 15(14/13). After jailbreaking the device, you will need to acquire both Cydia and the BrowserChooser app. The following steps will show you how to change default browser on iOS after jailbreaking it:
Steps to Change Default Browser on iOS 13/14/15
Step 1: Launch Cydia and click Manage, you will find Sources, click on it and then tap Edit.
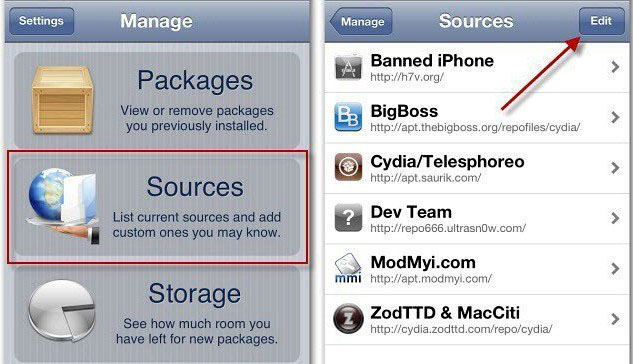
Step 2: Click the Add button, type:
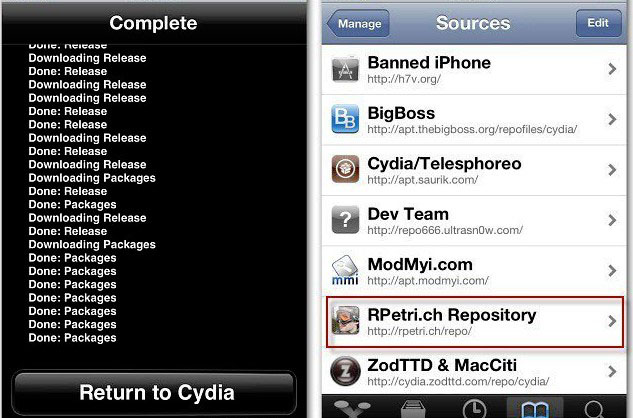
http://rpetri.ch/repo and then tap Add Source. You will need to wait as the resources get downloaded.

Step 3: Click Return to Cydia and then click RPetri.ch Repository under Sources.
Step 4: Choose BrowserChooser and install the app.
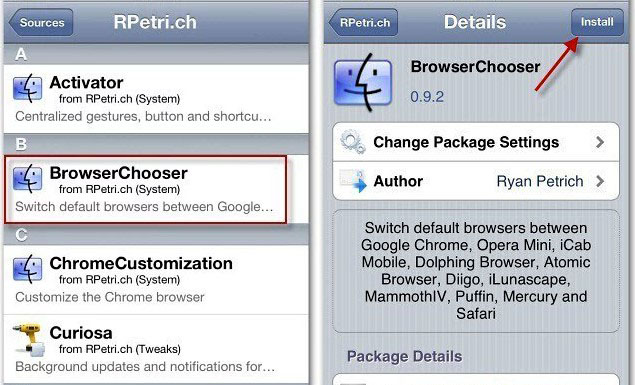
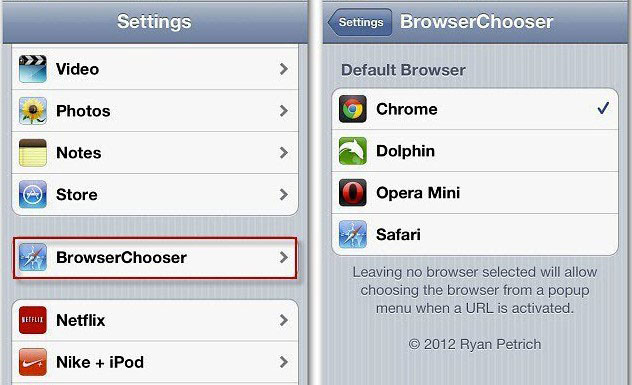
Step 5: After installing the BrowserChooser, close Cydia. Launch Settings and click BrowserChooser. Click Chrome to make it your default browser. Here, you will get to see other browsers available on your iOS device. You can choose to make any browser the default browser.
Maybe Safari Is a Good Choice on iOS 15
Apple has continued to improve Safari. Here are some features Apple has improved in the Safari present in iOS 15:
Improved Privacy
Browsers usually give too much information to the websites you visit. Apple has included a feature called Enhanced Tracking Prevention which keeps websites from acquiring your important data. Safari on iOS 15 is also capable of stripping the tracking code available on websites such as Facebook and Twitter.
Improved Speed
One of the things you will be looking for in a browser is its speed. Safari has a higher speed on iOS 15. Launching the app and also using it to load websites is much faster.
Security code AutoFill
When logging in to websites such as Twitter and Facebook, you end up getting a security code via SMS. You have to copy and then paste the code into the browser. In Safari available on iOS 12, the messages will be recognized automatically. The code will be copied in the AutoFill suggestions appearing on top of your keyboard.
Best Safari Data Eraser for iOS 13/14/15
When it comes to delete Safari data (history, cookies, cache), people tend to delete them conventionally, however, the deleted Safari data can be easily recovered by recovery sfotware. If you want to delete them with a 0% chance of recovery, you have to use a third-party professional eraser. iMyFone Umate Pro is one of them.
Features of iMyFone Umate Pro
Key Features:
- You can erase your Safari history, cookies, and cache with a 0% chance of recovery.
- If you had already deleted the Safari history before conventionally, you can use iMyFone Umate Pro to locate the deleted history and erase it in such a way it can’t be recovered.
- Before erasing any data, you get to preview it and erase it selectively.
- You can permanently erase other data types including media files (photos & videos), contacts, messages, third-party app messages etc.
- You can free up your device space with a single click.
To delete your Safari history using iMyFone Umate Pro, follow the steps outlined below:
Step 1: Launch iMyFone Umate Pro and connect your iOS device to the PC. Trust the computer if you are connecting for the first time.
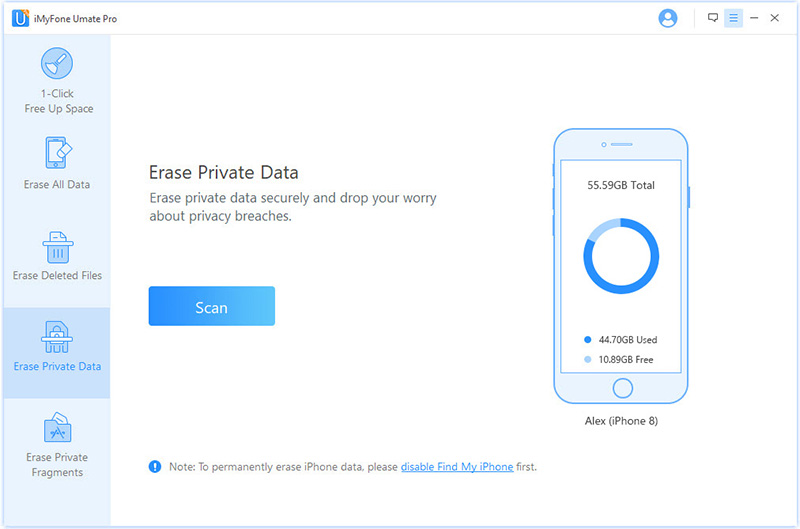
Step 2: On the left-hand column, click Erase Private Data and then tap Scan.
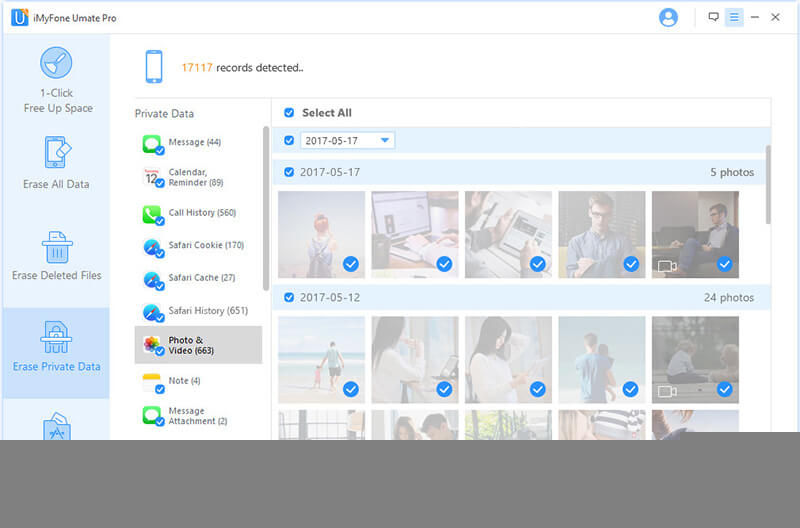
Step 3: After the scanning, preview your private data including Safari history, cookies, and cache. Select what you wish to erase and tap Erase Now.
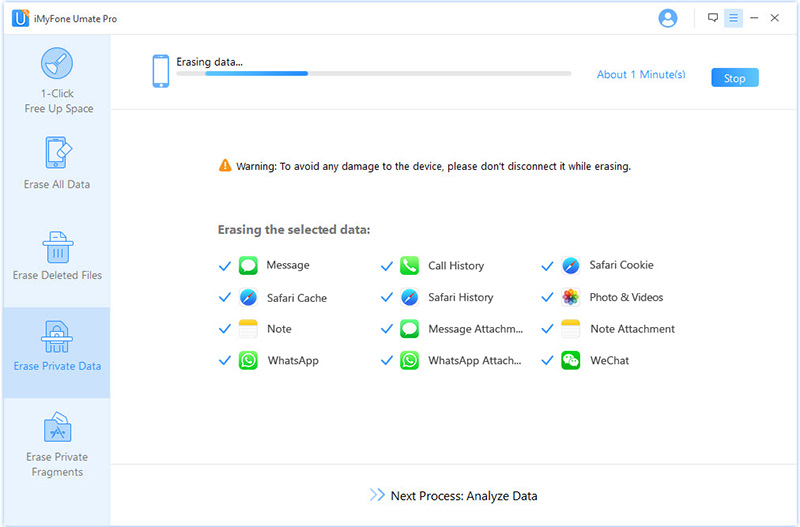
Step 4: Choose the security level and type “delete” to confirm. Tap Erase Now to initiate the deleting process.


 July 29, 2024

