Can You Recover Data from Mac in Target Disk Mode?
Category: PC Data Recovery

3 mins read
Restore data from Mac with one click.
Are you familiar with the Target Disk Mode on your Mac device? Do you know what kind of tasks it can do to make your life easy and simple regarding your digital data? If not, then read this article carefully. We will tell you about the Target Disk Mode of your Mac device, its uses, requirements, and solutions to the problems related to this Target Disk Mode.
Moreover, we will also share software through which you can recover data that can’t be restored through Target Disk Mode. Sometimes, the data disappears while using Target Disk Mode; we will show you how you can recover that using the best professional data recovery software.

In this article:
Part 1. Something about Target Disk Mode
1 What Is Target Disk Mode on Mac?
Target Disk Mode is one of the unique and compelling features of Mac that allows users to build a link and move data from one Mac device to another Mac device. This mode basically creates a connection between two devices through which they can be treated as an external hard drive. Using Target Disk Mode on Mac, data from one device can be moved, shared, stored, and viewed on the second device. The older Mac version can use this feature and create connections between two devices through USB cables or other media. On the other hand, the latest Mac versions can be connected just by using Thunderbolt.
2 When Do You Need to Use Target Disk Mode on Mac?
The Target Disk Mode is a very useful feature and can be used for various tasks and purposes. The accurate handling and usage of this mode allow users to accomplish the tasks like:
- Formatting and partitioning of hard drives
- Mac devices can be used as an external hard drive
- Data can be moved from one Mac to the other Mac device
- Data of one device can be viewed on the other device
- It can be used to overcome the shortage of device space
3 How Do You Use Target Disk Mode on Mac?
Using Target Disk Mode on Mac devices is a very simple and time-friendly process, and there is no requirement for any technical knowledge. There are two possibilities for using Target Disk Mode on macs. Let’s have a look at both of them separately.
- 1: The first scenario is when both computers are turned off:In this case, turn on the host device and connect both Mac devices through the thunderbolt cable. Now, turn on the target device by pressing and holding the T Key. This will show you a disk icon on the host computer from where you can easily move or preview data of the target computer easily.
- 2: The second scenario is when both computers are turned on: In this case, connect both devices through a USB cable and click on the Apple icon from the top right corner of the screen. Go to System Preferences > Startup Disk > Target Disk Mode. This will restart your device and then show you the disk drive on the host computer from where you can deal with the target device’s data.
Part 2. Recover Data from Mac in Target Disk Mode via a Professional Tool
iMyFone D-Back is one of the best data recovering, extracting, or scraping tools out in the market. This software is available for Mac as well as for Windows platforms. The main quality is its flexibility which makes this tool worth using in all types of scenarios. Through D-Back, anyone can extract and recover multiple data formats from various platforms or sources. Here is the guide that you can follow to recover data from Mac Target Disk Mode.
Steps to Use
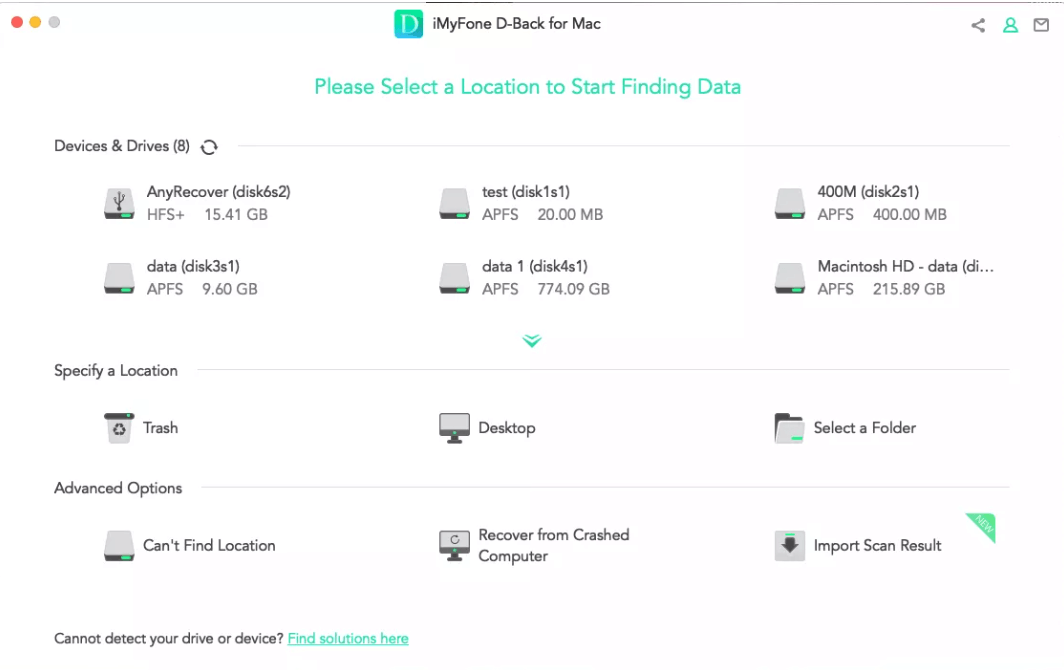
- Step 1. First of all, download and install the software on your device. After installation, open the software and select the location or derive where your lost data in Target Disk Mode before getting deleted.
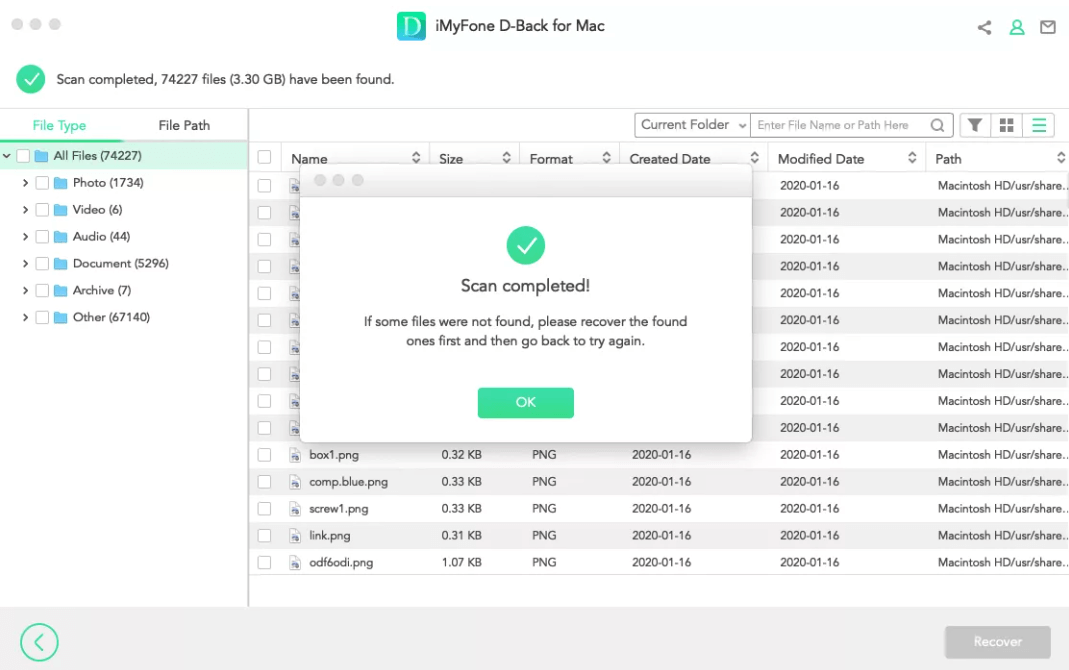
- Step 2. iMyFone D-Back will automatically start scanning the selected drive. All the recoverable data will be extracted and listed on the screen in real time. You can use the filter, stop & pause buttons to make the process according to your convenience.
- Step 3. Once you get the file of your interest on the screen, stop the scanning process > select the file in Target Disk Mode > click on the Recover button at the bottom right of the screen. This will also allow you to preview the file before restoration.
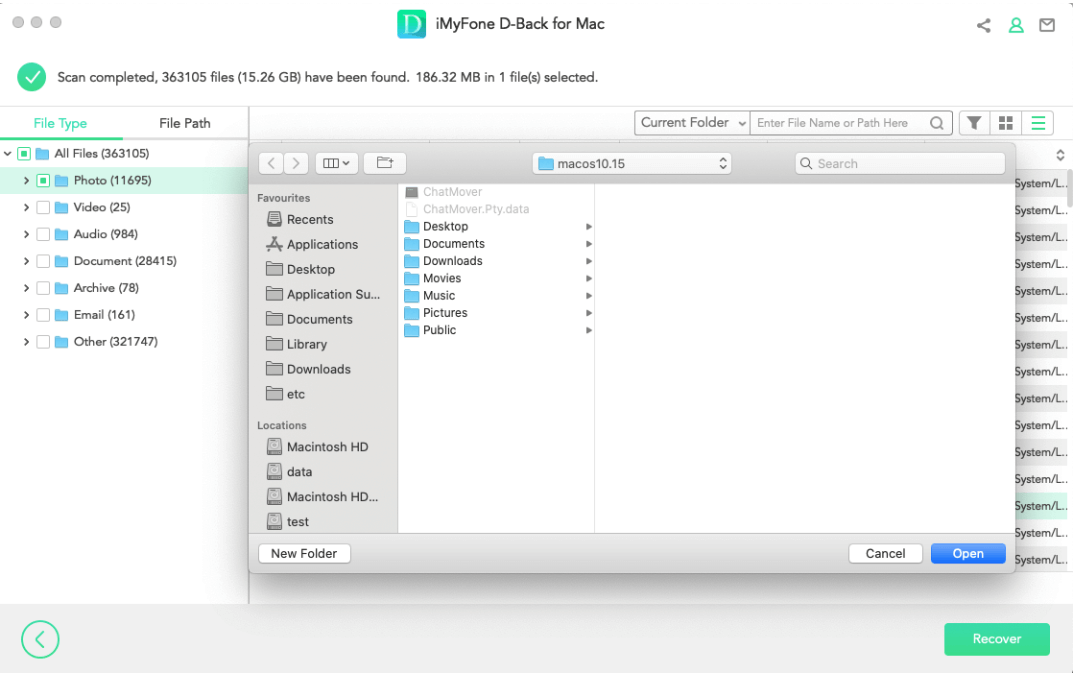
- Step 4. In the end, select the path or location where you want to restore the data and click on the OK button. Your data will be available at the selected location on your device.


Part 3. FAQs
1 How to Do When Target Disk Mode Not Working
There are several reasons for this Target Disk Mode not working issue. If you face Target Disk Not Working issue, then check and make sure that you are using perfect and un-faulty cables, both Mac devices are up-to-date, the firmware password set up is clear, and you are following the correct procedure for using TDM. These steps will solve the TDM not working problem.
2 How to Get Out of Target Disk Mode
There is nothing difficult in getting out of TDM. After being done with the task, hold, drag, and drop the disk drive into the trash. Just hold the power button from the target device, which will disconnect your target device from the host device.
3 What Happens If I Restart My Mac in Target Disk Mode?
Enabling the Target Disk Mode on your Mac requires your system or device to be restarted. After being restarted, your device starts acting like an external drive that can then be used for various purposes.
Conclusion
Target Disk Mode is one of the safest, quick, and easy ways of moving or shifting data from one Mac device to another, but some users are still unaware of this feature. We have tried our best to show you what Target Disk Mode is and how it works. Moreover, we have also given you D-Back as the best solution to recover deleted data from your Mac if the TDM features do not work.
Even if you have issues with the Target Disk Mode feature, iMyFone D-Back will resolve it by securely scraping and restoring data from your Mac. The most effective feature of D-Back is its supporting capability. It supports various data types from various sources seamlessly.


