


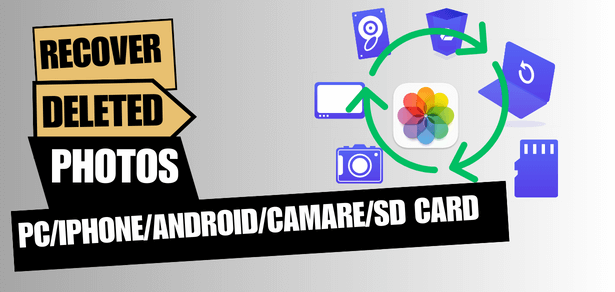
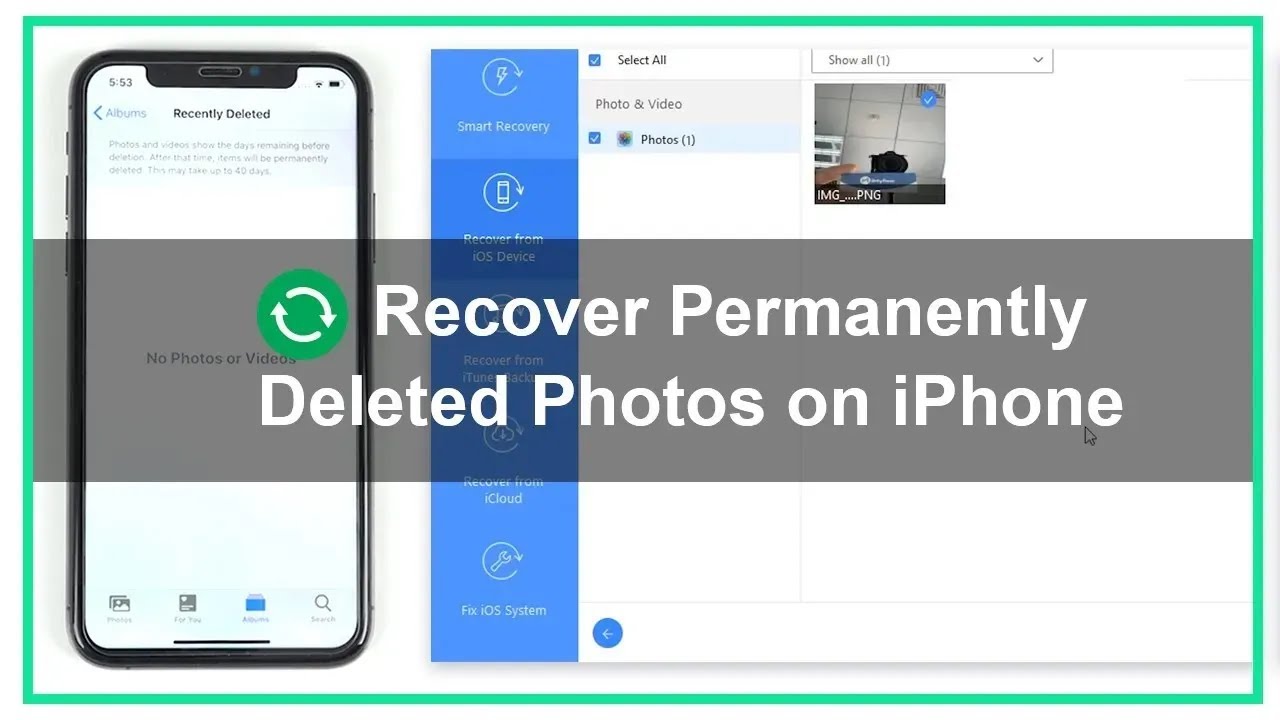
How to Recover Deleted or Lost Photos from Years Ago? (Different Device)
Category: PC Data Recovery

12 mins read
Nowadays, people often clear their computer's recycle bin to free up space. Losing data from computers, hard drives, phones, and SD cards is pretty common. Sometimes, folks accidentally delete important files from external devices like flash drives or SD cards. Other times, photos disappear due to formatting or a faulty hard drive. Unfortunately, once files are permanently deleted from a computer, they can't be recovered from the recycle bin.
So, does that mean you can't get back deleted pictures? If you're in this situation, don't worry. In this article, we'll look at simple ways to recover deleted pictures from years ago on any Devices.
In this article:
Part 1. Recover Permanently Deleted Photos on Windows
In this Part:
- Method 1. Recovering Deleted Photos with Previous Versions on Windows
- Method 2: Using Backup and Restore to Recover Deleted Photos
- Method 3: Recovering Deleted Photos with File History (Windows 8 & 10)
- Method 4: Recovering Deleted Photos from Recycle Bin (Windows)
- Method 5. Using a professional Photo Recovery Software

01 Method 1. Recovering Deleted Photos with Previous Versions on Windows
On method to retrieve permanently deleted photos on Windows is by accessing Previous Versions. Previous Versions are essentially copies of folders or files created by Windows PC Backup. These copies serve as backups automatically generated by your Windows PC.
Here's how you can utilize Previous Versions to recover deleted pictures on Windows
- Right-click the folder where you lost the photos and select "Restore previous versions."
- If you see a "Recover folder" option, choose that to restore the entire folder to a previous state.

If "Recover folder" is unavailable:
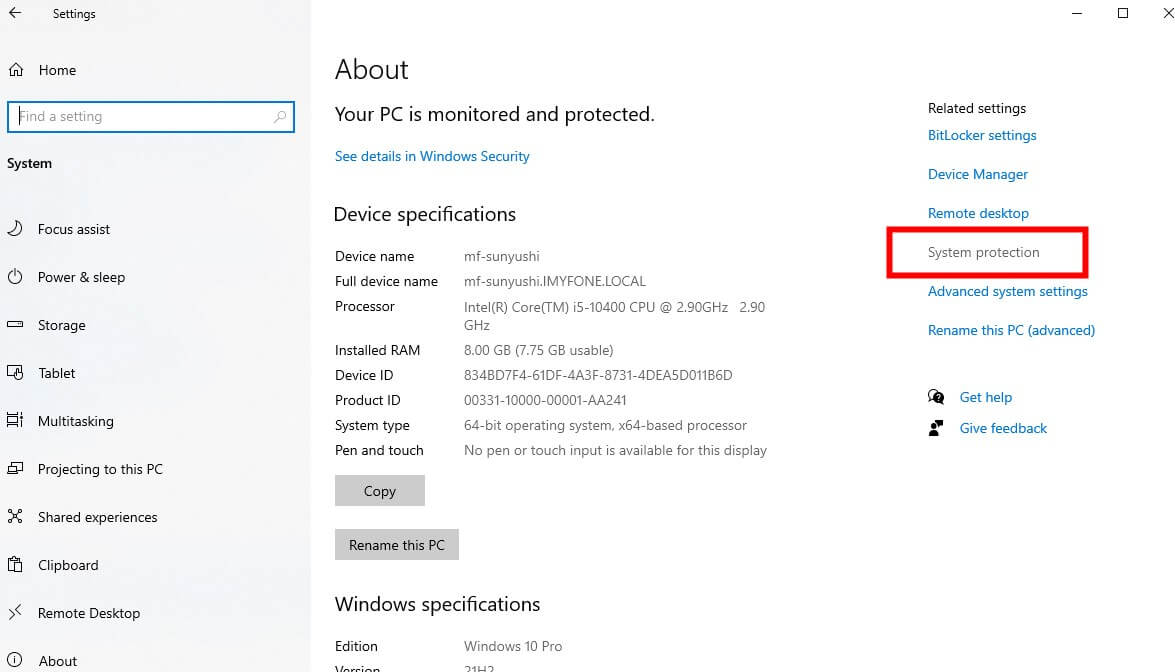
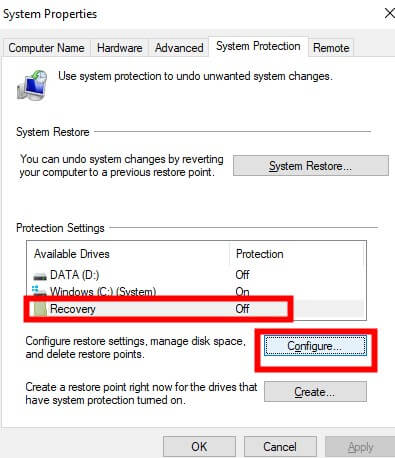
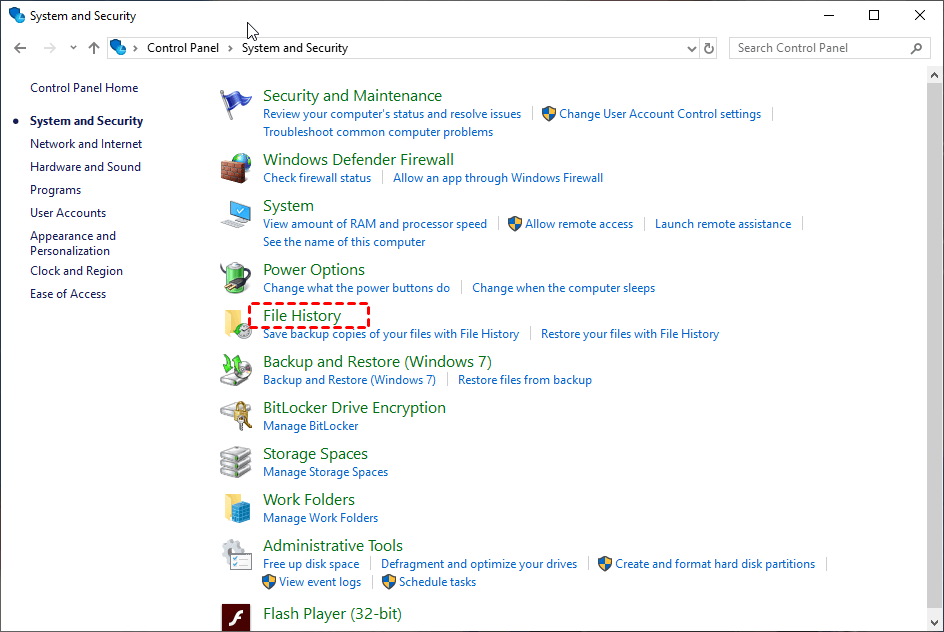
- Open the Control Panel. Go to "System & Security" > "System" > "System Protection".
- Select the drive containing the deleted photos and click "Configure".
- In the Backup and Restore window, choose the option labeled "Restore system settings and previous versions of files". Then, click "OK" to proceed.
02 Method 2: Using Backup and Restore to Recover Deleted Photos
This method attempts to recover permanently deleted photos using a previously created Windows backup. Remember, a backup needs to exist for this to work.
Here's how to try:
- Open the Start menu and type "Backup" in the search bar.
- Click on "Backup and Restore (Windows 7)" from the search results.
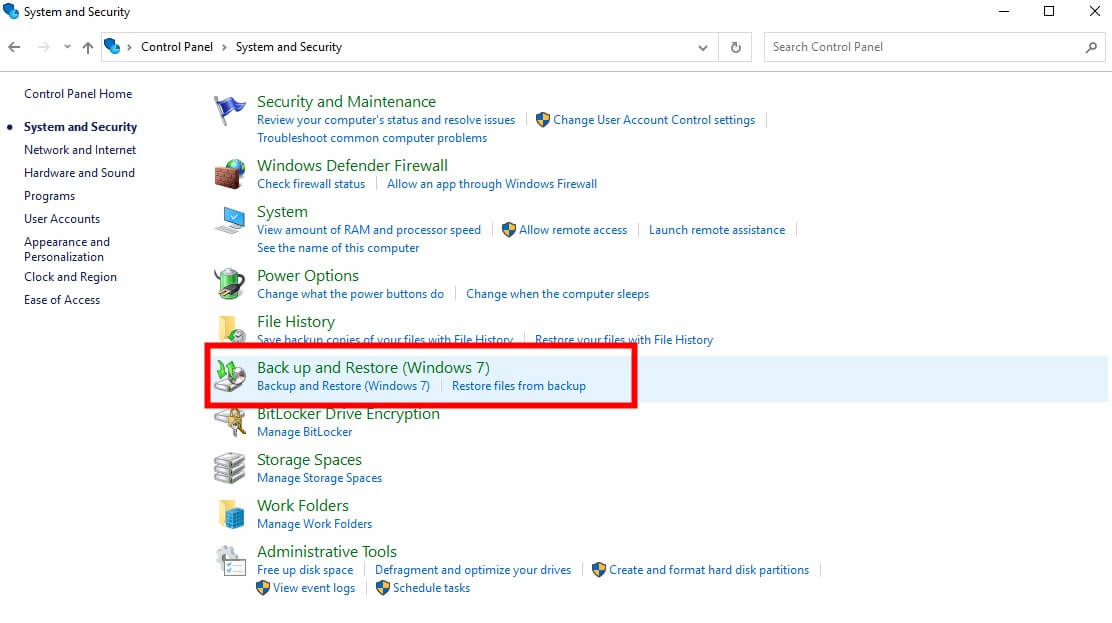
For other Windows versions, choose "Restore files from a backup".
- Depending on your version, select either:
- "Restore my files" (to recover specific photos)
- "Restore all users' files" (to restore the entire backup)
- Use the "Browse for Files" or "Browse for Folders" option to locate the folder containing your deleted photos.
- Select the desired photos and click "Restore" to recover them.
03 Method 3: Recovering Deleted Photos with File History (Windows 8 & 10)
This method retrieves deleted photos using File History, a built-in Windows backup tool for Windows 8 and 10. It's crucial to have File History enabled before deletion for this to work.
Here's how to recover photos:
Step 1. Find the folder where you originally stored the photos.
Step 2. In the Windows search bar, type "File History" and select "Restore your files with File History".
Step 3. Browse through the available backups. You can search for specific files or view folder versions.
Step 4. Locate the desired photos. Choose to recover specific photos or an entire folder at once.
Step 5. Click the "Restore" button (usually green).
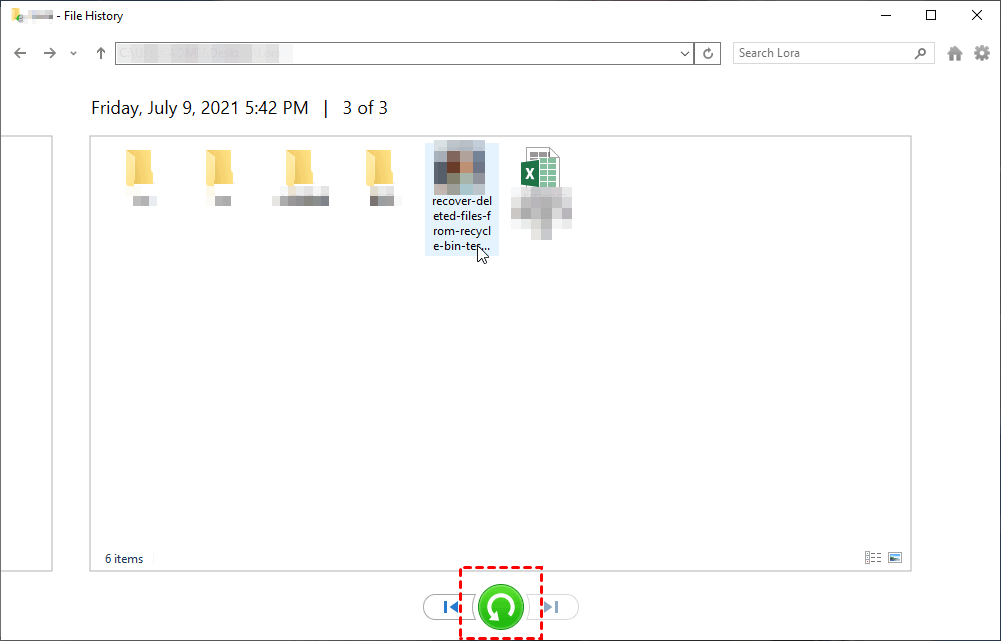
Step 6. If prompted, choose "Replace the file in the destination" to recover the photos.
04 Method 4: Recovering Deleted Photos from Recycle Bin (Windows)
The Recycle Bin is the first place to check for recently deleted photos on Windows. Here's how to recover them:
Step 1. Open the Recycle Bin on your computer.
Step 2. Locate the photos you want to recover.
Step 3. Check the "Original Location" displayed in the Recycle Bin window. This is where the photos will be restored after recovery.
Step 4. Right-click your chosen photos and select "Restore" to recover them.
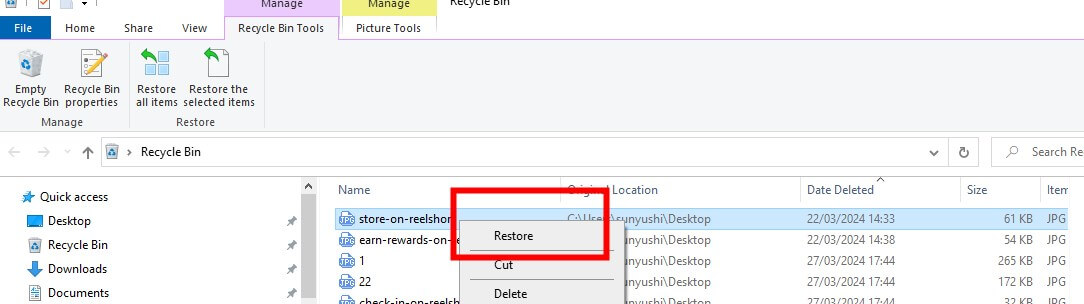
Step 5. Wait for the process to finish. The recovered photos will be placed back in their original location.
05 Method 5. Using a professional Photo Recovery Software
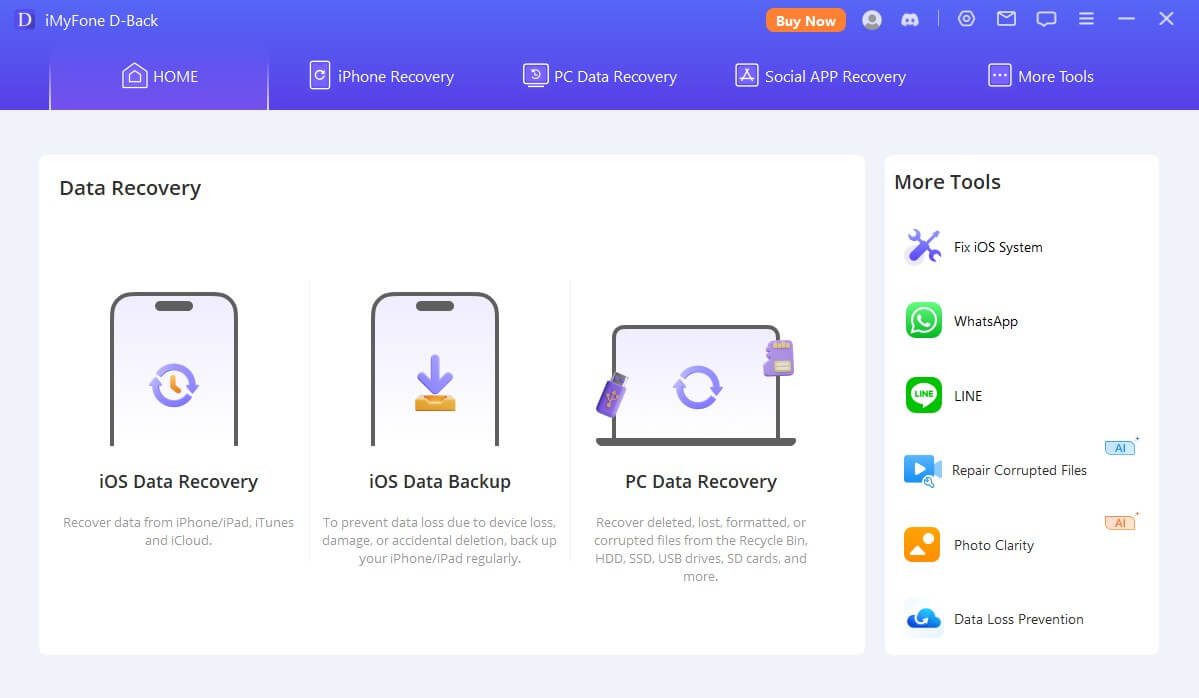
If you're seeking a simple yet robust solution to recover permanently deleted photos on Windows, consider using photo recovery software. Fortunately, there are numerous data recovery tools available that make it easy to recover permanently deleted pictures from your computer. However, when it comes to the most dependable and effective software for photo recovery, iMyFone D-Back stands out among the rest.
In addition to recovering deleted pictures on Windows, iMyFone D-Back also supports Mac computers, SD cards, USB drives, and over 2000 other devices. Moreover, when you get back your old pictures, you can use this powerful tool to enhance image quality and enlarge photos.
1,000,000+ Downloads
Key Features:
- D-Back can help you get back permanently deleted photos, even if you didn't have a backup!
- It can recover over 200 different types of data from your devices.
- D-Back also has a built-in AI tool that can repair corrupted photos, videos, and other files.
- Plus, you can store your recovered data safely in the cloud for extra peace of mind.
- And don't worry, D-Back is 100% secure to use.
Step-by-Step Guide: Recovering Permanently Deleted Pictures Using D-Back:
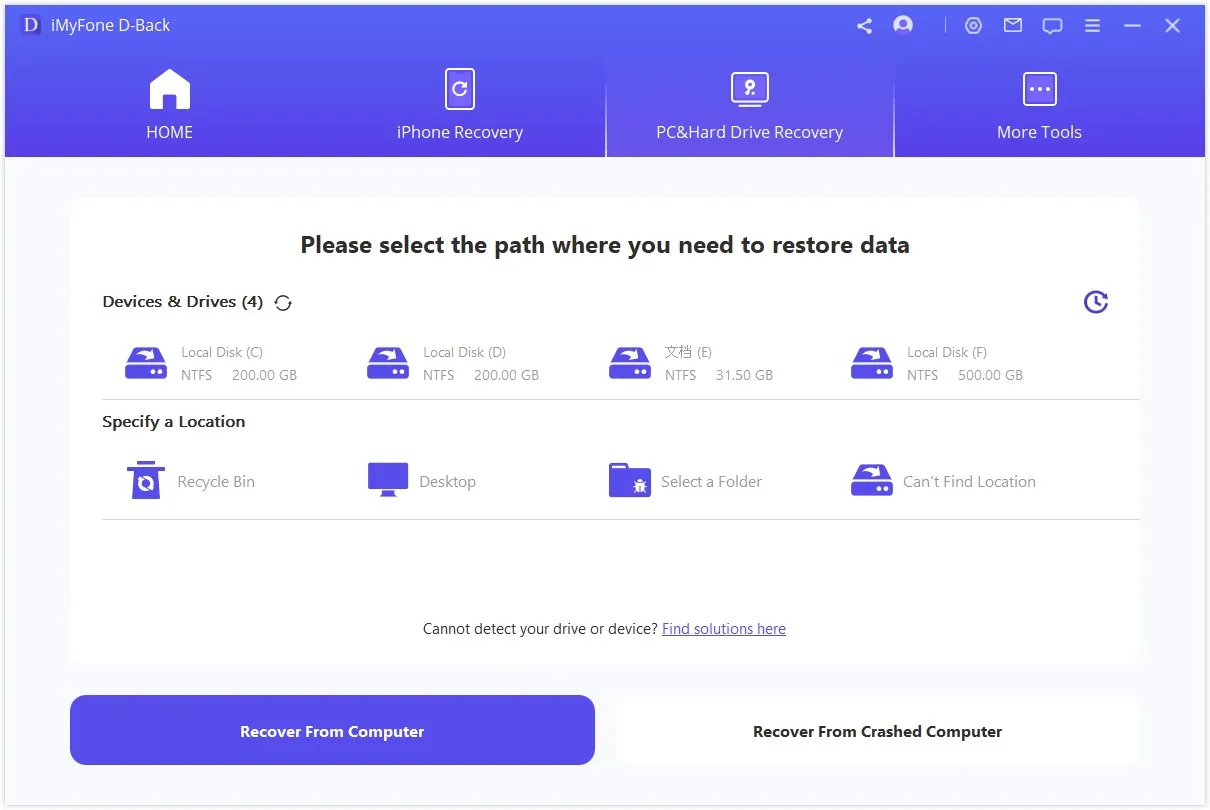
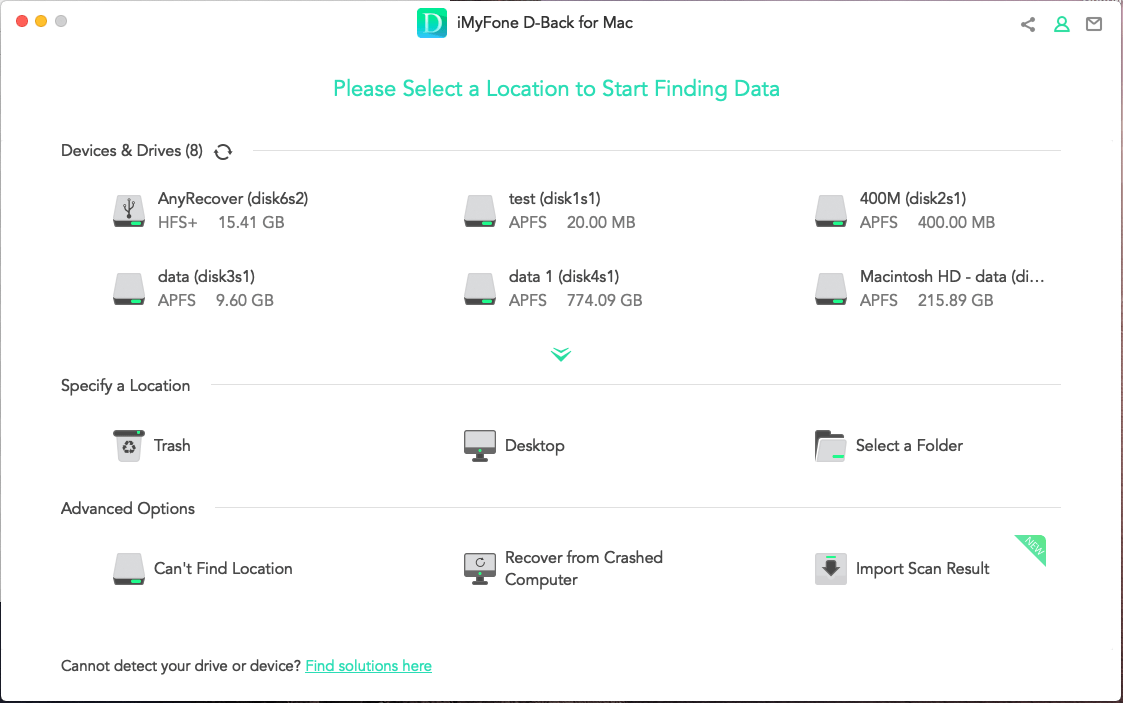
Step 1: Specify the Location
Begin by launching D-Back. Then, select the hard disk drive from which you deleted your photos. Click the "Start" button to begin searching for your lost files.
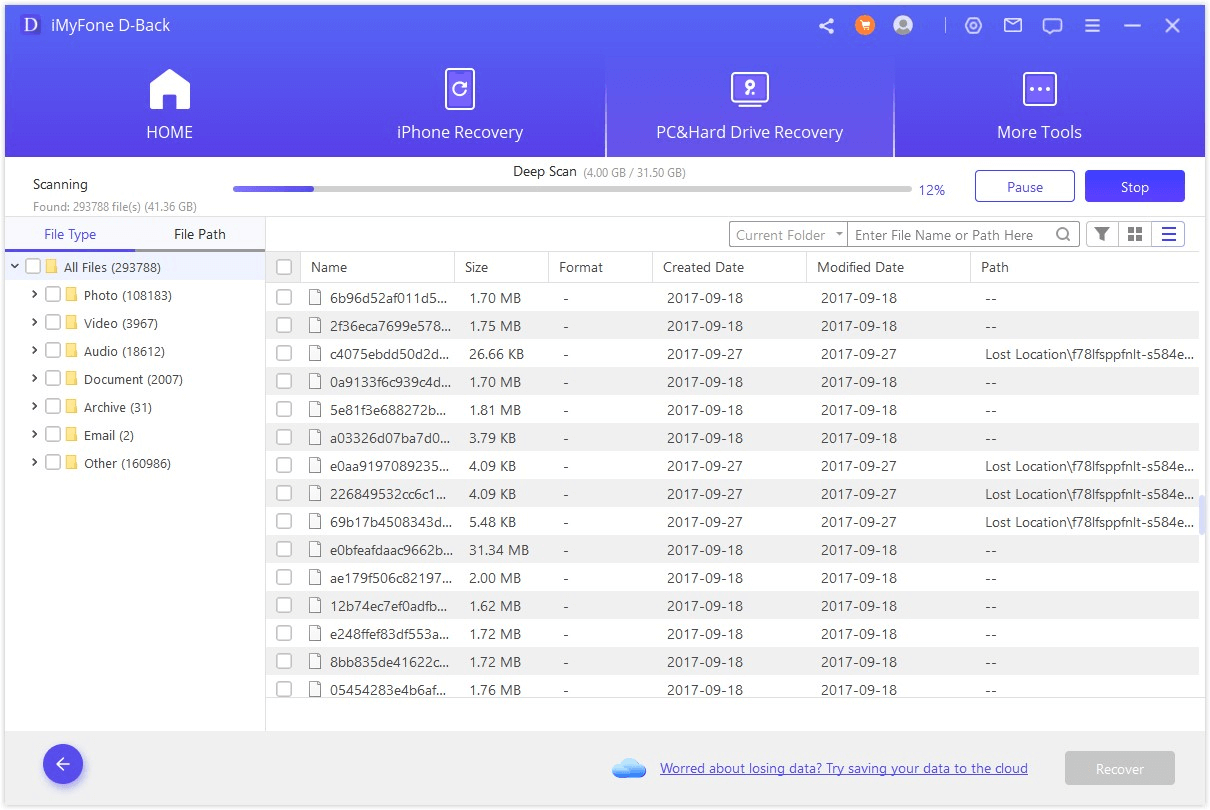
Step 2: Scan Your PC Hard Disk
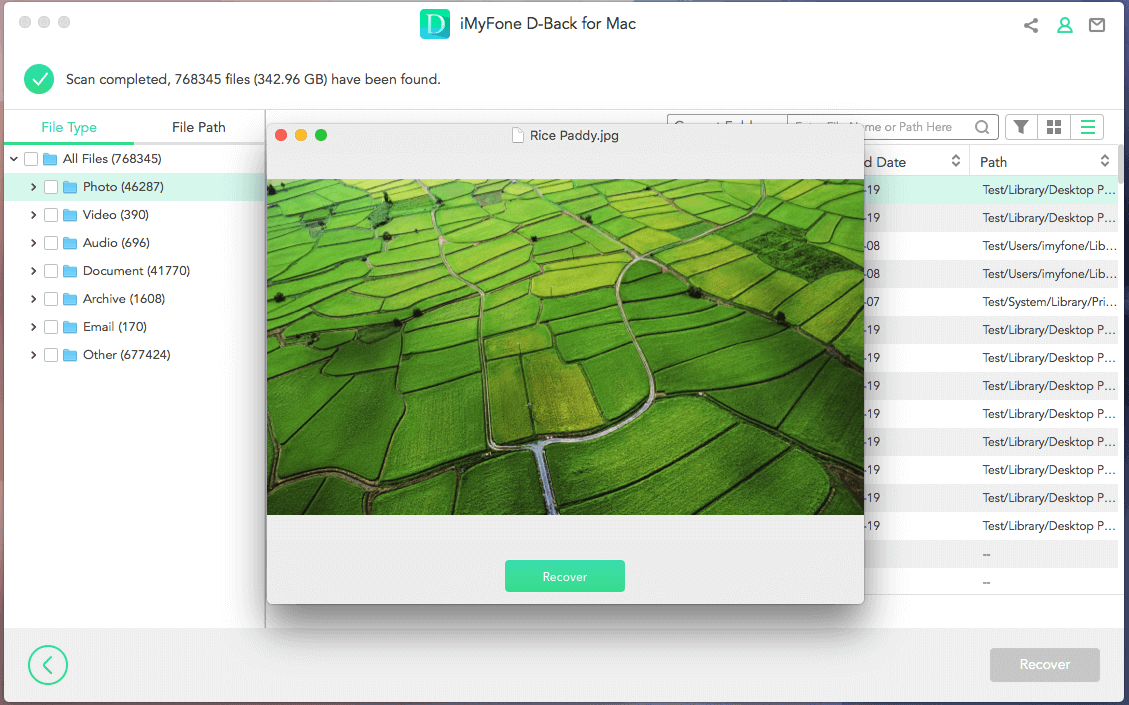
The software will now conduct a thorough scan of your chosen hard disk to locate deleted pictures. You can preview photos during the scanning process.
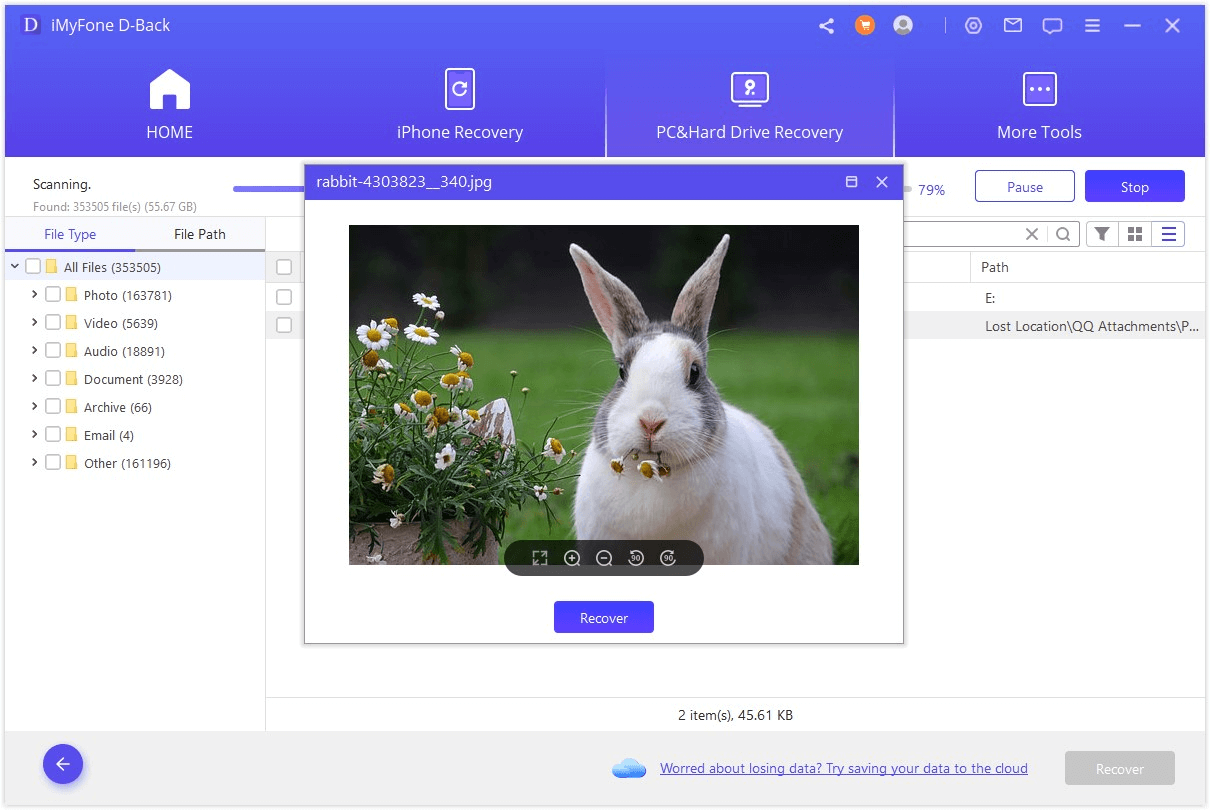
Step 3: Recover Permanently Deleted Photos
Once the scanning is complete, you'll be able to preview all recoverable pictures. Select the desired photos you wish to recover, then click on the "Recover" button to retrieve them.
Recover Permanently Deleted Photos on Mac
When a file is deleted, it remains on the disk, but its directory pointer is removed. However, over time, the space occupied by the deleted file may be replaced with new data.
If you don't have a Time Machine or other backup, refrain from using your Mac and seek assistance from a data recovery expert. Continuing to use the Mac increases the chances of overwritten deleted files, making recovery more difficult.
In this Part:
01 Method 1. Using Photo Recovery Software
Imyfone D-Back is your solution for recovering lost photos even when they're not in the Trash or backed up. It’s your best choice to recover deleted photos on Mac after 30 days. For Mac users, D-Back can recover Mac partitions, including raw partitions, formatted partitions, corrupted partitions, and more.
iMyFone D-Back Photo Recovery
Recover your deleted photos years ago on Mac without a backup
Here's how to use D-Back to recover your permanently deleted photos from Mac
Step 1: Download and install Imyfone D-Back for Mac.
Step 2: Launch the program and select a location your photos might be stored.
Step 3: Click the "Search for lost data" button to initiate the scan.

Step 4:Preview the recoverable files and make your selections. Click "Recover" to start the recovery process.
02 Method 2: Recover Deleted Photos from Mac Trash
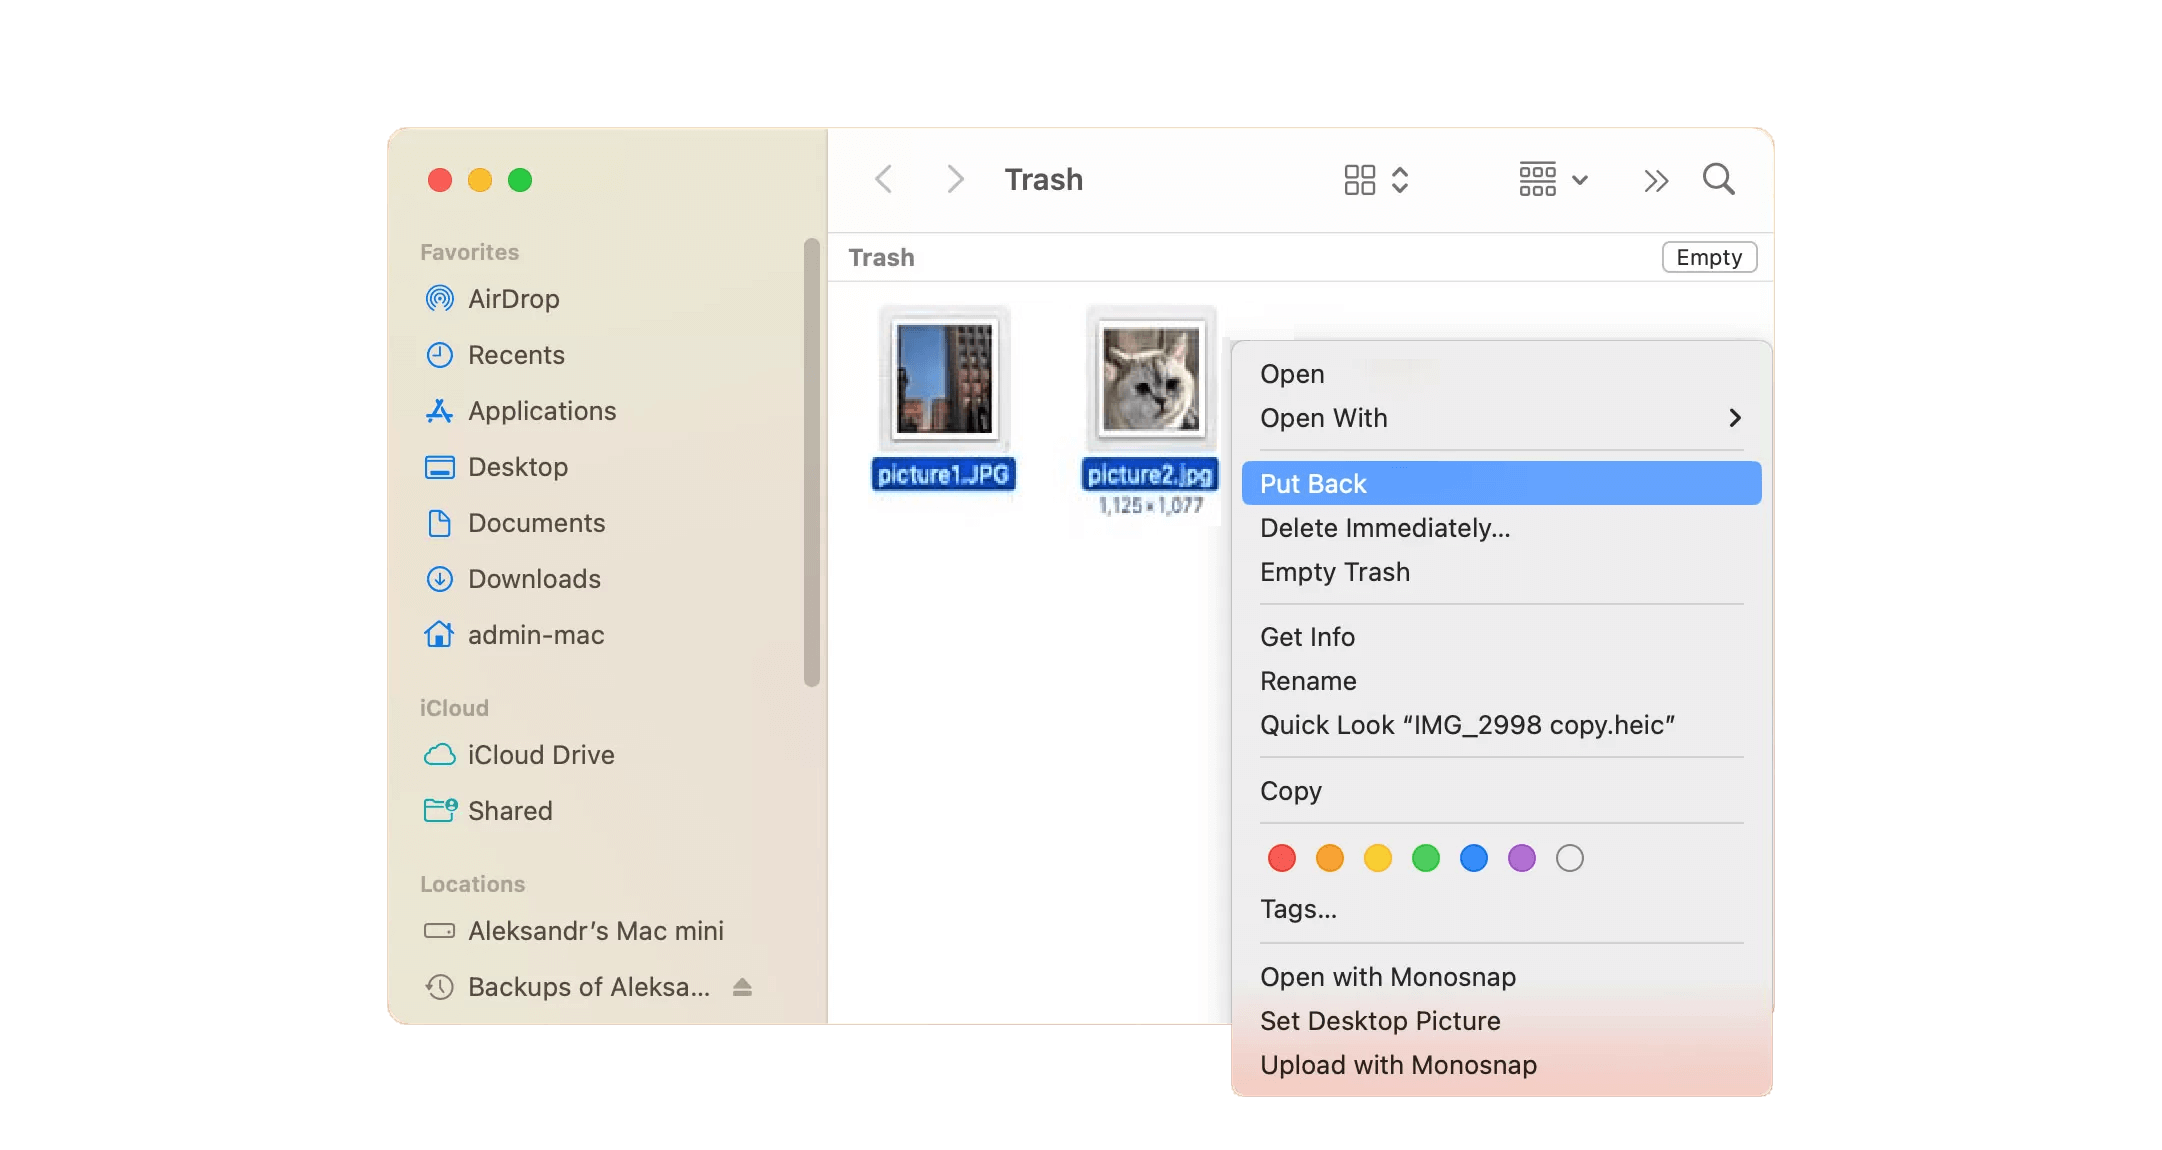
If your photos were deleted from an app or aren't found in the Recently Deleted folder, you can check the Mac Trash Bin. The Trash Bin holds recently deleted items for up to 30 days or until it's emptied manually.
Follow these steps to restore deleted photos or files from the Trash Bin:
1. Click on the Trash Bin icon to open it.
2. Find the item you wish to recover.
3. Right-click on the file and select "Put Back" to restore it to its original location.
03 Method 3. Recovering from a Time Machine Backup:
Time Machine is a built-in tool in macOS for backup and recovery. If you've been using it to back up your data, you can try restoring lost photos using these steps:
1. Connect the backup disk to your Mac.
2. Open a Finder window in the folder where the photos were stored.
3. Click on the clock icon in the menu bar and select "Browse Time Machine Backups" to open Time Machine.
4. Find the items you wish to recover.

5. Select the photos you want to restore, then click "Restore" to recover them.
04 Method 4: iCloud Recovery
To recover photos on Mac using iCloud, you must have previously backed them up to your iCloud account. Similar to Time Machine, you can also sync your photos with iCloud, allowing you to access them remotely and retrieve them from the "Recently Deleted" folder. However, note that you can only access photos from this folder within the first 30 days of their deletion.
Here's how to recover deleted photos on Mac from iCloud:
Step 1: Head to iCloud.com and sign in.
Step 2: From the options available on iCloud's homepage, click on the "Photos" icon to proceed.
Step 3: This will display all your saved photos on iCloud's interface. Navigate to the left side, where you'll find a "Recently Deleted" folder. Click on it to access your deleted photos.
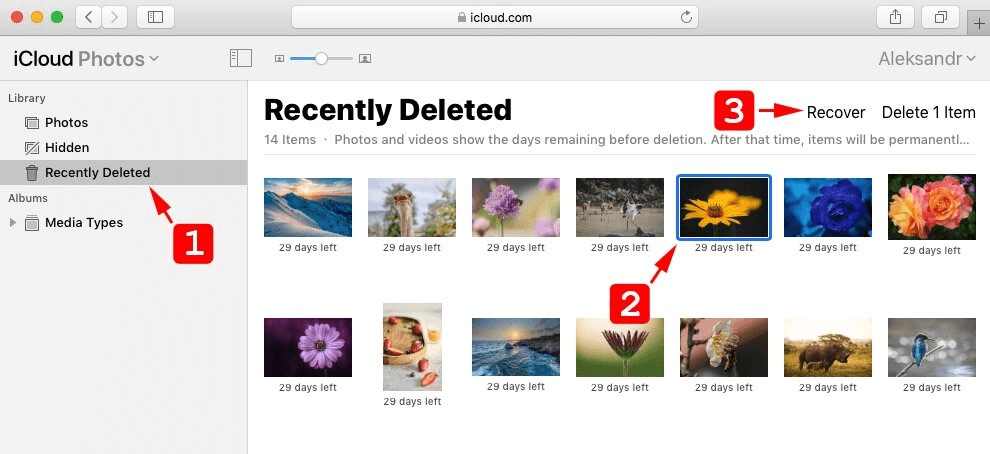
Step 4: Open the photo you wish to recover and click on the "Recover" button to save it back to your iCloud account.
Part 3. Recover Permanently Deleted Photos from iPhone
Deleting photos from your iPhone can cause anxiety. Below are various methods to recover deleted photos from iPhone. With some luck, you can retrieve your photos as long as they haven't been replaced by new data.
In this Part:
01 Method 1. Use Photo Recovery Software
To save time, we recommend using D-Back to retrieve your deleted photos directly from your iOS device. It can also recover lost data from your iTunes and iCloud backup. Unlike directly recovering deleted photos from iCloud or iTunes backup, with D-Back, you can save the recovered photos on your PC, ensuring they won't overwrite the current data on your device.
iMyFone D-Back Photo Recovery
Recover your deleted photos years ago on iPhone/iPad without a backup
Steps to Recover Deleted Photos from iPhone without Backup:
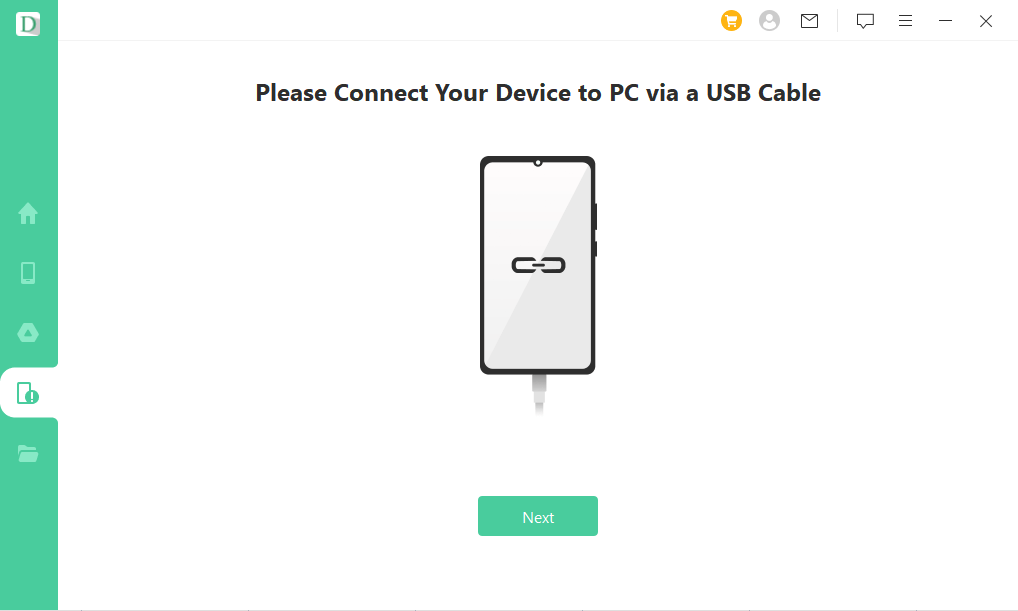
Step 1: Begin by downloading and installing iMyFone D-Back on your computer. Launch the program and navigate to the "iPhone Recovery" tab, then click on the Start button.
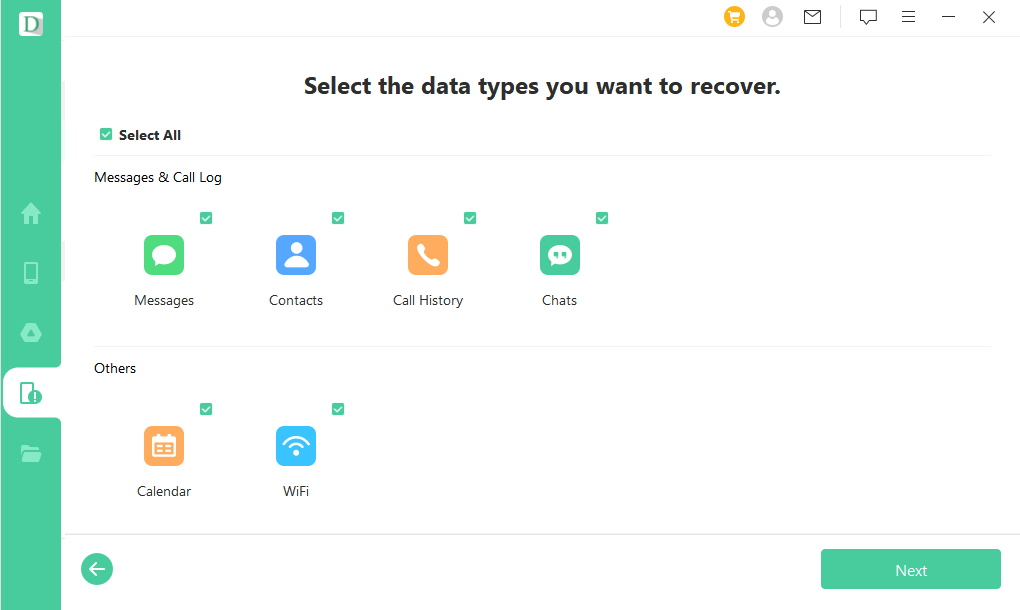
Step 2: Connect your iPhone to the computer. Once detected by the program, click Next to initiate the search for all photos on your iPhone. Select the data types you wish to recover, such as Photos, or any other desired data types.

Step 3: After the scan is complete, a window will display all recoverable photos. Preview them and select the ones you need. You can also opt to view only deleted files by selecting 'Show only the deleted files'. Once you've made your selections, click Recover to finalize the process.

02 Method 2. From an iPhone Backup
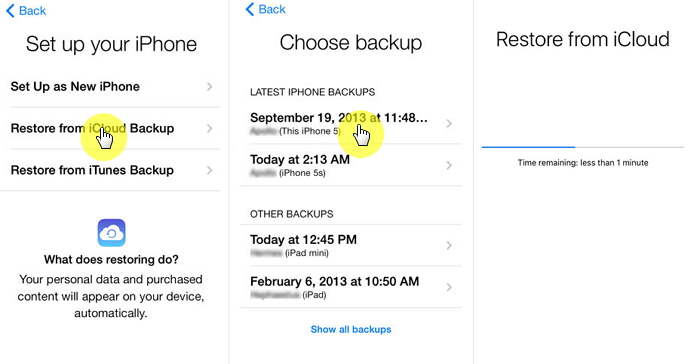
To recover from an iPhone backup without using additional software, you'll need to restore a previous backup over your existing data. Follow these steps to complete the process:
1. Open Settings, then go to General and select Reset.
2. Choose Erase All Content and Settings, then confirm the reset by tapping Erase iPhone.

3. Proceed through the setup screens and select Restore from iCloud Backup.
03 Method 3. Check iCloud Backup
You can utilize an iCloud backup to retrieve your lost images. Simply follow these straightforward steps:
1. On your iPhone, go to Settings > [your name] > iCloud > Manage Storage > Backups.
2. Ensure you have a valid backup available for recovery.
3. Navigate to Settings > General > Reset, then tap Erase All Content and Settings.
4. On the Apps & Data screen, select Restore from iCloud Backup.
5. Sign in with your Apple ID.
6. Choose the backup you wish to use for the recovery, then follow the on-screen instructions to complete the process.
Part 4. Recover permanently deleted photos from Android Phone
There are multiple methods available to retrieve deleted pictures on an Android device, depending on whether you utilize cloud storage or need to recover directly from the device. Below are instructions for recovering your photos using different techniques.
In this Part:
01 Method 1. Get Back Lost Photos from the Cloud (Google Photos, OneDrive, Dropbox):
Storing photos in the cloud offers an extra layer of security in case of data loss on your phone. Here's how to recover deleted photos from some popular cloud services:
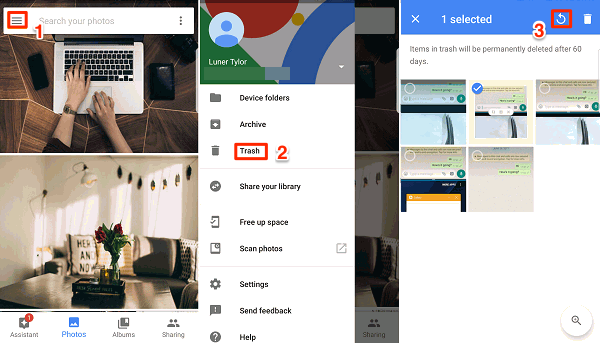
Google Photos (within 60 days of deletion):
Step 1: Open the Google Photos app on your Android device.
Step 2: Tap Menu (usually three horizontal lines) in the top left corner, then select Trash.
Step 3: Find the photo you want to recover and tap and hold on it.
Step 4: Select Restore at the bottom to bring it back.
Microsoft OneDrive (within a limited time):
Step 1: Launch the OneDrive app on your Android device.
Step 2: Tap the Me icon in the bottom navigation bar.
Step 3: Select Recycle Bin.
Step 4: Choose the photos you want back and tap Restore.
Dropbox (within a limited time):
Step 1: Open a web browser on your Android device (e.g., Chrome).
Step 2: Go to https://www.dropbox.com/ and log in to your account.
Step 3: Request the desktop site using the options in the top right corner (might vary depending on the browser).
Step 4: Click on Files in the left sidebar.
Step 5: Select Deleted files.
Step 6: Find the photo you want back, tap it, and select Restore.
02 Method 2. Use Photo Recovery Tool
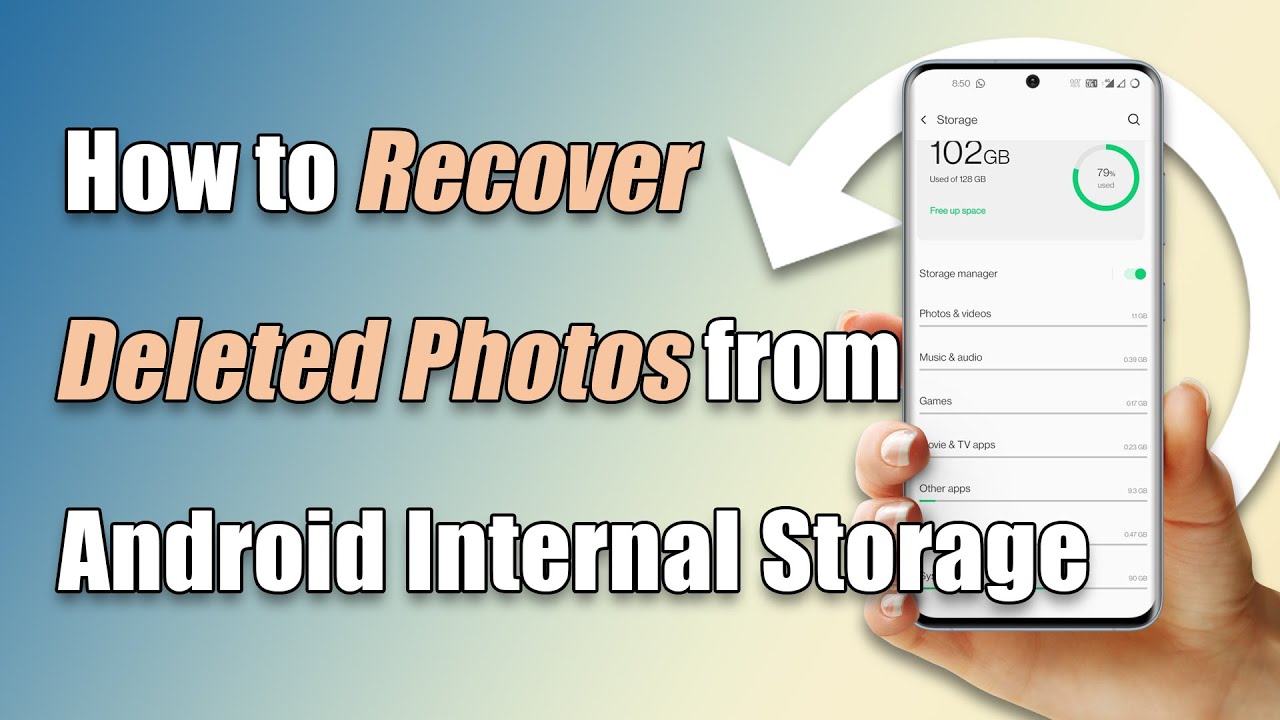
When photos are permanently deleted from the Android gallery, they are initially stored in your Android phone’s internal memory until they are overwritten by new data. To locate and retrieve these deleted and hidden photos, you may require a robust photo recovery tool to extract them from your phone's memory.
D-Back – Android Data Recovery is the perfect solution for this in 2024. With D-Back, you can easily locate, preview, and recover deleted photos years ago from your without needing a backup.
iMyFone D-Back(Android)
iMyFone D-Back(Android) can recover deleted photos, messages, call logs from Android with ease.
Step 1: Open iMyFone D-Back for Android and select "Recover Phone Data."

Step 3: Select the Photo type and click Next. D-Back will start scanning your Android photos.
Step 4: After the scan is complete, browse through the photos and select the ones you want to recover. Click "Recover" to restore your chosen files to your computer.

03 Method 3: Recovering from an SD Card
To retrieve files from an Android SD card, start by removing the card from your phone and connecting it to a computer. Then, utilize user-friendly data recovery software like D-Back, which is compatible with both Mac and Windows, to scan the card for lost data. This method is highly effective.

Here's how to do it:
1. Download and install D-Back on your computer.
2. Use a card reader to connect the SD card to either a Mac or Windows PC.
3. Select the SD card from the list of disks displayed.
4. Click "Scan" on your computer to begin finding your missing files.
5. Preview the photos detected by the software and choose the ones you want to recover. Click "Recover" to restore your lost images.
Part 5. Recover permanently deleted photos from Digital Camera

If you need to retrieve photos directly from your Canon, Fujifilm, Nikon, or any other brand of digital camera, start by checking the camera’s recently deleted folder where files are temporarily stored after deletion. If the photos are not found there, you can use D-Back to recover your files. Simply follow these easy steps to recover deleted photos from your digital camera:
Step 1: Install iMyFone D-Back and connect your camera to your PC. Ensure that your computer detects the camera. Then, open the software.
Step 2: Your camera will appear on the screen with its name. Click on the camera icon to initiate the recovery process. The scanning process will begin, and all recoverable data will be displayed on the screen.
Step 3: Your images will also be visible. Select and preview them to confirm. Click "Recover" to restore your photos. You can recover multiple files and save them to your desired location.
Summary
Losing photos can be stressful, but there's hope! This guide explored various recovery methods for different devices. Remember, prevention is key, but for those "oh no" moments, consider using D-Back. It boasts powerful recovery features and even offers free tools to help safeguard your irreplaceable photos in the future.
- Supports a wide range of data types such as messages, photos, videos
- Fix a variety of iOS issues, including being stuck on the Apple logo, screen not turning on, recovery mode loop and black screen, ect.
- AI repair broken/corrupted files, photos and videos.
- 100% Work with a variety of data loss scenarios.
- Retrieve lost data from different types of devices
(Click to rate this post)
Generally rated 5 (256 participated)
Rated successfully!
You have already rated this article, please do not repeat scoring!