iOS 13 brings new feature to edit screenshot after taking. There are many reasons why you might want to take a screenshot in iOS 13. Maybe you want to show your friend a funny text that you received or you want to save some information. Either way, you might end up having to edit the screenshot for one reason or another. Here you can have a full review of the screenshot markup tool in iOS 13.
What Are the New Screenshot Features in iOS 13?
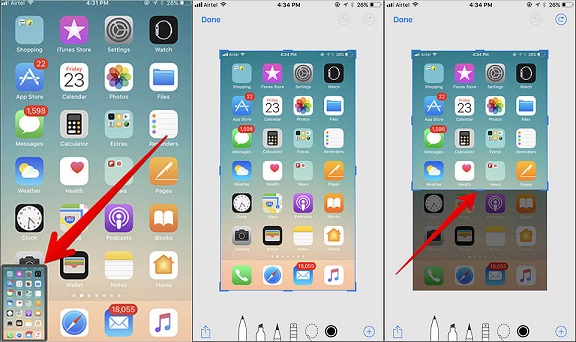
Before, when you took a screenshot and wanted to edit it on iOS, you had to go into Photos and look around for your screenshot and then load it into an editing application. In iOS 13, this has changed and editing your screenshot is a lot easier. The feature Markup, which you can use to draw on or edit photos, is now better integrated into the process. With just a single touch right after you take the screenshot, you have the opportunity to edit it with Markup and save it.
Interesting Tips for Screenshot Markup Tool in iOS 13
Here are some tips that might make it easier for you to use the new editing process for screenshots on iOS 13:
How to Access Screenshot Markup Tool in iOS 13
When you take a screenshot, a little thumbnail of the shot will show up in the corner of the screen. Just tap on the thumbnail and you will automatically be taken to Markup, where you can edit the screenshot however you want before you save it. If you don’t want to edit it, then just swipe the thumbnail away and it will be saved into your camera roll. Later, if you change your mind, you can just find the screenshot in Photos and edit it on Markup like you would a normal photo.

How to Edit a Screenshot in iOS 13 Using the Markup Tool
There are a few different things you can do to the screenshot with Markup:
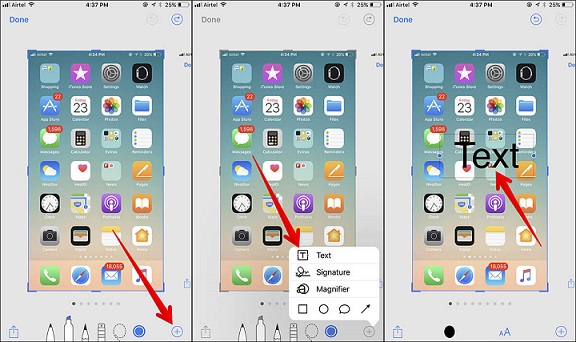
- Add Text - Tap the little plus sign in the right bottom corner, then choose Text. After that, you will be able to add a text box to the image. Tap inside the text field and your keyboard will come up so you can add the text.
- Add Signature - Tap the plus sign in the corner and choose Signature. You can then add a signature from Preview onto your screenshot.
- Magnifier - Tap the plus sign in the corner and choose Magnifier. Drag the circle around to where you want to magnify. This is a feature that lets you highlight a certain part of the screen.
- Shapes - Again, tap the little plus in the corner and choose one of the shapes at the bottom of the box that comes up. You can choose from a circle, a speech bubble, an arrow, or a square. You can resize them by tapping and dragging the edges.
- Share - Tap the share icon in the upper right corner and you can choose a few options on who you want to share it with or where you want to send it.

Can We Disable Screenshot Markup Features in iOS 13?
Currently, you can’t actually disable the screenshot markup feature on iOS 13. However, if you don’t want to edit your screenshot with Markup, simply swipe away the thumbnail that comes up in the corner when you take your screenshot.
What Should You Do If Screenshots Occupies Too Much Space in iOS 13?
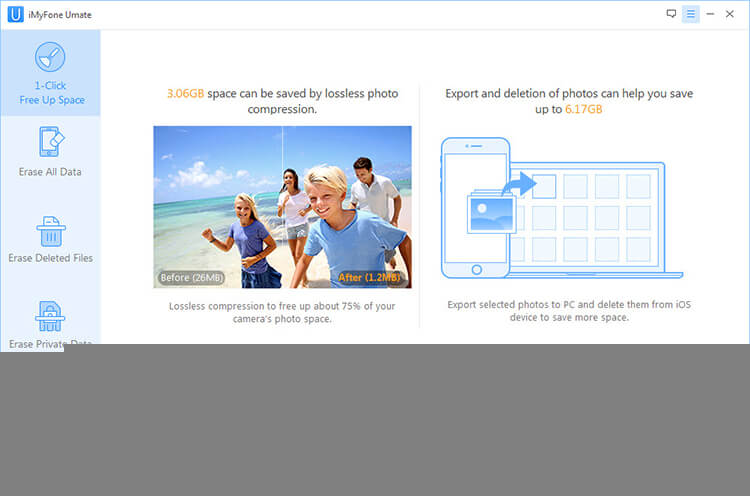
Screenshots can indeed occupy a lot of space if you’re not careful. They are detailed images, so this means that the files can be fairly large. This is why it’s a good idea to use a third-party app like iMyFone iPhone Cleaner Win to help make room on your iPhone/iPad in iOS 13. It can save you a lot of space in a number of ways.
Key Features about iOS 13 Screenshots:
- Losslessly compress your photos (and screenshots) to reclaim 75% photo space.
- Back up screenshots or photos and safely delete them from iOS 13 iPhone/iPad.
- Permanently erase screenshots/photos to be unrecoverable and none of your privacy is compromised.
- Previously deleted screenshots can be found out and completely destroyed.
- 1-click to clear photo cache so that you have less junk files taking up space - free trial.
- Strongly recommended as iPhone cleaner by MacWorld, iPhoneinCanada, makeuseof.com, etc.
How to Compress Screenshots from iOS 13?
Step 1: Connect your iOS 13 device to your computer and launch iMyFone iPhone Cleaner (after you have installed it).
Step 2: Click “Photos” tab from the home interface. It should tell you how much you can save by compressing your photos.
Step 3: Click on “Backup & Compress.” It will start to back up screenshots and photos and losslessly compress them.

It’s also suggested to run “Junk Files” from the home interface to clear photo cache for free.
iMyFone Umate Pro is one of the most advanced data erasers for iPhone, making recovery next to impossible.
It not only recovers a great deal of space on your iPhone, but also removes private data from your iPad and iPod touch with no possibility of its recovery.
-- Appked
While taking screenshots is often necessary, they can also take up a lot of space. If you compress them or permanently delete them with Umate Pro, this will help you recover room on your iOS 13 device.


