


 June 3, 2025
Want to know how to transfer picture files from Google Pixel to computer? Then this article is for you. Here, I am discussing the three best ways you can follow to export the photos (and other data) and I am also giving my final say about which way is the easiest one in the end.Let's go!


Part1. How to Transfer Picture Files From Google Pixel to Computer with D-Back for Android?
If you have hundreds of picture files and want to know how you can smoothly transfer them from your Google Pixel to a Computer, then iMyFone D-Back is for you.It is, in fact, a data recovery software, not only can you get back lost picture files, but also you can use it to easily send photos from Google Pixel to Computer in no time.
The reason people prefer iMyFone D-Back software is that it is perhaps the easiest one to use to export files. You just have to follow simple steps that won’t even take five minutes to send the pictures (or any data). This software has already been downloaded over a million times, and more people are choosing it every day to transfer or recover pictures, videos, and any other data.
1,000,000+ Downloads
Key Features:
- Extract Google Pixel data including picture,contacts, messages, call history, calendar, etc;
- Capable of transferring your lost/disappeared pictures caused by accidental deletion, water damage, system crash and more;
- 100% safe and Legit for transferring pictures from Google Pixel;
- Support to preview and select the pictures you'd like to transfer to your PC.
iMyFone D-Back User Guide
Step 1: First, download iMyFone D-Back on your PC/Computer. After downloading, install it and then open it.
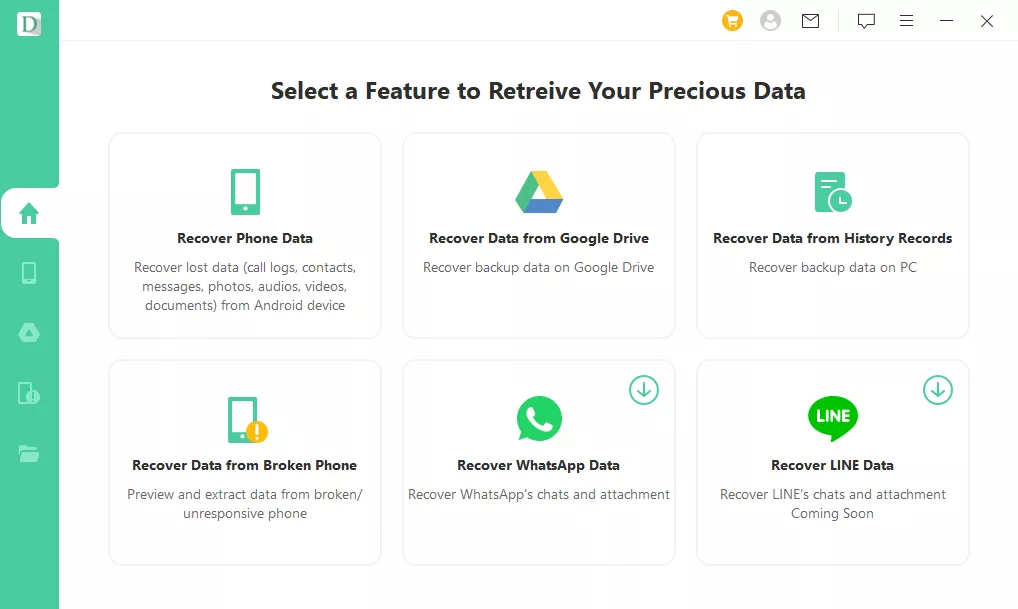
Step 2: On your screen, you will then see the iMyFone D-Back Interface. Out of the different options, click on “Recover Phone Data”
Step 3: Connect your Google Pixel to your PC/computer with a USB cable and confirm the connection on your mobile.

Step 4:iMyFone D-Back will then ask you what type of data you want to transfer/recover. If you want to transfer pictures only, select “Photos” and let the software scan.

Step 5: You will then see every picture on your screen after a few minutes. Preview them and then select the ones you want to transfer. After selecting, click on “Recover,” and the images will be saved on your computer/PC.

In addition to photos, you can also use iMyFone D-Back to transfer videos, audio, contacts, messages, and many other data.
Part2. How to Transfer Videos Files From Google Pixel to a PC via USB Cable?
You can also simply use the USB cable to connect your Google Pixel mobile to a PC to transfer videos (and not use any extra software to do this).
Step 1: Connect one end of a USB cable to your Google Pixel and the other end to a USB cable.
Step 2: On Google Pixel, confirm the device, and the PC will also recognize your mobile.
Step 3: On your Google Pixel, you will see the “Charging this device via USB” notification in the notification bar. Tap on it and change the settings to “File Transfer.”

Step 1: Open “My Computer,” and you will see your mobile at the end. Click on it.
Step 2: Your data on your mobile will now be on your PC’s screen. Select the videos you want to transfer. Right-click on them and choose “Copy.”
![]()
Step 3: Then, go to the folder where you want to save the videos. Right-click there and choose “Paste” to save the videos.
Wondering how this method is different from the iMyFone D-Back?
The reason iMyFone D-Back is easier than just simply using USB is that when you select which type of data (pictures, audio, videos, etc.) you want to export before the scanning, every file of such data only comes on your screen.
But when you simply use a USB, you will have to open every folder to find the videos or pictures to copy and save.
So, what the iMyFone D-Back can do in a few minutes, you will have to spend hours doing the same when you simply use USB and no other software.
Part3.How to Transfer data from Google Pixel to Computer via Coolmuster Android Assistant?
Coolmuster is another software that can help you transfer data to a computer easily. Just like iMyFone D-Back, it can be used to export any type of file to a different device by following simple steps:
Step 1. Download and launch Coolmuster on your Computer.
Step 2. On the interface, choose “Android Assistant.”

Step 3. Next, use a USB cable to connect your Google Pixel to your computer.
Step 4. After following the prompts, click on “My Device” on the top left side and then choose the data you want to transfer.

Step 5. Select the files and then click on “Export” to save them on your computer.
Final Say
So, how to transfer picture files from Google Pixel to a computer?There are many ways to do this, but the best one that millions of people follow is: By using iMyFone D-Back.Why?It is because this software is easy to use, has ultra-fast scanning speed, and is super safe. Plus, you can also preview the files before you save them on your PC or computer.So, download iMyFone D-Back and transfer pictures from Google Pixel to a Computer smoothly.