iPhones are known for their amazing performance and camera capabilities. However, when transferring the images and videos captured on the iPhone, most people do not know which is the best method. So, here we have the 4 best methods to transfer videos from iPhone camera roll to computer.
Table of Content [Hide]
- Part 1. Transfer Videos and Photos from iPhone Camera Roll to Computer Wirelessly
- Part 2. Copy Videos from iPhone Camera Roll to Computer with File Explorer
- Part 3. Transfer iPhone Camera Roll to PC Using Photos App
- Part 4. Sync Photos from iPhone Camera Roll to Computer via iCloud
- Bonus: Ultimate Tool to Export Videos from iPhone to PC Within Several Clicks

Part 1. Transfer Videos and Photos from iPhone Camera Roll to Computer Wirelessly
The first method you can try is using the AirDrop feature. It helps share videos and photos across different devices wirelessly. However, there is one major requirement. The requirement is that you must have an Apple Computer running on macOS.
It is because AirDrop only works on the Apple ecosystem, and you cannot use it on Windows PCs. So, if you meet this requirement, you can proceed with the process using the following steps:
Step 1. Select the photos or videos that you want to transfer to your PC, share them and go for AirDrop.
Step 2. Make sure that AirDrop receiving is turned-on on your PC.
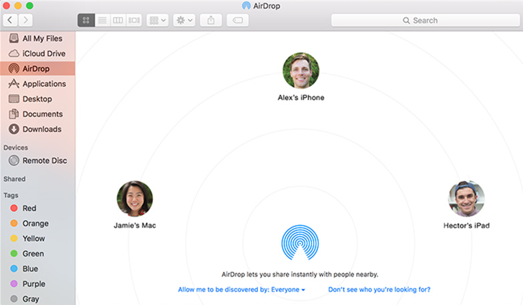
Step 3. Open AirDrop, and your devices will easily find each other.
Step 4. Accept receiving photos on your PC; within a short time, you will have those images transferred to your PC.
You can still use the wireless transfer method if you have a Windows PC. Many third-party applications provide this functionality, including SHAREit, Xender, Snapdrop, etc. The experience of transferring your photos and videos to your computer using those apps may not be the same as Airdrop. However, they will still get the job done for you.
Part 2. Copy Videos from iPhone Camera Roll to Computer with File Explorer
This method is also among the reliable ones because of the simplistic approach. You only need the USB data cable to connect your iPhone to your computer, and there are no additional requirements. So, if you are going to use this method of transferring your photos from iPhone to PC, here is how you can do it:
Step 1. Unlock your iPhone and then connect it to your PC using the USB data cable, trust your PC on iPhone if it asks.
Step 2. Now open the file explorer on your PC, and in the drives section, you will find your iPhone.
Step 3. Open the iPhone folder and go to an internal storage folder. There will be a DCIM folder that will contain many sub folders.
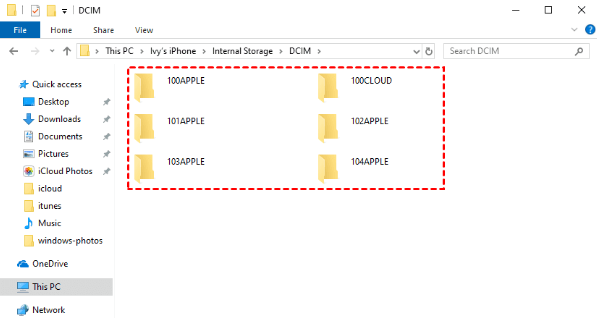
Step 4. The tricky part starts now because you have to look inside each folder and copy the photos and videos you want to transfer.
Step 5. Select, copy, and paste those images to a folder in your PC storage and disconnect your iPhone from the PC.
With these steps, you will be done transferring your photos and videos from your iPhone's camera roll to your Pc. The best part is that this method works across all Windows computers.
Part 3. Transfer iPhone Camera Roll to PC Using Photos App
For this method to work, we will use the Photos App on your Windows computer. Remember that throughout this method, whenever we refer to Photos App, we will use the Windows photos app, not the iPhone. You will need a USB data cable to connect your iPhone and PC for this method to work. After you have everything, you can follow the steps below:
Step 1. Install the latest iTunes version on your PC.
Step 2. Unlock iPhone and connect it to the PC using a USB data cable, and tap on Trust.
Step 3. Open Photos App on PC, click on Import and select From a USB device. The import option is present on the top right.
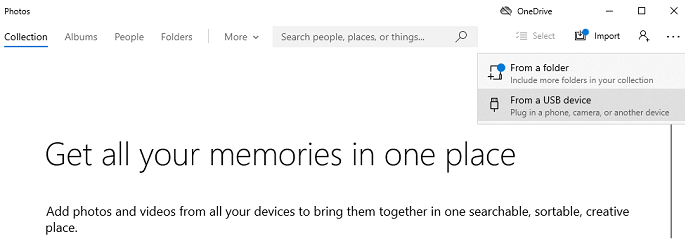
Step 4. Uncheck the images and videos that you do not want to transfer and continue.
Within a short time, your PC will have all your selected photos and videos transferred to your PC, providing you with a simple and easy experience. Make sure that unless the process is not complete, you do not disconnect your iPhone from the PC. Otherwise, you may not get all the required photos and videos on your PC.
Part 4. Sync Photos from iPhone Camera Roll to Computer via iCloud
Using the iCloud Sync Photos feature is the last method we will discuss here. It is also one of the most convenient methods that you can try. However, it needs you to have iCloud storage space available and a good internet connection. It is because, for this method to work, the process will include downloading and uploading images through the iCloud platform on your devices. Here are all the steps that you will need to follow to use this method:
Step 1. Get the same Apple ID working on your iPhone and your PC.
Step 2. Go to your iPhone, turn iCloud Photos on.
Step 3. Open iCloud for Windows and go to options, check iCloud Photo Library and then check/uncheck any other options you want according to your requirements.
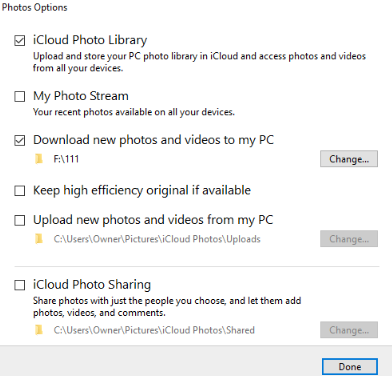
Step 4. Click on Done, then on apply.
With these steps, your PC will automatically sync with the iCloud platform, and you will get all the images and videos on your PC that are synced. This method also works for all iOS devices and Windows PCs. The best part here is that you must set it up only once. It can also work across multiple devices.
Bonus: Ultimate Tool to Export Videos from iPhone to PC Within Several Clicks
If you have tried all the methods up there and it still doesn't work, don't worry and you can try the tool we've tested. iMyFone iTransor Lite is an app designed for exporting more than 18 types of data from iPhone to computer, and it is really user-friendly and can help you backup or export any data including videos and photos on iPhone camera roll really quick. Moreover, you can also export data from iTunes or iCloud without actually downloading those apps on your computer.
Conclusion
After capturing amazing videos and photos, you may need to transfer from iPhone camera roll to computer for whatever reason. Depending on your computer and OS, the experience may vary for you. So, depending on your resources, you must go for the best one of the above methods to get the best experience of transferring photos and videos from your iPhone to your computer.


 July 5, 2022

