1. I've been getting many pop-up and email notifications about my meager iCloud storage space. There's no chance that I'll upgrade so how do I turn off iCloud notifications on iPhone?
2. How do I turn off annoying notifications about iCloud and backup? Annoying Alerts.
3. Yes, I know my iCloud storage is full. No, I don't want to buy more at the moment. How can I get those annoying notifications to stop popping up every 30 minutes?
We found the above questions in Apple's communities and other Q & A sites. If you are an iOS device user, you probably back up your data on iCloud and face same problem like them. At some point, your storage will become full. This is when you will start getting a notification telling you that you don't have enough storage every now and then. This can be annoying. However, there are ways tells how to stop iCloud notifications on iPhone/iPad, even if you use iOS 15. We outline these methods in this article.
1. Delete Old Backups in iCloud
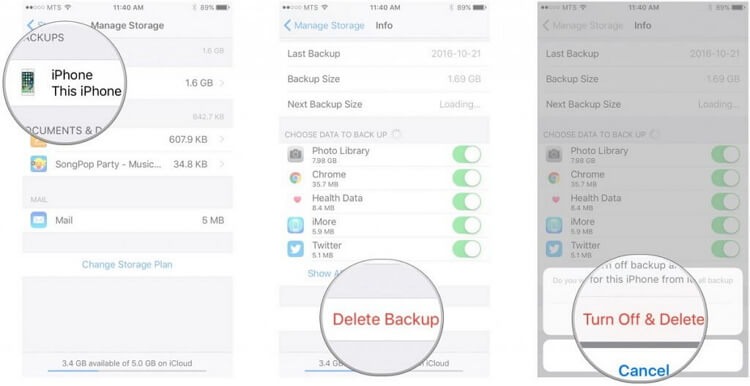
Old backups you don't need anymore may be filling your iCloud storage and leads to the annoying notifications. To stop iCloud storage pop up on iPhone/iPad, you can release this space by deleting these old backups. The steps below should help you do it:
- Step 1: Open your iOS device Settings. For people using from iOS 10.3 to iOS 15, tap on [your name] > iCloud > Manage Storage or iCloud Storage. If you are using iOS 10.2 and before, tap on Settings > iCloud > Storage.
- Step 2: Go to Backups you will find how much space used by your old backups.
- Step 3: Select the Backups you don't need and tap Delete Backup.
2. Carefully Choose What to Back Up
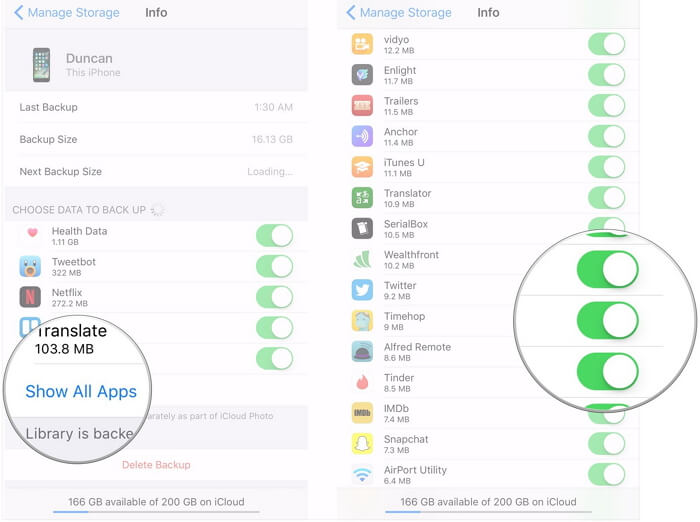
You should only back up the most important data on iCloud. Most apps on your iPhone/iPad usually back up to iCloud automatically. By disabling the automatic backups for the less important apps, you will save yourself a lot of storage space and stop iCloud notifications on iPhone/iPad. Here is how to do it.
- Step 1: Same with the method 1, you need to open Settings and go to Manage Storage or Storage in iCloud.
- Step 2: Go to Backups and locate your device. Tap on it you will find what apps are backed up under CHOOSE DATA TO BACK UP.
- Step 3: Click Show All Apps. Go through your apps and turn off the ones you may never need to restore.
BTW, you can also directly search this file and then save it to any place you think it will be safe there.
3. Back Up Photos to My Photo Stream
Using iCloud Photo Library to back up your photos will take too much of your space, especially when the amount of photos is large. My Photo Stream doesn't eat into your iCloud storage at all. To use My Photo Stream to back up your photos, follow the steps below:
- Step 1: Visit Settings, tap on iCloud, and then on Photos.
- Step 2: Toggle off iCloud Photo Library and then toggle on My Photo Stream.
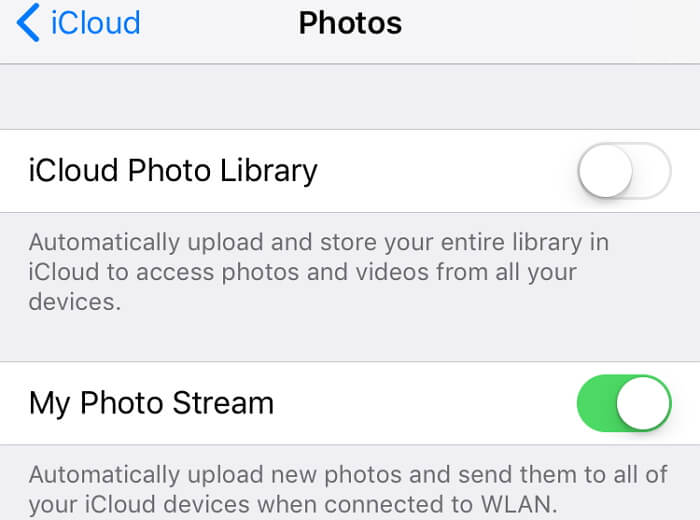
But you need to notice that My Photo Stream only uploads your last 30 days and up to 1000 photos. The photos which are not in the scope will be saved on your device and use your device storage.
4. Back Up iPhone with an Alternative
If you are tired of having to worry about the iCloud storage notifications, you will be happy to know that you can stop using iCloud for backup, then stop iCloud notifications on iPhone/iPad permanently. However, how to ensure the data on your device? Try to use an alternative to back up your data and the best alternative available is the iMyFone D-Port.
What Can iMyFone D-Port do for iPhone Users?
This is a tool that works for almost all iOS devices and iOS versions, including iPhone 13 running iOS 15. You will have the ability to use iMyFone D-Port with iPad, iPod touch, and iPhone. The benefits you get from this tool include:
Key Features:
- It's free to back up all the data, or only certain types of data on your device.
- It won't affect your old iCloud and iTunes backup, which is what iTunes or iCloud cannot do.
- The backups it makes will not use your iCloud storage space. This could be a good news for those who have 5GB free space.
- This tool is pretty easy to use. With several clicks, you get a backup for your device.
How to Back Up iPhone with iMyFone D-Port?
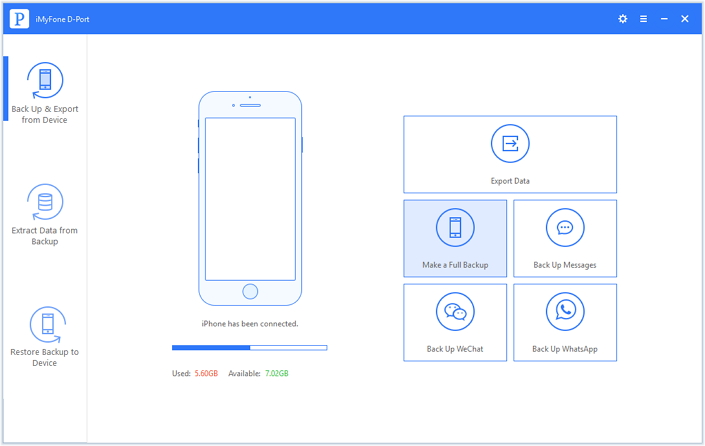
- Step 1: From iMyFone D-Port left panel, select Back Up and Export from Device. You can see that the program can back up all the data, or specific data on your device. Here we take Make a Full Backup option as example.
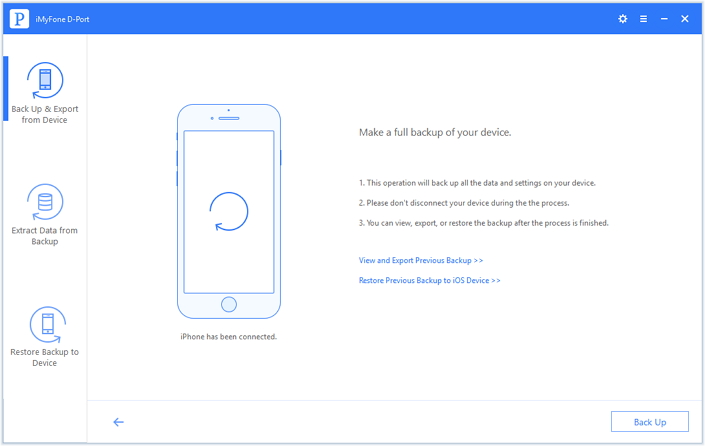
- Step 2: After click Make a Full Backup, you will see the notices about the process. Click the Back Up Button, iMyFone D-Port will begin the backup process.
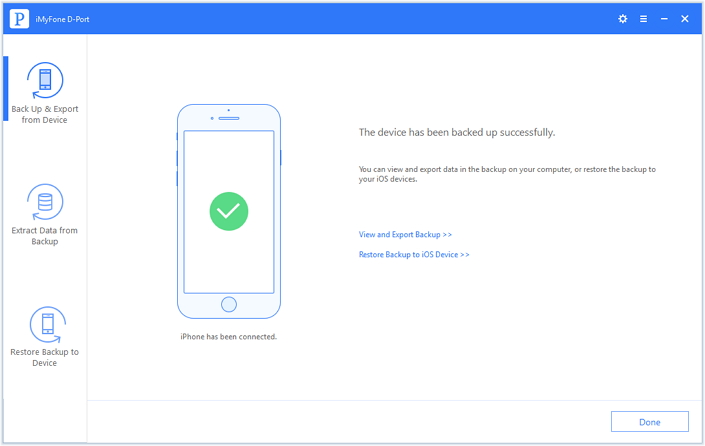
- Step 3. Keep your device connected. When the backup is complete, you should get a notification.
Note: You can back up other types of data with similar steps.
If you ask how to stop iCloud notifications on iPhone/iPad, the only way is by making sure you don't use all the storage. The first three methods should help you keep some of your iCloud storage free. However, iMyFone D-Port is the best solution since it will allow you to back up your iPhone for free with an alternative, and you don't have to worry about the space left or getting annoying storage notifications. Use this free tool now to back up your iPhone/iPad!


 September 13, 2021
