Android Recovery Mode is a useful tool for every Android user. It’s a dedicated runtime environment that’s stored on a different partition from the actual OS and can be used to troubleshoot a wide range of Android errors. Whether your device is overheating abnormally or crashing frequently, the Recovery Mode will help you reset the device to factory settings and fix the error instantly. However, there are many situations when the Recovery Mode may do more harm than any good. While scrolling through an Android forum, we came to know that many users get stuck in the recovery mode while trying to repair their devices.
Fortunately, getting out of recovery mode is not as challenging as you may think. In today’s guide, we’ll take you through different methods on how to get out of the Android system recovery and retrieve any lost data during the process.
Part 1: Common Knowledge about Android Recovery Mode - Does Recovery Mode Erase My Data?
As we said earlier, Android data recovery is a pretty useful feature when your device has become unresponsive. Since you won’t be able to operate the device directly, you can boot it into the recovery mode and perform a hard reset using the volume buttons. Many users also use the Recovery Mode to flash custom ROMs into their devices.
But, when you get stuck in the recovery mode, things can be a bit tricky as even the volume buttons won’t work. In this situation, you’ll have to try different solutions to get Android out of the recovery mode. When you perform these solutions, however, you will lose all your data as well. So, along with these troubleshooting methods, it’s also important to know the data recovery methods so that you can get back all your data after getting out of the recovery mode.
But, first, let’s take a look at different solutions to make your device exit the recovery mode.
Part 2: If Your Android Stuck In Recovery Mode - How To Get Out Of Android System Recovery
Option 1: Force Restart
The most convenient way to exit recovery mode in Android is to force restart your device. But, since you can’t use the volume buttons to navigate the menu in the Recovery Mode, you’ll have to follow a different approach to restart the device. Now, when it comes to doing a force-restart, each device has its own way of getting the job done. You can visit the manufacturer’s website to check the right method to force reboot your model.
In general, however, the majority of Android devices will restart when you simultaneously press and hold the “Power & Volume-Up” buttons. Hold these buttons for 15 seconds and the screen will automatically turn black.
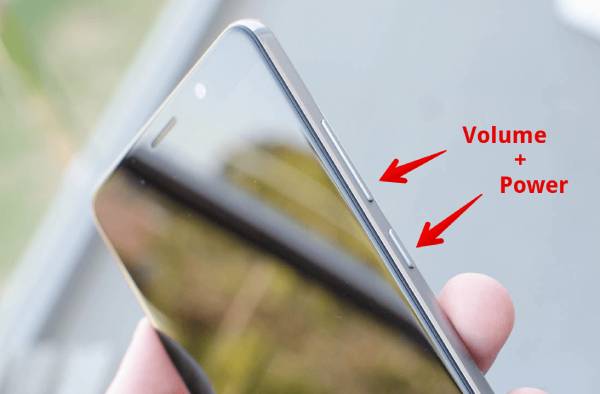
This indicates that the smartphone has switched-off and you can reboot it by simply pressing the Power button.
Option 2: Factory Reset
If force reboot doesn’t work on your device or you can’t find the right methods to do it, there’s another way to reset the device. You can simply perform a factory reset using the “Recovery Mode” menu only. However, this method will only work in a selective number of cases, i.e., when you’re able to navigate the “Android Recovery menu.”
Follow these steps to perform a hard reset through the Recovery menu.
Step 1 - If your device has a removable battery, take it out and reinsert it after a while. And, if you have a device with a non-removable battery, simply press the power button to switch off the device.
Step 2 - Now, press and hold the “Power” and “Volume-Down” buttons at the same time and wait until the device vibrates.
Step 3 - Now, you’ll be prompted to the “Android Recovery” window. Using the volume buttons, navigate to “Wipe Data/ Factory Reset” and press the “Power” button to select it.
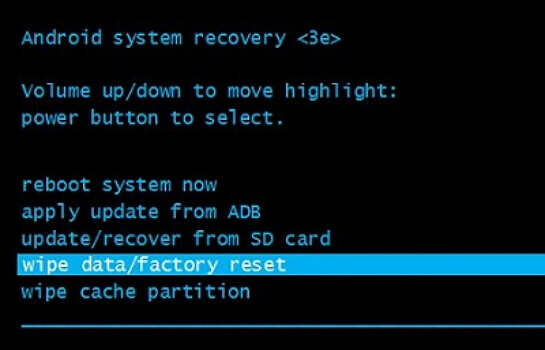
Step 4 - Your device will automatically start resetting your device. Wait until the process completes and you’ll be prompted with an option to “Reboot System.” Again, use the power button to select this option, and the device will reboot automatically.
Option 3: Schedule a Physical Repair for your Android
In case none of the above methods work, there are chances that your device has experienced some sort of physical or software damage. In this case, you’ll have no other option but to visit the repair center and get your device fixed by professionals. They’ll repair the device and make the device get out of Android system recovery as well.
Part 3: Lost Data after Getting out of Android System Recovery? How to recover it [Editor’s Recommendation]
Now that you have exited out of the recovery mode, let’s take a look at how to recover your lost data from Android. Like we mentioned earlier, if you choose the second option, i.e., factory reset the device, to get out of recovery mode, all your data will be lost during the process. This can become a bit annoying, especially if you don’t have any backup to retrieve the data. The good news is there is an optimal way to recover the lost data. We recommend using D-Back Data Recovery for Android, a data recovery tool that’s designed to retrieve deleted/lost data from an Android device, even it is broken.
Whether you have accidentally deleted the data or lost it while trying to exit the “Recovery Mode,” D-Back will help you recover the data without any hassle. With D-Back, you can retrieve different types of files, including images, videos, documents, etc. Let us take these features at galance.
Follow these steps to recover lost data using D-Back for Android after you’ve exited the recovery mode on your device.
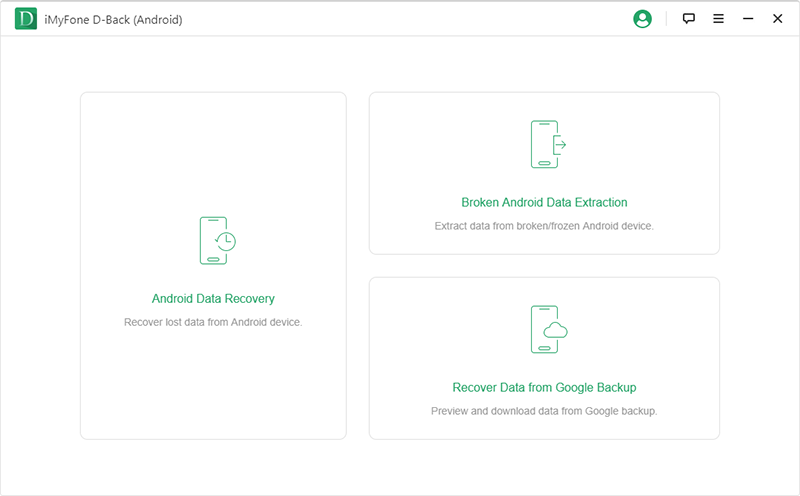
Step 1 - Install and launch D-Back on your PC and select the 1st option, i.e., “Android Data Recovery” from its main interface.
Step 2 - In the next window, enter the device name & model using the drop-down menus. Now, click “Next.”

Step 3 - D-Back will download the right data package for your device. Be patient as it can take a while for the entire process to complete.

Step 4 - Now, connect your device to the PC via USB and select the file type that you want to recover. With D-Back, you can even retrieve deleted WhatsApp conversations and other text messages. Once you have selected the right file type, click “Next.”


Step 5 - D-Back will start scanning your device for the deleted files. Once the scanning completes, simply click the files that you want to get back and click “Recover” in the bottom-right corner.
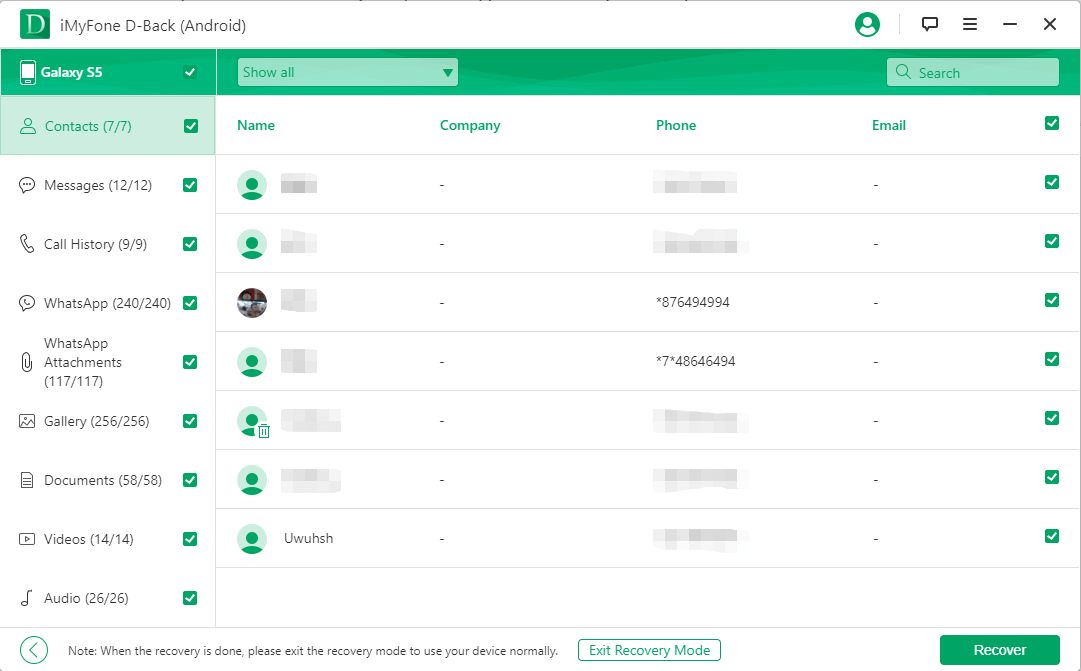
That’s it; the selected files will be restored safely on your PC.
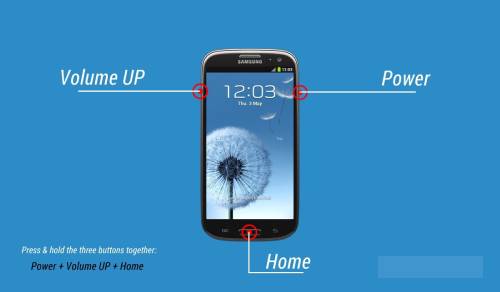
Bonus Tips: How to Enter Recovery Mode on Android
At this point, you already know the significance of the “Recovery Mode” for an Android user. Even though it can be pretty annoying to get stuck in the recovery mode, it’s still a useful feature that’ll protect your device from several unexpected errors. So, it’s quite imperative to know the steps to enter recovery mode on Android.
Step 1 - Press and hold the “Volume Up” and “Power” buttons simultaneously and wait until the Samsung logo appears on your screen.
Step 2 - Release the buttons and use the “Volume” keys to navigate the menu. Here you can select “Recovery Mode,” and the device will automatically boot into the recovery mode.
Wrapping It Up
So, that’s how to get out of Android system recovery when you get stuck in the recovery mode. We hope this guide helped you understand everything about the Recovery mode in Android and how it can help you troubleshoot different problems. And, in case you end up losing the data while exiting recovery mode, simply use D-Back Data Recovery to get it back.


 April 23, 2024
